Getting Started with the SBC-S32V234
Contents of this document
-
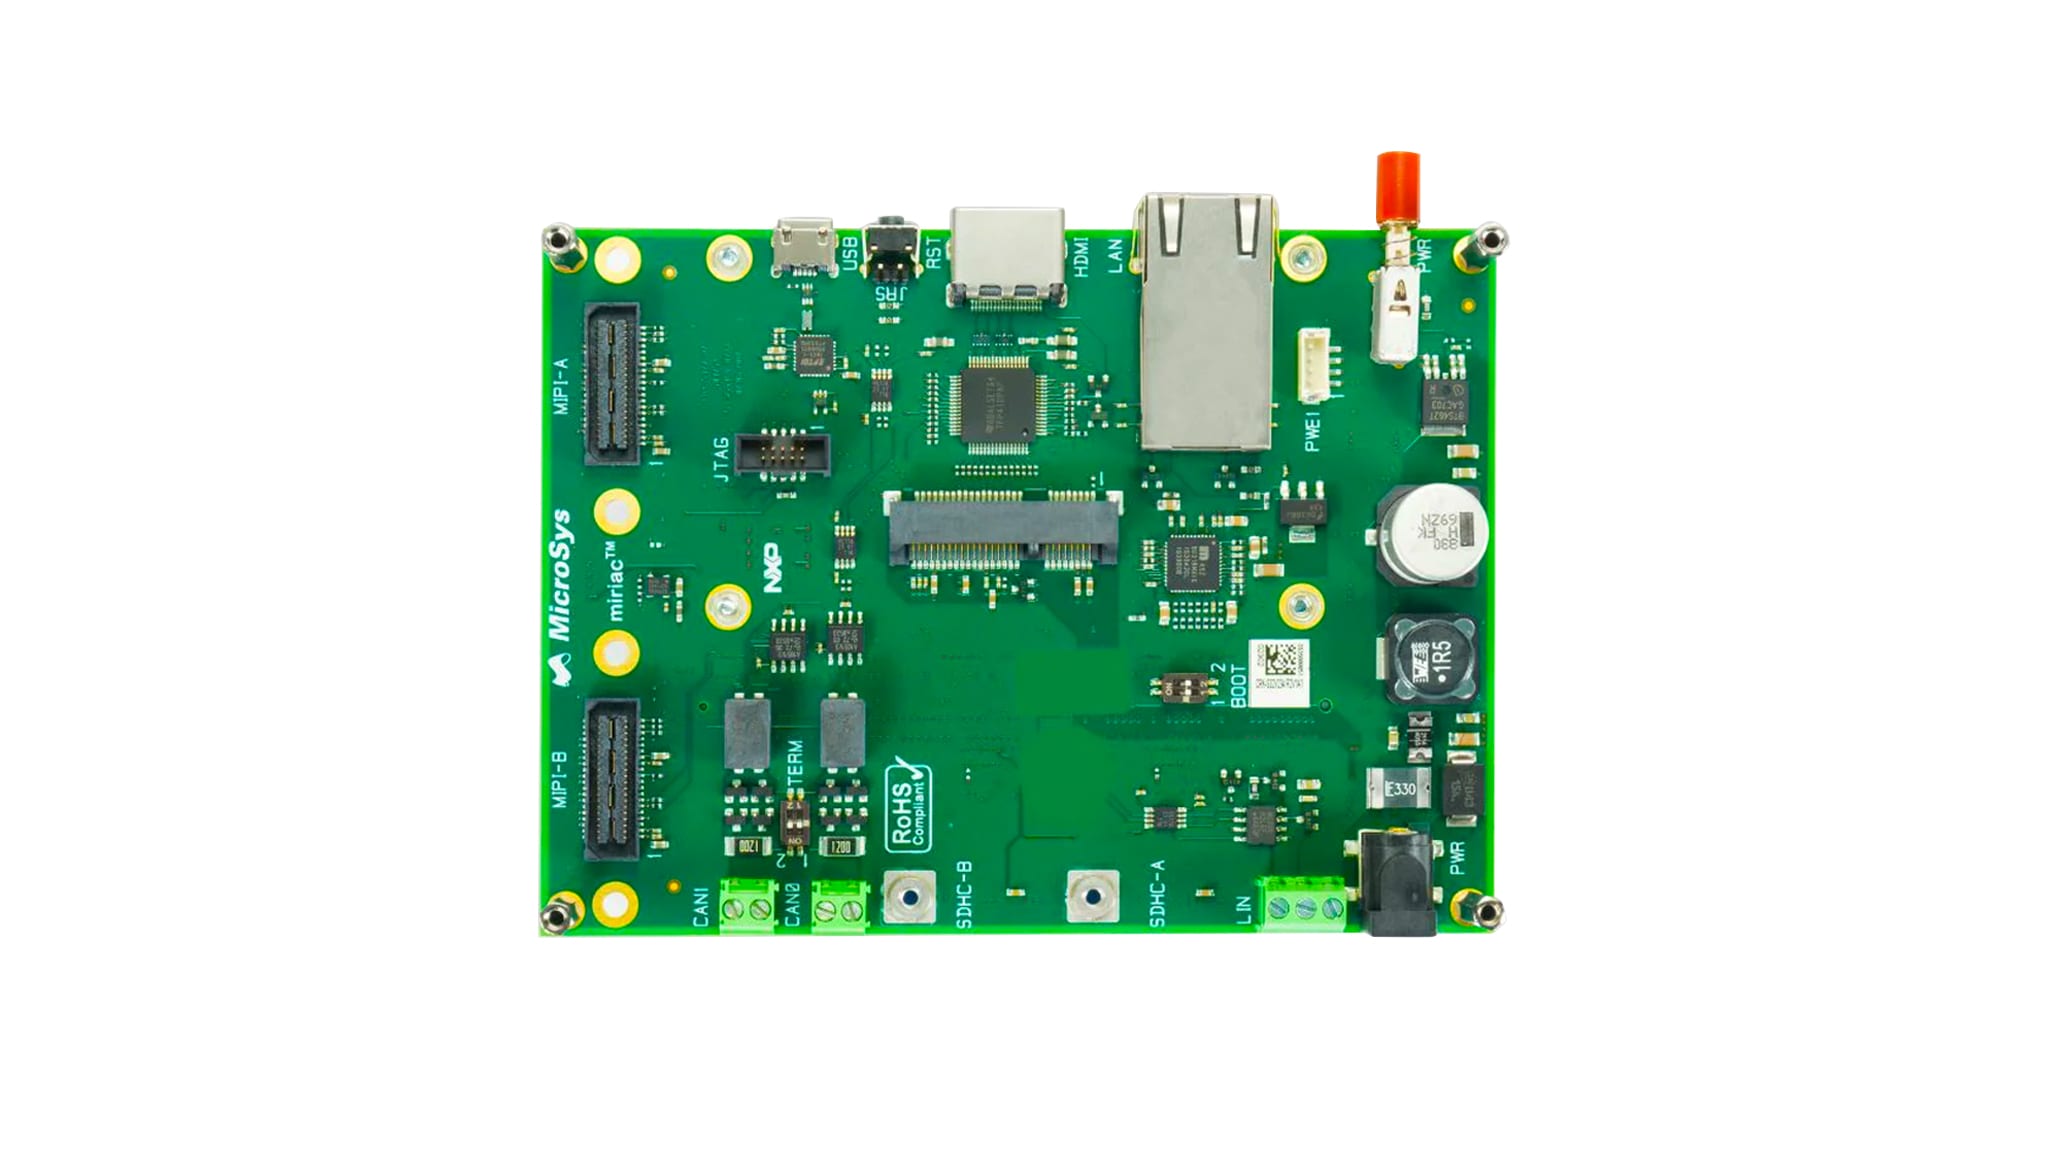
Plug It In
-
Get Software
Sign in to save your progress. Don't have an account? Create one.
Purchase your S32V2 Vision and Sensor Fusion low-cost Evaluation Board
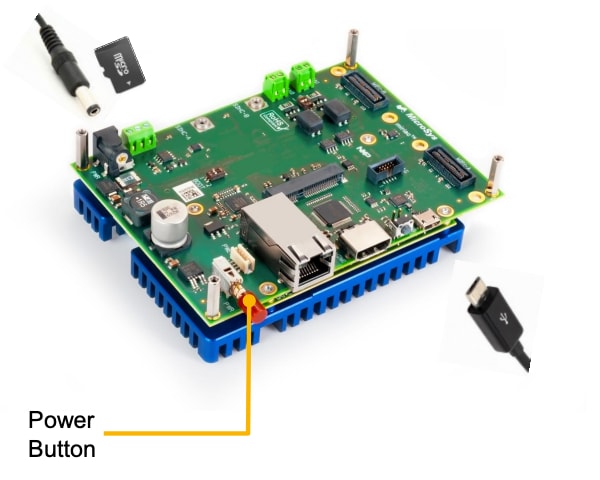
1. Plug It In
1.1 Plug the 12 V / 2 A DC Power Supply
1.2 Configure the USB Drivers
Allow the PC to configure the USB drivers automatically. You will need to download the FTDI drivers if your computer is not detecting the USB-serial device.
1.3 Setup a Serial Terminal
Install and run any serial terminal (like TeraTerm, Putty, or other) on your Windows PC.
Select the port where the SBC-S32V234 is connected and configure it to '115200' baud rate, '8' data bits, 'no parity', and '1' stop bit.
1.4 Insert the SD Card
Insert the SD card (with pre-installed Linux Board Support Package) in the respective slot.
1.5 Power the SBC-S32V234 ON
Power on the device by pressing the Power button. You will see the SBC-S32V234 booting U-Boot, followed by Linux in the terminal window. Use the username = 'root'.
2. Get Software
The two most important software components for S32V2 devices are Linux and the Vision SDK:
- Linux runs on the S32V2 vision processor and supports various NXP development boards. NXP uses the Yocto project to create a custom Linux BSP
- Vision SDK is the collection of libraries that can be used to create Vision specific programs. It includes libraries for Image Signal Processor (ISP), Image Cognition Processor (APEX), IOs, MIPI-CSI2, display, and others. Also includes useful utilities and third party software to aid development, like OpenCV, FFmpeg, Pthreads, and more
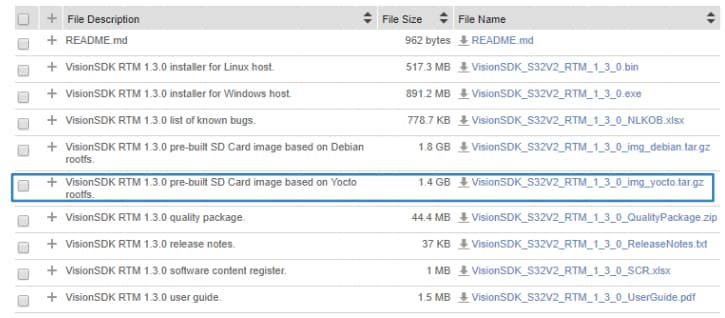
2.1 Download the SBC-S32V234 Quick Start Package (QSP)
Get the SBC-S32V234 QSP and check both the '1a_understand_Linux_BSP.pdf' and the '1b_understand_Vision_SDK.pdf' to understand different components of Linux BSP.
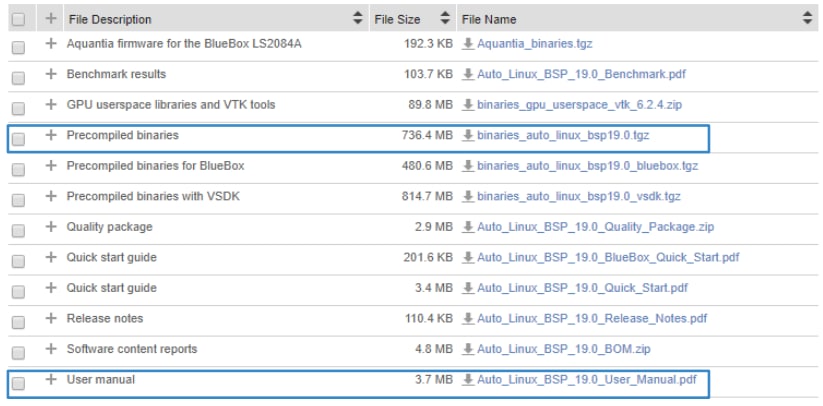
2.2 Download the Latest Linux BSP
Get the 'precompiled Linux binarie' together with the 'Linux User Manual'.
Download Automotive SW - Linux BSP
2.3 Extract the Compressed Linux Files
The SBC-S32V234 specific files are available under the 'FILE IS MISSING' folder.

2.4 Flash the SD Card
Use the '.Sdcard' image to flash the SD card.
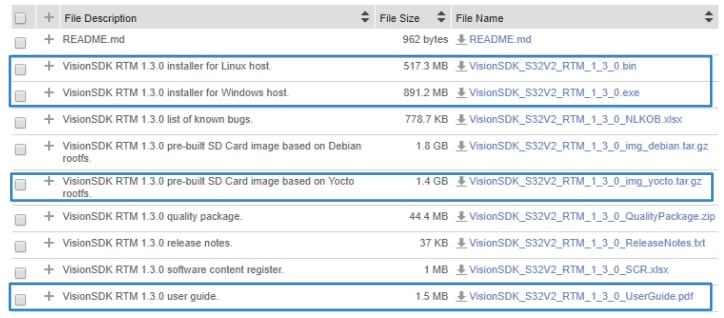
2.5 Download the Vision SDK
The Vision Software Development Kit (VSDK) for S32V234 Vision processors is an essential part of vision application development.
2.6 Create a Linux BSP that Supports VSDK
The Linux BSP that came with the SBC-S32V234 is generic; it DOES NOT support Vision SDK out-of-the-box. NXP provides the precompiled Linux BSP binaries with all VSDK specific modifications.
2.7 Download the Pre-Compiled Binaries
Download the prebuilt Linux binaries supporting VSDK.
2.8 Extract the Compressed File
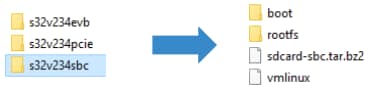
Go to build_content\v234_linux_build\s32v234sbc from the Vision SDK. You will find all components of Linux BSP in both 'boot' and 'rootfs' folders.
2.9 Format the SD Card and Create the Partitions
Insert the card into the card reader of your PC.
Using a Linux Machine, get the name of SD card by using cat /proc/partitions
  Sudo fdisk /dev/sdb

  d [repeat this until no partition is reported by the 'p' command]

  n [create a new partition]

  p [create a primary partition]

  1 [the first partition]

  [enter] [using the default value will create a partition that starts at offset 2048]

  +255M [size of the actual partition = 255 MB]


  n [create a new partition]

  p [create a primary partition]

  2 [the second partition]

  [enter] [using the default value will create a partition that starts at offset 67584]

  [enter] [using the default value will create a partition that uses the remaining space on the
  card]


  t [set partition type]

  1 [partition #1]

  c [FAT32]

  t [set partition type]

  2 [partition #2]

  83 [Linux]


  w [this writes the partition table to the medium and fdisk exits]


  Remove the SD card from the slot and put it back again.

  sudo mkfs.vfat -n boot /dev/sdb1

  sudo mkfs.ext3 -L rootfs /dev/sdb2


  Remove the SD card from the slot and put it back again.
2.10 Load the Content onto the SD Card
cd path_to_fsl-auto-yocto-bsp/build_s32v234sbc/tmp/deploy/images/s32v234sbc
sudo dd if=u-boot.s32 of=/dev/sdb bs=512 seek=8 conv=fsync
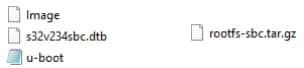
sudo cp Image /media/boot
sudo cp s32v234sbc.dtb /media/boot
cd /media/rootfs
sudo tar xvf
path_to_fsl-auto-yocto-bsp/build_s32v234sbc/tmp/deploy/images/s32v234sbc/fslimage-vsdk-s32v234sbc-xx.rootfs.tar.gz
Sync
2.11 Boot the SBC-S32V234 Board
Insert the SD card into the board and turn the power supply on. The UART is running on '115200' baud. The Linux will boot into command line and automatically loads OAL, APEX, CSI, FDMA, and other drivers.
On this page
- 1.1
Plug the 12 V / 2 A DC Power Supply
- 1.2
Configure the USB Drivers
- 1.3
Setup a Serial Terminal
- 1.4
Insert the SD Card
- 1.5
Power the SBC-S32V234 ON
- 2.1
Download the SBC-S32V234 Quick Start Package (QSP)
- 2.2
Download the Latest Linux BSP
- 2.3
Extract the Compressed Linux Files
- 2.4
Flash the SD Card
- 2.5
Download the Vision SDK
- 2.6
Create a Linux BSP that Supports VSDK
- 2.7
Download the Pre-Compiled Binaries
- 2.8
Extract the Compressed File
- 2.9
Format the SD Card and Create the Partitions
- 2.10
Load the Content onto the SD Card
- 2.11
Boot the SBC-S32V234 Board