Getting Started with FRDM-IMX8MPLUS
Contents of this document
-
Out of the Box
-
Get Software
-
Build, Run
-
Developer Experience
Sign in to save your progress. Don't have an account? Create one.
Purchase your FRDM i.MX 8M Plus Development Board
1. Out of the Box
The following section describes the steps to boot the FRDM-IMX8MPLUS.
Development kit contains:
- FRDM-IMX8MPLUS board with onboard u-blox module MAYA-W276-00B with NXP’s Wi-Fi 6 Tri-radio IW612
- Cable: Assembly, USB 3.0, Type-C male to Type-A male
- Cable: Assembly, USB 3.0, Type-C male to Type-C male
- Software: Linux BSP image Programmed in eMMC
- Quick Start Guide
Get started developing your application on the FRDM-IMX8MPLUS with the out of the box video. For more information, please visit the i.MX 8M Plus applications processor Documentation.
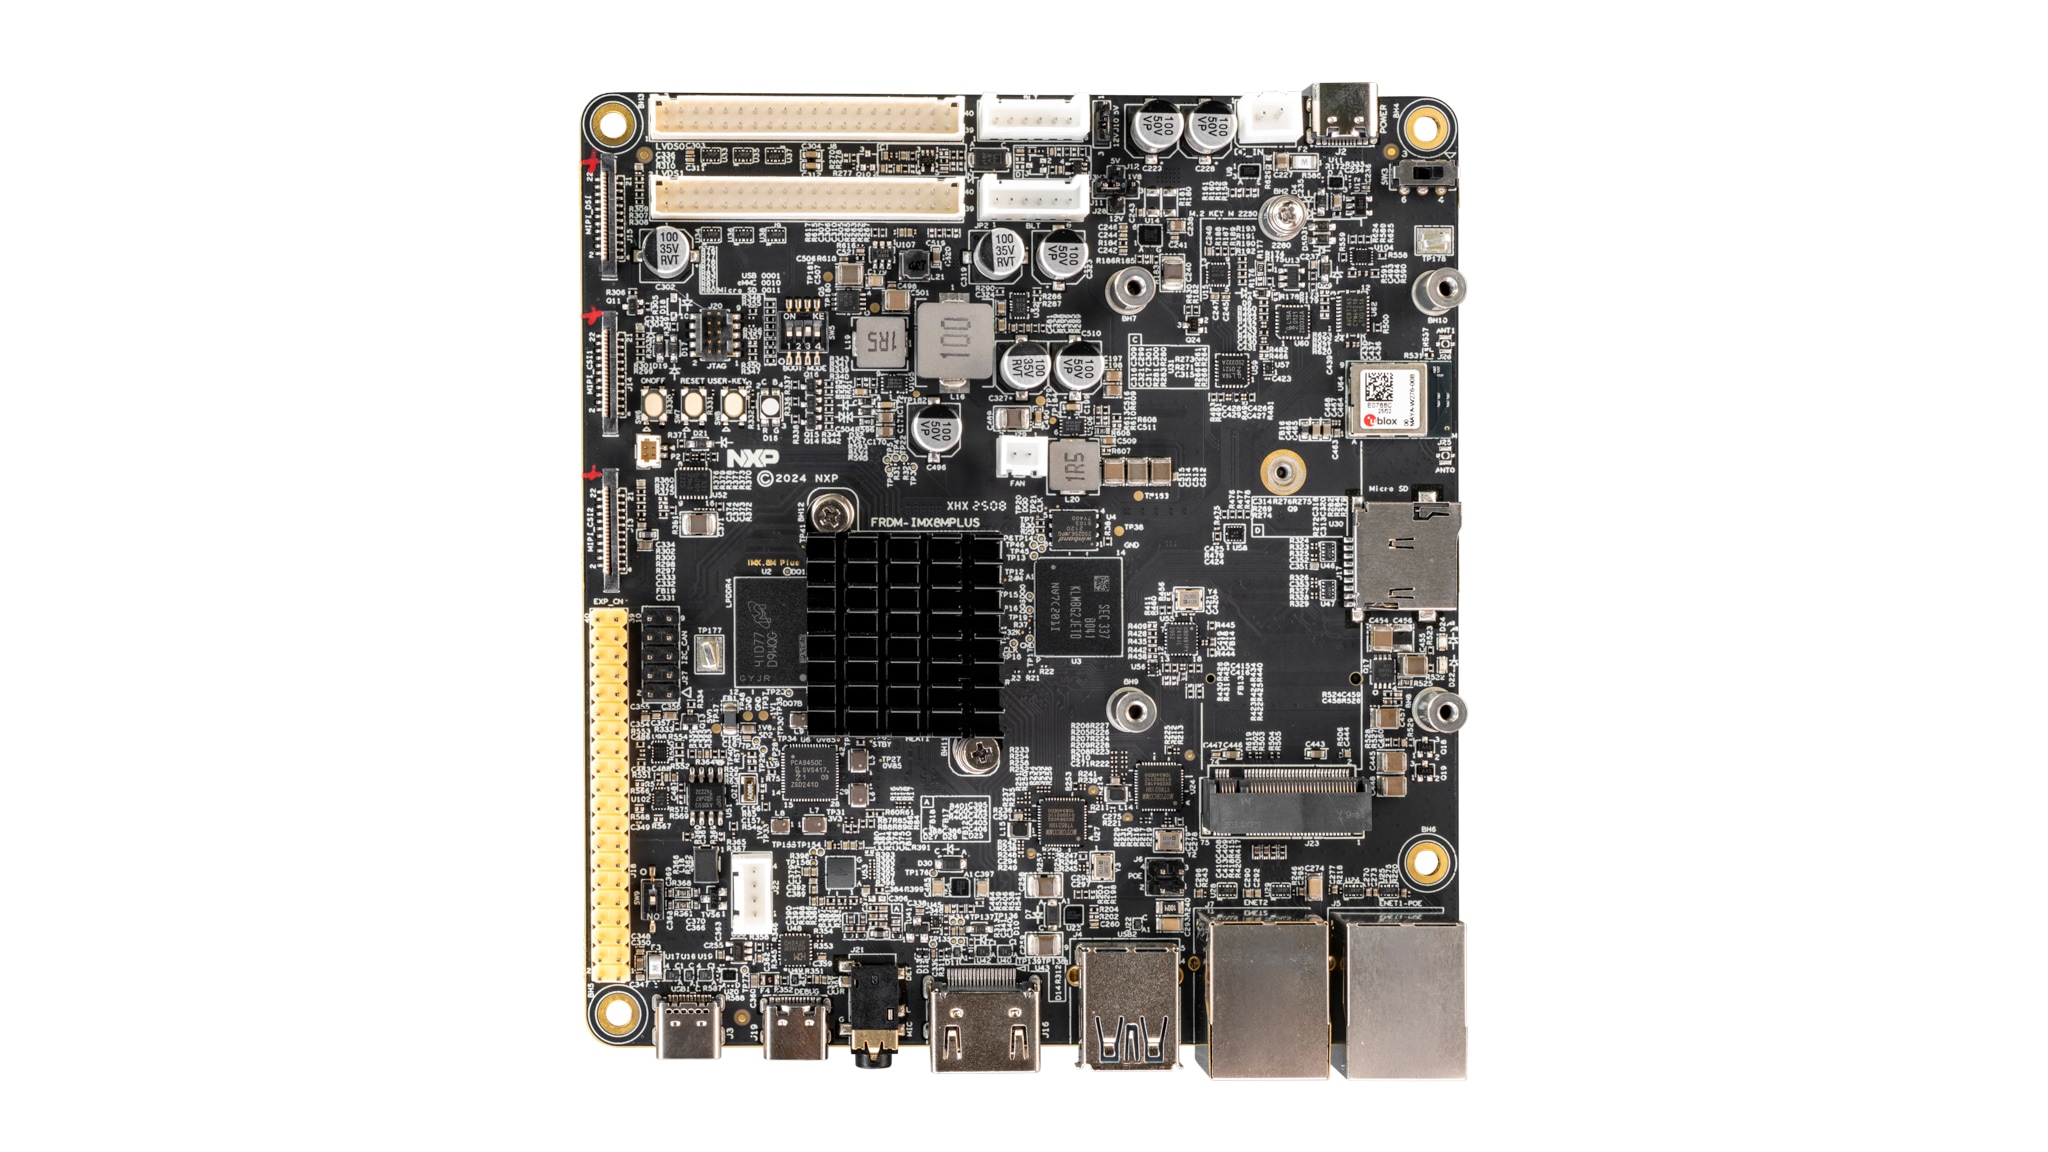
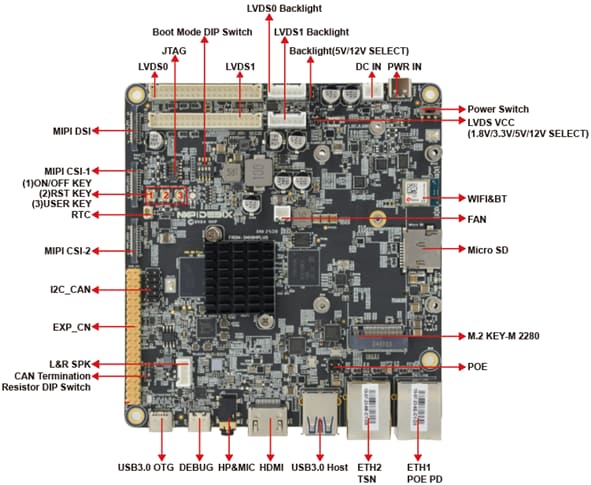
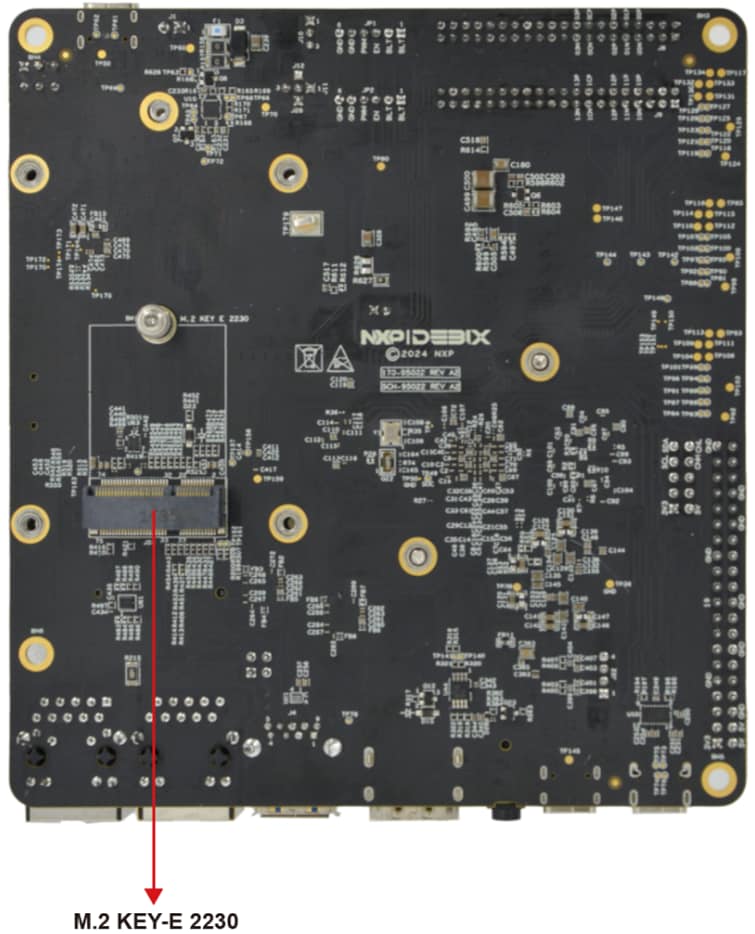
1.1 Get Familiar with the Board
1.2 Boot from eMMC
The FRDM-IMX8MPLUS comes with a prebuilt NXP Linux binary demo image flashed on the eMMC. Without modifying the binary inside, booting from the eMMC provides a default system with certain features for building other applications on top of Linux.
To understand more about NXP’s Embedded Linux®, continue reading the next sections.
1.3 Connect USB Debug Cable
Connect the supplied USB-Type C male to Type-A male cable to the debug UART port J19, then connect the other end of the cable to a host computer.
Two UART connections will appear on the host computer. The first port is for A53 core system debugging.
If you are unfamiliar with terminal applications, please view one of the following tutorials before continuing to step 1.4: Minicom Tutorial, Tera Term Tutorial, PuTTY Tutorial.
To debug under Linux, make sure the CH342F Linux driver is installed.
1.4 Boot Switch Setup
SW5 [1-4] is the boot configuration switch. By default, the boot device is eMMC/uSDHC3.
| Boot Device | SW5-1 |
SW5-2 |
SW5-3 |
SW5-4 |
|---|---|---|---|---|
| From internal fuses | 0 | 0 | 0 | 0 |
| USB serial download | 0 | 0 | 0 | 1 |
| uSDHC3 8-bit eMMC 5.1 | 0 | 0 | 1 | 0 |
| uSDHC2 4-bit SD3.0 | 0 | 0 | 1 | 1 |
| NAND 8-bit single device 256 page | 0 | 1 | 0 | 0 |
| NAND 8-bit single device 512 page | 0 | 1 | 0 | 1 |
| QSPI 3B Read | 0 | 1 | 1 | 0 |
| QSPI Hyperflash 3.3 V | 0 | 1 | 1 | 1 |
| ecSPI Boot | 1 | 0 | 0 | 0 |
1.5 Connect HDMI Display
Connect an HDMI cable to the HDMI connector J16. Connect the other end of the cable to an HDMI display panel.
1.6 Board Boot Up
Connect the supplied USB-Type C male to Type-C male cable to the power connector J2 and the other end to a USB PD adapter.
The board has been set up to boot from eMMC by default. The processor starts executing the bootable image from eMMC. Information is printed in the serial console for the Arm® Cortex®-A53. As the board boots up, you will see that 4 penguins appear in the upper left-hand corner of the HDMI display and then you will see the Linux terminal Icon on the top left and timer on the right top corner. Congratulations, you are up and running.
2. Get Software
The i.MX Linux board support package (BSP) is a collection of binary files, source code and support files that are used to boot an Embedded Linux image on a specific i.MX development platform.
Current releases of Linux binary demo files can be found on the Linux download page. Additional documentation is available in the i.MX Linux documentation bundle under the Linux sections of the i.MX Software and Development Tools.
2.1 Overview
FRDM-IMX8MPLUS support booting from eMMC and SD card.
This Getting Started guide only outlines a few methods of flashing the Linux BSP image to an SD card. Experienced Linux developers can explore other options if desired.
2.2 Download NXP Linux BSP Pre-Built Image
The latest prebuilt images for the FRDM-IMX8MPLUS are available on the FRDM i.MX 8M Plus Development Board.
The prebuilt NXP Linux binary demo image provides a typical system and basic set of features for using and evaluating the processor. Without modifying the system, the users can evaluate hardware interfaces, test SoC features and run user space applications.
2.3 Burn NXP Linux BSP Image Using Universal Update Utility (UUU)
In addition to the connections from "Out of the Box" section, connect the USB3.0 OTG (J3) to the host machine using the proper USB cable.
Turn off the board. Refer to the 1.4 Boot Switch Setup section and configure the board to boot in serial download protocol (SDP) mode.
Depending on the OS used in the host machine, the way to transfer the Linux BSP image onto an SD card can vary. Choose an option below for detailed instructions:
Linux
Install UUU on Linux Distro
Download the latest stable files from UUU GitHub page. If further assistance for UUU is needed, please refer to this extensive tutorial.
uuulibusb1(via apt-get or any other package manager)
Burn the NXP Linux BSP Image to the Board
By default, this procedure flashes the image to the SD card. Check the UUU GitHub page for reference on how to flash the image to other devices.
Open a terminal application and change the directory to the location where uuu and the latest Linux distribution for FRDM-IMX8MPLUS are located. Add execution permission to the uuu file and execute it. uuu will wait for the USB device to connect.
$ chmod a+x uuu
$ sudo ./uuu -b sd_all imx-image-full-imx8mpfrdm.rootfs.wic.zst
Confirm that FRDM-IMX8MPLUS boot mode is switched to serial download mode and turn on the board, uuu will start to flash the images to the SD card.
When it finishes, turn off the board and the terminal. If further assistance with configuring the board to boot from SD card is needed, please refer to the 1.4 Boot Switch Setup.
Windows
Install UUU on Windows Distro
Download the latest stable files from UUU GitHub page. If further assistance for UUU is needed, please refer to this extensive tutorial.
uuu.exe- Serial USB drivers (depending on your board and Windows installation - check Windows Device Manager)
Burn the NXP Linux BSP Image to the Board
By default, this procedure flashes the image to the SD card. Check the UUU GitHub page for reference on how to flash the image to other devices.
Open the command prompt application and navigate to the directory where the uuu.exe file and the Linux release for the FRDM-IMX8MPLUS are located.
uuu.exe -b sd_all imx-image-full-imx8mpfrdm.rootfs.wic.zstConfirm that FRDM-IMX8MPLUS boot mode is switched to serial download mode and turn on the board, uuu will start to copy the images to the board.
When it finishes, turn off the board and the command prompt application. If further assistance with configuring the board to boot from SD card is needed, please refer to the 1.4 Boot Switch Setup.
3. Build, Run
In the section, a brief guide of how to build Yocto BSP image for FRDM-IMX8MPLUS is introduced, along with how to add Matter support and how to build Debian release image.
3.1 FRDM-IMX8MPLUS Yocto BSP
The FRDM-IMX8MPLUS BSP release is based on i.MX SW 2024 Q3 release with Yocto Project 5.0 (Scarthgap). To build FRDM-IMX8MPLUS image from source code, please first check i.MX Yocto Project User’s Guide to get familiar with Yocto project and Yocto build. Then please follow below steps to build image for FRDM-IMX8MPLUS.
- Download i.MX SW 2024 Q3 BSP Release:
- Integrate FRDM-IMX8MPLUS layer into Yocto code base:
- Yocto Project Setup:
- Build images:
- Flashing SD card image:
- Change boot switch
SW5[1:4] to “0011” to select SD card boot, insert the SD card and power up the FRDM-IMX8MPLUS board
$ repo init -u https://github.com/nxp-imx/imx-manifest -b imx-linux-scarthgap -m imx-6.6.36-2.1.0.xml
$ repo sync$ cd ${MY_YOCTO}/sources
$ git clone https://github.com/nxp-imx-support/meta-imx-frdm.git $ cd ${MY_YOCTO}
$ MACHINE=imx8mpfrdm DISTRO=fsl-imx-xwayland source sources/meta-imx-frdm/tools/imx-frdm-setup.sh -b frdm-imx8mp$ bitbake imx-image-full$ zstdcat imx-image-full-imx8mpfrdm.rootfs.wic.zst | sudo dd of=/dev/sdx bs=1M && syncOr using uuu to burn image into SD card:
$ uuu -b sd_all imx-image-full-imx8mpfrdm.rootfs.wic.zst3.2 FRDM-IMX8MPLUS Matter Support
FRDM-IMX8MPLUS has support for Matter. To include Matter support, please follow below steps to include Matter layer into Yocto build.
- Download i.MX SW 2024 Q3 BSP Release:
- Download i.MX Matter Yocto layer:
- Integrate FRDM-IMX8MPLUS layer into Yocto code base:
- Yocto Project Setup:
- Build images:
$ repo init -u https://github.com/nxp-imx/imx-manifest -b imx-linux-scarthgap -m imx-6.6.36-2.1.0.xml
$ repo sync$ cd ${MY_YOCTO}/sources/meta-nxp-connectivity
$ git remote update
$ git checkout imx_matter_2024_q3$ cd ${MY_YOCTO}/sources
$ git clone https://github.com/nxp-imx-support/meta-imx-frdm.git $ cd ${MY_YOCTO}
$ MACHINE=imx8mpfrdm-matter DISTRO=fsl-imx-xwayland source sources/meta-imx-frdm/tools/imx-frdm-matter-setup.sh bld-xwayland-imx8mp$ bitbake imx-image-multimedia3.3 FRDM-IMX8MPLUS Debian
FRDM-IMX8MPLUS has support for Debian 12 and 13 OS. i.MX Debian Linux SDK distribution is a combination of NXP-provided kernel and bootloaders with a Debian distro user-space image, which includes:
- Debian-based rootfs;
- Debian Base (basic packages)
- Debian Desktop (with Gnome or Weston desktop)
- Linux kernel
- BSP components
- Various applications (graphics, multimedia, networking, connectivity, security and AI/ML)
For more details of the NXP Debian Linux SDK Distribution, please check the NXP Debian Linux SDK Distribution for i.MX and Layerscape page.
3.4 Quick Start with Debian
To create an SD card with Debian for FRDM-IMX8MPLUS, please follow below steps.
- Download flex-installer on the Linux host:
- Plug the SD card into the Linux host and install the images as below:
- Plug the SD card into the FRDM-IMX8MPLUS board and install the extra packages as below: 1) Setup Ethernet network interface by DHCP or setting it manually
$ wget http://www.nxp.com/lgfiles/sdk/lsdk2512/flex-installer
$ chmod +x flex-installer
$ sudo mv flex-installer /usr/bin# format SD card
$ flex-installer -i pf -d /dev/<sd_dev>
# automatically download and install images into SD card
$ flex-installer -i auto -d /dev/<sd_dev> -m imx8mpfrdm$ dhclient -i end0$ date -s "22 Nov 2025 09:00:00"$ debian-post-install-pkg 3.5 Building Debian Images with Flexbuild from Source Code
To build Debian image with Flexbuild for FRDM-IMX8MPLUS, please follow below steps.
- Set up the build environment:
- Build image with Flexbuild:
- Flexbuild usage: To build individual part of the image, please check below command list for Flexbuild usage:
$ git clone https://github.com/nxp/flexbuild
$ cd flexbuild && source setup.env
#Continue to run commands below in case you need to build in Docker due to lack of Ubuntu 22.04 or Debian 12 host
$ bld docker
$ source setup.env$ bld -m imx8mpfrdm$ bld uboot -m imx8mpfrdm (compile u-boot image for imx8mpfrdm)
$ bld linux -m imx8mpfrdm (compile linux kernel for all arm64 i.MX machines)
$ bld bsp -m imx8mpfrdm (generate BSP firmware)
$ bld boot -m imx8mpfrdm (generate boot partition tarball including kernel, dtb, modules, distro bootscript for iMX machines)
$ bld rfs -m imx8mpfrdm (generate Debian rootfs)
$ bld apps -m imx8mpfrdm (compile apps against runtime dependencies of Debian RootFS)
$ bld merge-apps -m imx8mpfrdm (merge iMX-specific apps into target Debian RootFS)
$ bld packrfs -m imx8mpfrdm (pack and compress target debian rootfs)4. Developer Experience
To enable faster development for users of all skill levels, NXP provides extensive example applications to showcase various features and capabilities of the platform.
4.1 Application Code Hub
The Application Code Hub (ACH) repository enables engineers to easily find microcontroller and processor software examples, code snippets, application software packs and demos developed by NXP in-house experts. This space provides a quick, easy and consistent way to find microcontroller and processor applications.
ACH provides filter and search options to quickly find specific applications. With the support of Git capabilities, there is an easy way to import and use applications within user’s development environments.
To learn more details of ACH, please visit this link.
To find available example applications for FRDM-IMX8MPLUS, please select “i.MX” in Device Families as shown below.
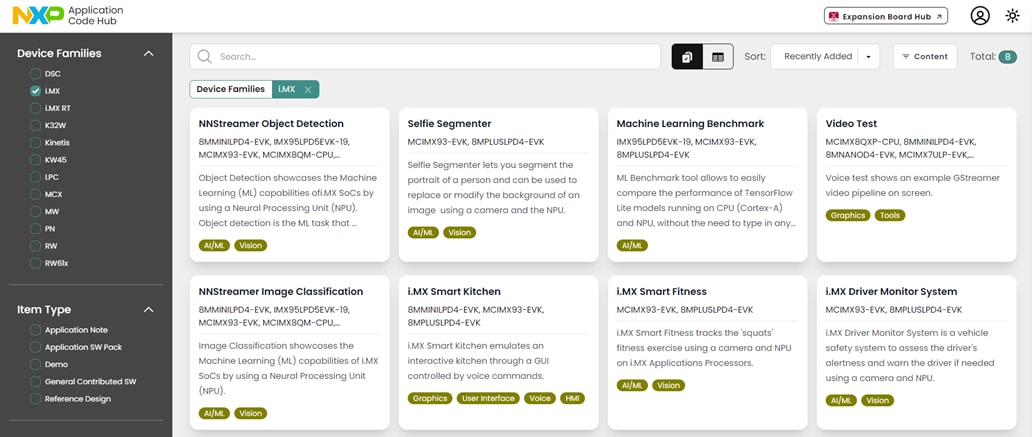
Select each example application to check for details.
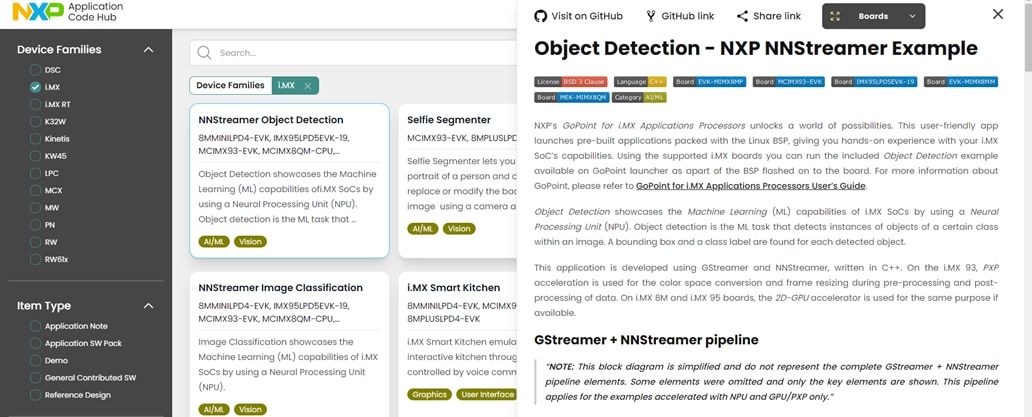
To get the source code of each example application, click the “Visit on GitHub” button on the top to visit the code repository in NXP GitHub.

4.2 GoPoint for i.MX Applications Processors
The GoPoint for i.MX Application Processors is a user-friendly application launches prebuilt applications packed with the Linux BSP, giving users an excellent out of the box experience and hands on experience with i.MX SoC's capabilities. GoPoint highlights advanced features while providing practical solutions for implementation, with source code and build recipes for the applications provided in GitHub.
To learn more details of GoPoint, please visit this link.
For FRDM-IMX8MPLUS, GoPoint is included in the BSP release by default. To open the GoPoint GUI launcher, press the NXP logo displayed on the top left-hand corner of the screen after the FRDM-IMX8MPLUS boot up as shown below.
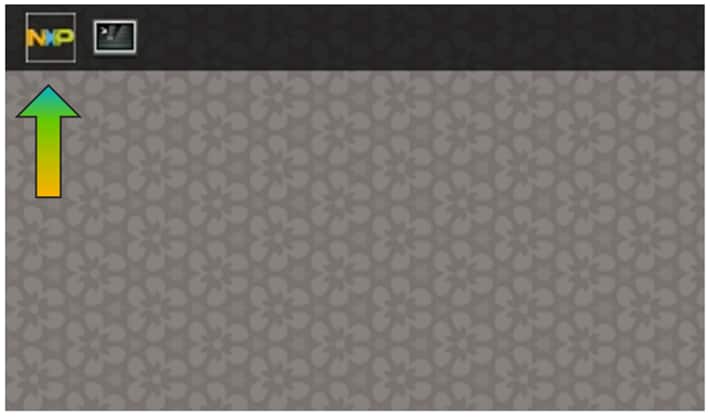
Available example applications are shown with icons of screenshot for each application. When selecting the example application, a brief description of this example application is shown on the right side. To launch the currently selected application, click the “Launch Demo” button.
After an application is started, it can then be force-quit by clicking the “Stop Current Demo” button in the launcher (appears once the application is started).
For more details of the usage for each application, please refer to GoPoint for i.MX Applications Processors User's Guide.

Debug Terminal Setup
Debug Terminal in Linux
Serial Communication Console Setup
The serial-to-USB drivers are available at CH342F Linux Drivers.
On the command prompt of the Linux host machine, run the following command to determine the port number:
$ ls /dev/ttyCH343USB*The first number is for Arm® Cortex®-A53.
Minicom
Use the following commands to install and run the Minicom program:
- Install Minicom using the Ubuntu package manager
- Launch Minicom using a console window using the port number determined earlier
$ sudo apt-get install minicom$ sudo minicom /dev/ttyCH343USB * -s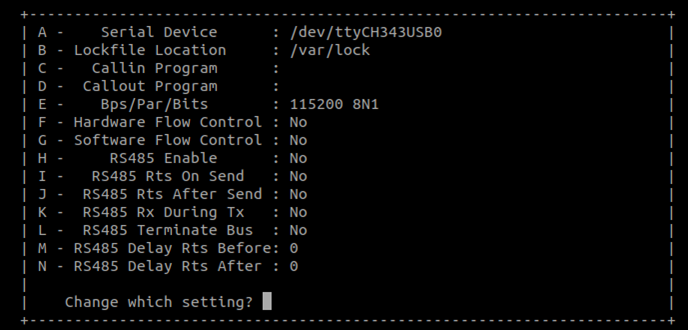
Configure Minicom as show in Figure and Exit configure.
Debug Terminal in Windows
Serial Communication Console Setup
The WCH USB-serial chip on FRDM-IMX8MPLUS enumerates 2 serial ports. Assume that the ports are COM11 and COM12. The first Port(COM11) is for the serial console communication from Arm® Cortex®-A53. The serial-to-USB drivers are available at CH342F Windows Driver.
Tera Term
Tera Term is an open source terminal emulation application. This program displays the information sent from the NXP development platform’s virtual serial port.
- Download Tera Term. After the download, run the installer and then return to this webpage to continue
- Launch Tera Term. The first time it launches, it shows the following dialog. Select the serial option. Assuming your board is plugged in, there should be a COM port automatically populated in the list
- Configure the serial port settings (using the COM port number identified earlier) to 115200 baud rate, 8 data bits, no parity and 1 stop bit. To do this, go to Setup → Serial Port and change the settings
- Verify that the connection is open
PuTTY
PuTTY is a popular terminal emulation application. This program displays the information sent from the NXP development platform’s virtual serial port.
- Download PuTTY. After the download, run the installer and then return to this webpage to continue
- Launch PuTTY by either double-clicking on the executable file you downloaded or from the Start menu, depending on the type of download you selected
- Configure In the window that launches. Select the Serial radio button and enter the COM port number that you determined earlier. Also enter the baud rate, in this case 115200
- Click Open to open the serial connection. Assuming the board is connected and the correct COM port is entered, the terminal window opens. If the configuration is not correct, PuTTY alerts you
Cortex-M7 Enablement
FRDM-IMX8MPLUS has one general-purpose Arm® Cortex®-M7 running up to 800 MHz, which can be used for real-time and low-power processing. In this section, developers can learn how to build program, run program and debug program for Cortex-M7 core.
Download SDK
The Cortex-M7 MCUXpresso SDK is distributed by the MCUXpresso Web Builder tool. The MCUXpresso SDK includes a flexible set of peripheral drivers designed to speed up and simplify development of embedded applications. Along with the peripheral drivers, the MCUXpresso SDK provides an extensive and rich set of example applications covering everything from basic peripheral use case examples to demo applications. The MCUXpresso SDK also contains optional RTOS integrations, such as FreeRTOS and Azure RTOS and device stack to support rapid development on devices.
To obtain the MCUXpresso SDK for FRDM-IMX8MPLUS, please follow below steps.
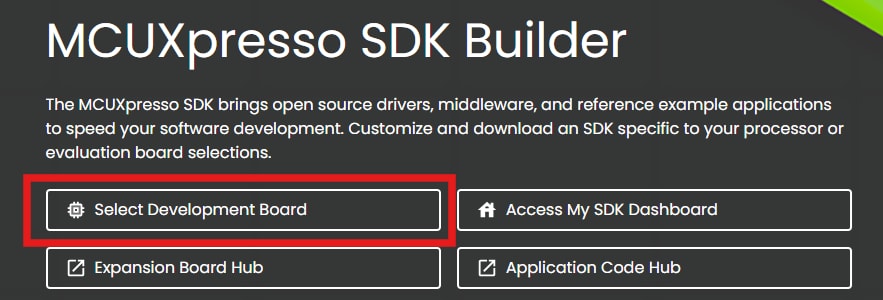
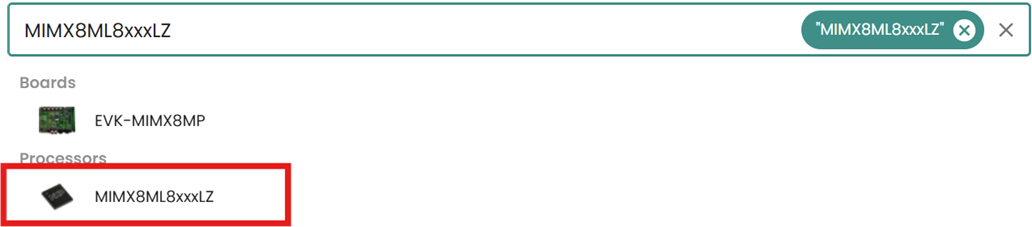
- Visit MCUXpresso SDK Builder
- Click the “Select Development Board”
- Search for “MIMX8ML8xxxLZ” and select it
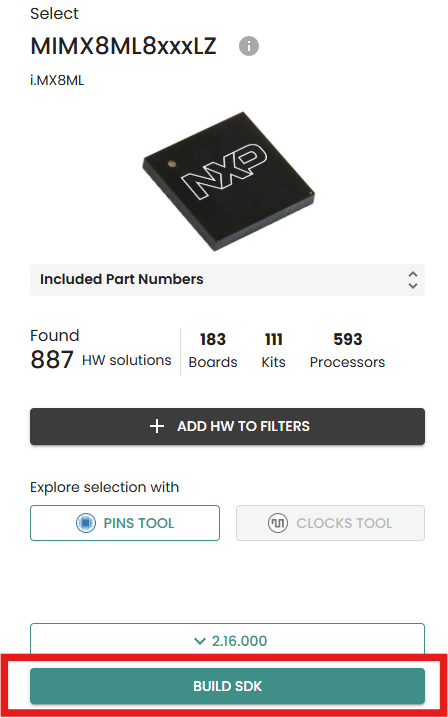
- Choose the SDK release version 2.16 and press the “BUILD SDK” button
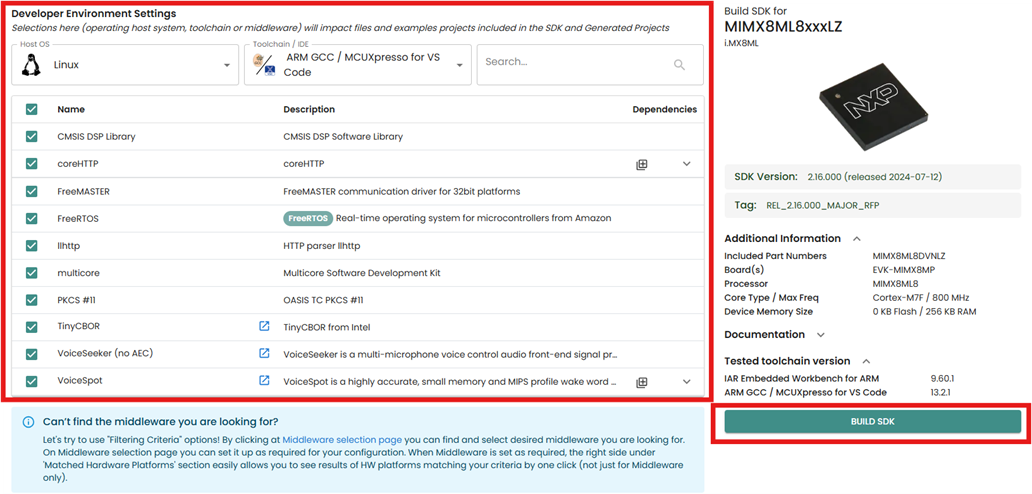
- Choose the Host OS, Toolchain and middleware to be included in the SDK, then press the “BUILD SDK” button
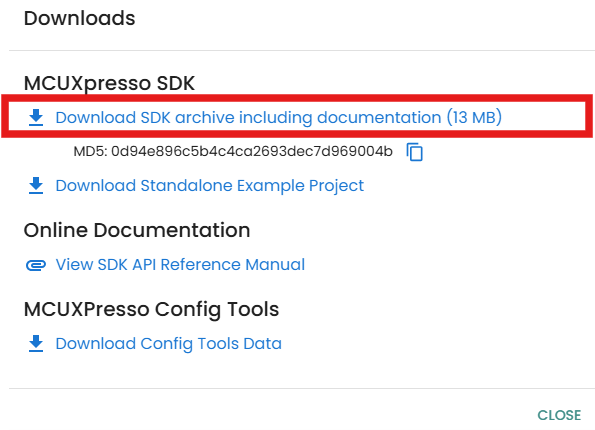
- After the SDK finishes building, click “Download” in the Dashboard page
- Download the SDK with documentation
- After the SDK package is downloaded, unpack the package. Please check the release note and “Getting Started with MCUXpresso SDK for EVK-MIMX8MP.pdf” document in the docs folder to learn more about Cortex-M7 MCUXpresso SDK

Build Cortex-M7 Program
Please refer to “Getting Started with MCUXpresso SDK for EVK-MIMX8MP.pdf” document in the docs folder in the SDK package to learn how to setup toolchain and build cortex-M7 program.
Run Cortex-M7 Program
There are two methods to run a compiled program on Cortex-M7: U-Boot bootaux and Linux remoteproc. After using bootaux or remoteproc to start the Cortex-M7 core, using remoteproc to stop the Cortex-M7 core is for debug purposes only. It is not recommended to stop the Cortex-M7 core from Linux OS in a production system.
Before starting the Cortex-M7 core, make sure the debug UART port of the Cortex-M7 core is opened in the debug terminal.
- Using bootaux in U-Boot
- Using remoteproc in Linux
In this example, Cortex-M7 program is first loaded from SD card’s partition 1 in U-Boot. Then Cortex-M7 core is booted by bootaux command. Finally, the Linux is booted on Cortex-A53 core by boot command. Please make sure the Cortex-M7 program binary is stored in the SD card’s partition 1 with fat partition format. In this example, the binary file “hello_world.bin” is used as an example.
After the board is powered up, press any key in the Cortex-A53’s debug terminal to enter U-Boot. Then use following command to start Cortex-M7 core.
u-boot=> fatload mmc 1:1 0x48000000 hello_world.bin
u-boot=> cp.b 0x48000000 0x7e0000 20000
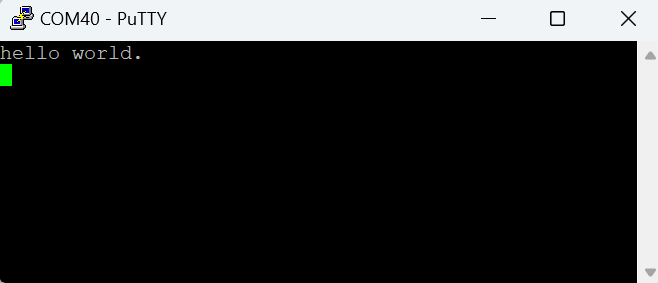
u-boot=> bootaux 0x7e0000If the Cortex-M7 core boots successfully with this binary file, following log should be printed in the Cortex-M7 debug terminal:
Then run the following command to boot up Linux if needed.
u-boot=> run prepare_mcore
u-boot=> bootIn this example, Cortex-M7 program is loaded from Linux’s rootfs and boots with remoteproc. The binary file “imx8mp_m7_TCM_hello_world.elf” is used here as an example.
u-boot=> setenv fdtfile imx8mp-frdm-rpmsg.dtb
u-boot=> run prepare_mcore
u-boot=> boot
After Linux boots up, use the following command in the Cortex-A53’s debug terminal to start Cortex-M7 core.
root@imx8mpfrdm:~# echo /lib/firmware/imx8mp_m7_TCM_hello_world.elf > /sys/class/remoteproc/remoteproc0/firmware
root@imx8mpfrdm:~# echo start > /sys/class/remoteproc/remoteproc0/state
If the Cortex-M7 core boots successfully with this binary file, the following log should be printed in the Cortex-M7 debug terminal:
How to Debug
Please refer to application note AN14120: Debugging Cortex-M with VS Code on i.MX 8M, i.MX 8ULP and i.MX 93.
Deploy ML models on NPU
FRDM-IMX8MPLUS has a Neural Processing Unit (NPU) operating at up to 2.3 TOPS to accelerate neural-network machine learning inference. For more details of the hardware architecture of NPU, please check i.MX 8M Plus Applications Processor Reference Manual. For more details of software architecture of NPU, please check i.MX Machine Learning User's Guide.
Model Quantization
To be accelerated by the NPU, the neural-network operators must be quantized to either 8-bit (unsigned or signed) or 16-bit (signed). For model quantization, please download latest eIQ toolkit and check the user guide.
Note: The NPU on i.MX 8M Plus is optimized for per-tensor quantization. When running per-channel quantized models, the accelerator must involve additional compute. Therefore, the performance might be lower compared to per-tensor quantized models. The additional compute might also introduce a small accuracy error. The actual impact for both accuracy and latency depends on the model used.
Model Inference
To evaluate the NN model’s performance on NPU, the simplest method is to use the benchmark_model tool in Linux BSP. It uses random data as input and gives average inference time for a given number of runs. Here is an example:
root@imx8mpfrdm:~# /usr/bin/tensorflow-lite-2.16.2/examples/benchmark_model --graph=/usr/bin/tensorflow-lite-2.16.2/examples/mobilenet_v1_1.0_224_quant.tflite --external_delegate_path=/usr/lib/libvx_delegate.soIf running successfully, the following log is printed in the debug terminal.
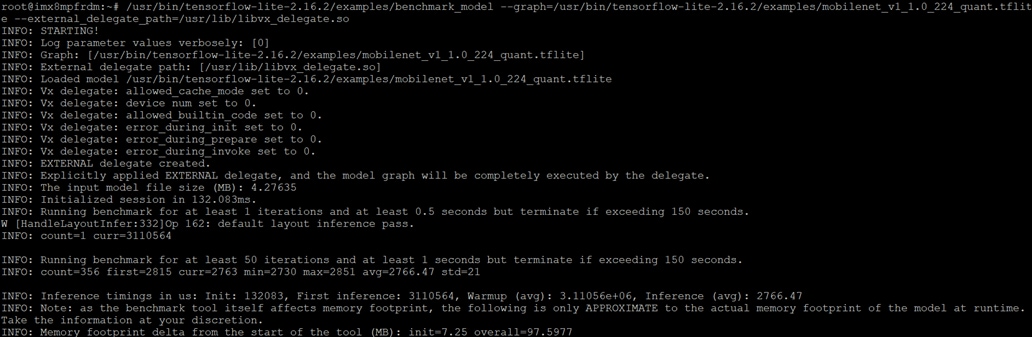
The benchmark_model tool can also provide an operator profiling report by setting --enable_op_profiling=true in the command. For more usage of benchmark_model, please use --help to check.
Note: For TensorFlow Lite, the initial execution of model inference takes longer time, because of the model graph initialization needed by the NPU. The initialization phase is known as warmup. This time duration can be decreased for subsequent application that runs by storing on disk the information resulted from the initial OpenVX graph processing. The following environment variables should be used for this purpose:VIV_VX_ENABLE_CACHE_GRAPH_BINARY: flag to enable/disable OpenVX graph caching VIV_VX_CACHE_BINARY_GRAPH_DIR: set location of the cached information on diskFor example, set these variables on the console in this way:
root@imx8mpfrdm:~# export VIV_VX_ENABLE_CACHE_GRAPH_BINARY="1"
root@imx8mpfrdm:~# export VIV_VX_CACHE_BINARY_GRAPH_DIR=`pwd`For how to write code in c++ and python to run model inference on NPU, please refer to example applications in GoPoint.
Deploy PyTorch Model
Besides Tensorflow, PyTorch is also a popular deep learning frameworks to build NN models. For how to convert PyTorch models into TensorFlow Lite models, please check application note AN13769: Deploy PyTorch Models to NXP Supported Inference Engines Using ONNX.
Using HiFi 4 DSP
Using HiFi 4 DSP
FRDM-IMX8MPLUS has a Cadence® Tensilica® HiFi 4 DSP running up to 800MHz, which is a highly optimized audio processor geared for efficient execution of audio and voice codecs and pre- and postprocessing modules.
To test the DSP, the simplest way is to play an MP3 audio file using the following command:
root@imx8mpfrdm:~# gplay-1.0 --audio-sink="alsasink device=sysdefault:CARD=wm8962audio" MP3_EXAMPLE_FILE.mp3
The gplay-1.0 will automatically choose DSP as audio decoder and play the MP3 file through wm8962 sound card. You should be able to hear the audio from a headset connecting to the 3.5mm JACK port.
For more details of DSP usage, please check “i.MX DSP User's Guide”.
Besides audio signal processing, the DSP also has the capability to be programmed for more generic usage. For how to use DSP to run Machine Learning inference, please check application note AN13336: i.MX 8M Plus HiFi4 TFLM ML Enablement. For how to use DSP to run Zephyr RTOS, please check application note AN13970: Running Zephyr RTOS on Cadence Tensilica HiFi 4 DSP.
Using VPU
Using VPU
FRDM-IMX8MPLUS has a Hantro Video Processing Unit (VPU) includes both decoder and encoder, which supports H.264, H.265, VP8, VP9 decoding and H.264, H.265 encoding.
To test the VPU, the simplest way is to play an MP4 video file using the following command:
root@imx8mpfrdm:~# gplay-1.0 MP4_EXAMPLE_FILE.mp4
The gplay-1.0 will automatically choose VPU as video decoder and play the MP4 file on the Weston desktop. You should be able to see the video playing on the HDMI display if connected.
For more details of how to use VPU API in applications, please check i.MX VPU API Reference Manual.
Using ISP
Using ISP
FRDM-IMX8MPLUS has two Camera Image Signal Processor (ISP). When one camera is used, two ISP can support up to 12MP@30fps or 4kp45. When two cameras are used, each ISP supports up to 1080p80.
To test the ISP, you can use OS08A20 camera with FRDM-IMX8MPLUS.
u-boot=> setenv fdtfile imx8mp-frdm-os08a20.dtb
u-boot=> boot
After FRDM-IMX8MPLUS boots up with OS08A20 camera connected, please run the following command to open camera preview of OS08A20:
root@imx8mpfrdm:~# gst-launch-1.0 -v v4l2src device=/dev/video3! "video/x-raw,format=YUY2,width=3840,height=2160" ! queue ! waylandsinkIf a camera preview is shown on the HDMI display with correct view, then it proves the ISP is working fine. For more details of ISP usage, please check i.MX 8M Plus Camera and Display Guide.
Using GPU
Using GPU
FRDM-IMX8MPLUS has a GC7000 Ultra-Lite Graphics Processing Unit (GPU) operating at up to 16 GFLOPS (high-precision), which supports OpenGL ES 1.1, 2.0, 3.0, 3.1, OpenCL 3.0, OpenVG 1.1, OpenGL 4.0, EGL 1.5, Vulkan 1.1.
To test the GPU performance, the simplest way is to run glmark2-es2-wayland benchmark as the following command:
root@imx8mpfrdm:~# glmark2-es2-wayland --fullscreen
Besides this, there are many other GPU example applications installed in the FRDM-IMX8MPLUS default rootfs under folder /opt/imx-gpu-sdk/. You can try them by directly executing the binary or launch the application from GoPoint.
For more details of GPU usage, please check i.MX Graphics User’s Guide.
Security and Integrity
Security and Integrity
System security and integrity are always one of the most critical aspects to be considered in product development.
FRDM-IMX8MPLUS support secure boot feature, helping to prevent unauthorized software execution during the device boot sequence. For more details of the secure boot feature, please check application note AN4581: i.MX Secure Boot on HABv4 Supported Devices.
Fast Boot
Fast Boot
In certain use cases, there is a requirement for the device boot time, which means the device needs to complete booting in a given time limit.
To optimize the boot time, FRDM-IMX8MPLUS supports falcon mode in U-Boot. Falcon mode is a feature in U-Boot that enables fast booting by allowing SPL to directly start the Linux kernel. It completely skips the U-Boot loading and initialization, with the effect of reducing the time spent in the bootloader.
For how to enable falcon mode and further optimize boot time, please check application note AN14093: Fast Boot on i.MX 8M and i.MX 9 Using Falcon Mode and Kernel Optimizations.
Design Resources
Board Information
Additional References
In addition to our FRDM i.MX 8M Plus Development Board page, you may also want to visit:
On this page
- 1.1
Get Familiar with the Board
- 1.2
Boot from eMMC
- 1.3
Connect USB Debug Cable
- 1.4
Boot Switch Setup
- 1.5
Connect HDMI Display
- 1.6
Board Boot Up
- 2.1
Overview
- 2.2
Download NXP Linux BSP Pre-Built Image
- 2.3
Burn NXP Linux BSP Image Using Universal Update Utility (UUU)