Getting Started with the FRDM-LS1012A
Contents of this document
-
Get Started
-
Plug It In
-
Get Software
Sign in to save your progress. Don't have an account? Create one.
Purchase your FRDM-LS1012A | LS1012A | Dev Platform
1. Get Started
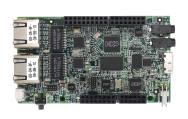
1.1 Get Started with the QorIQ FRDM-LS1012A
This video provides an overview of the FRDM-LS1012A. For details about the features of the board, refer to QorIQ FRDM-LS1012A Reference Manual.
2. Plug It In
2.1 Booting FRDM-LS1012A Board
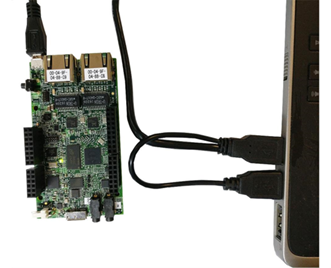
2.2 Attach the USB Cable
Plug the type-A connectors of the type-A to micro-B Y cable into the two USB ports of your PC. Connect the type-B connector of the cable to the USB 2.0 debug/UART connector.
2.3 Install the Mbed Windows Serial Port Driver
Make sure that the Mbed driver for the board serial port is installed. Before you run the driver installer, you MUST have the board plugged in to your PC.
2.4 Setup Serial Port
With the serial port driver installed, run your favorite terminal application to control and monitor the FRDM-LS1012A from the serial console. Configure the terminal to 115,200 baud rate, 8 data bits, no parity and 1 stop bit. To determine the port number of the FRDM-LS1012A's virtual COM port, open the device manager and look under the "Ports" group.
Not sure how to use a terminal application? Try one of these tutorials: Tera Term Tutorial, PuTTY Tutorial.
3. Get Software
3.1 Flashing Binaries on FRDM-LS1012A via U-Boot
3.2 Jump Start Your Design with the LS1012A SDK
The LS1012A Software Development Kit (SDK) is complimentary and includes full source code under a permissive open source license for all hardware abstraction and peripheral driver software.
Click below to download the LS1012A SDK prebuilt images depending on whether you are using a 32-bit or 64-bit kernel.
3.3 Updating FRDM-LS1012A Board Images
The FRDM-LS1012A Getting Started guide provides easy, step-by-step instructions on how to flash prebuilt binaries on FRDM-LS1012A.
Tera Term Tutorial
Tera Term Tutorial
Tera Term is a very popular open source terminal emulation application. This program can be used to display information sent from your NXP development platform's virtual serial port.
- Download Tera Term from SourceForge. After the download, run the installer and then return to this webpage to continue
- Launch Tera Term. The first time it launches, it will show you the following dialog. Select the Serial option. Assuming your board is plugged in, there should be a COM port automatically populated in the list
- Configure the serial port settings (using the COM port number identified earlier) to 115,200 baud rate, 8 data bits, no parity and 1 stop bit. To do this, go to Setup → Serial Port and change the settings
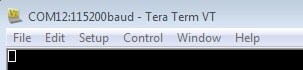
- Verify that the connection is open. If connected, Tera Term will show something like below in its title bar
- You're ready to go

PuTTY Tutorial
PuTTY Tutorial
PuTTY is a popular terminal emulation application. This program can be used to display information sent from your NXP development platform's virtual serial port.
- Download PuTTY using the button below. After the download, run the installer and then return to this webpage to continue
- Launch PuTTY by either double clicking on the *.exe file you downloaded or from the Start menu, depending on the type of download you selected
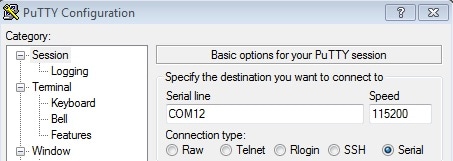
- Configure in the window that launches, select the Serial radio button and enter the COM port number that you determined earlier. Also, enter the baud rate, in this case 115,200
- Click Open to open the serial connection. Assuming the board is connected and you entered the correct COM port, the terminal window will open. If the configuration is not correct, PuTTY will alert you
- You're ready to go
Design Resources
Support
Forums
Connect with other engineers and get expert advice on designing with the FRDM-LS1012A on one of our community sites.