Getting Started with the NXP EdgeReady MCU-Based Solution for Local Voice Control
Contents of this document
-
Plug It In
-
Get Software
-
Build, Run
Sign in to save your progress. Don't have an account? Create one.
Purchase your NXP EdgeReady MCU Based Solution for Local Voice Control
1. Plug It In
1.1 Unboxing
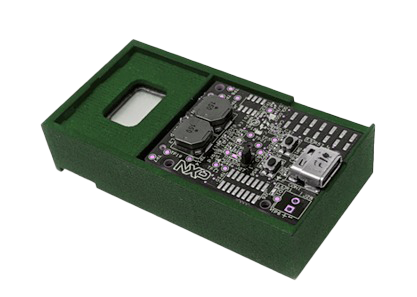
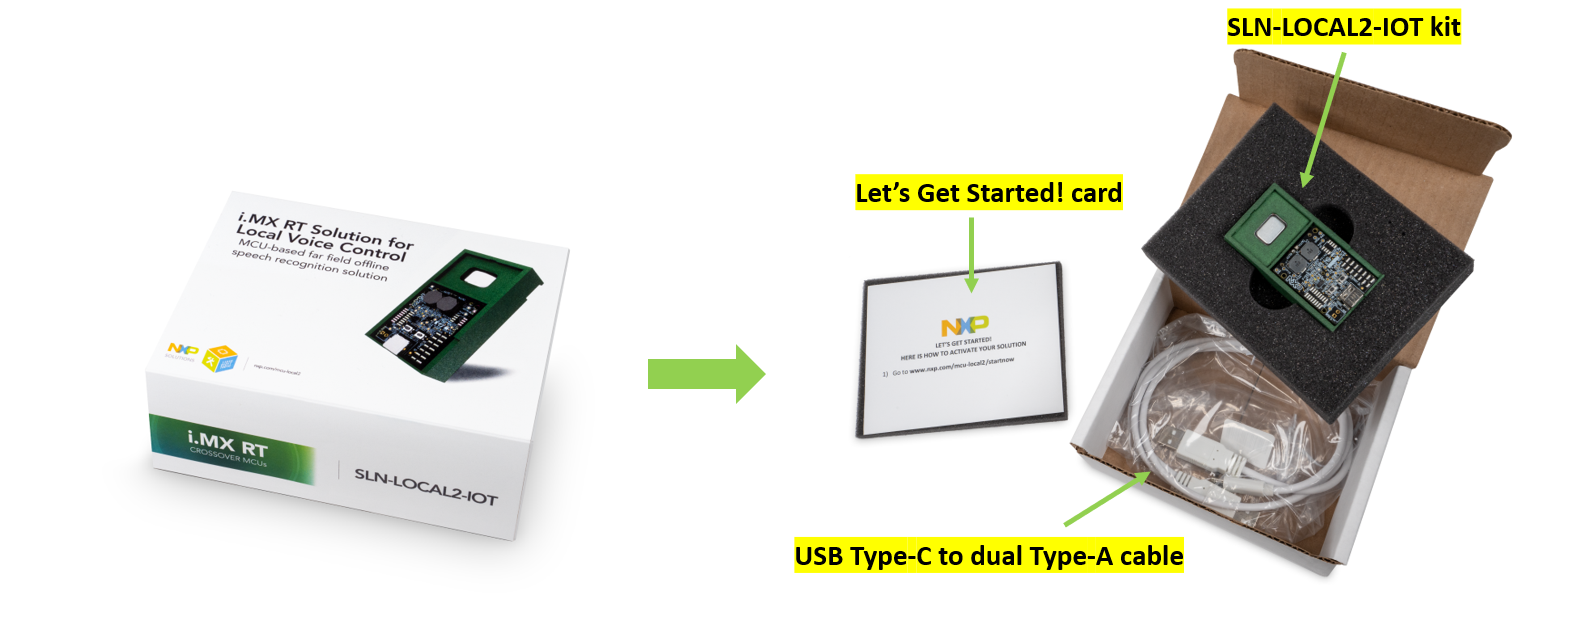
The SLN-LOCAL2-IOT kit arrives in a box as shown in Figure 1. Inside the box, in addition to the kit, you will find a Quick Start Card, “Let’s Get Started!” and a Type-C to dual Type-A cable. The kit is pre-programmed with a LED control demo that is ready to run, as soon as it is powered via the USB cable.
In addition to the contents listed above, owners of the SLN-LOCAL2-IOT development kit can also access a software package containing the SLN-LOCAL2-IOT MCUXpresso SDK, precompiled release binaries and manufacturing tools.
Section 2.1 details how to download the SLN-LOCAL2-IOT MCUXpresso SDK.
The manufacturing tool can be downloaded here.
1.2 Power On
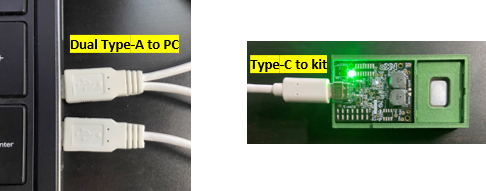
Plug the USB Type-C connector into the SLN-LOCAL2-IOT kit and the dual Type-A connectors into your PC. Figure 2 illustrates how to connect the kit with the USB cable.
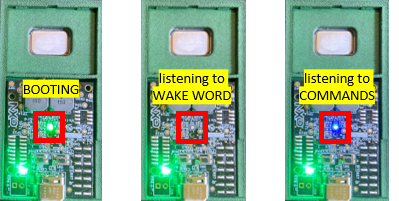
When you power on the kit for the first time, the device will turn the LED green for about 2 seconds before turning off. Once the LED is off, the kit will play audio "L, E, D, Demo" from the onboard speaker indicating that the LED control demo is running and listening to the wake word “Hey, NXP”. Figure 3 depicts the LED status while booting and being ready for listening to wake word and commands.
1.3 Out-of-Box Demo #1 - LED Control
Everything is ready to run the first out-of-box demo. Just say “Hey, NXP” then the SLN-LOCAL2-IOT development kit will respond to your voice with audio “Can I help you?” and turn the LED blue while waiting for your LED control command.
Say one of the following commands:
- "L, E, D, Red"
- "L, E, D, Green"
- "L, E, D, Blue"
- "Cycle Fast"
- "Cycle Slow"
If the kit detects your voice command, it will change the LED color and play audio “OK!”.
If the kit does not detect any of the LED control commands within a period of time, the device will turn the LED purple and play a chime indicating the response waiting time has ended. By default the response waiting time is 8 seconds but you can change the value by the Shell command timeout after connecting a serial terminal.
1.4 Out-of-Box Demo #2 - Multilingual
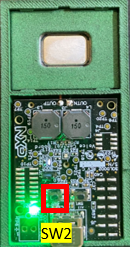
Press SW2 on the kit to switch from LED control to multilingual demo. Once it is changed, the kit will play audio “Smart Home, Multilingual Demo”.
The kit ships with four languages. Table 1 shows the wake words and command sets in English, Chinese, German and French.
Table 1. Wake Words and Commands for Multilingual Demo.
| Language | Wake Word | Smart Home Commands | Elevator Commands | Audio Device Control Commands | Washing Machine Commands |
|---|---|---|---|---|---|
| English (EN) | Hey, NXP |
|
|
|
|
| Chinese (ZH) | 你好, 恩智浦 |
|
|
|
|
| German (DE) | Hallo, NXP |
|
|
|
|
| French (FR) | Salut, NXP |
|
|
|
|
Say one of the wake words:
- “Hey, NXP” for English (en)
- “你好, 恩智浦” for Chinese (zh)
- “Hallo, NXP” for German (de)
- “Salut, NXP” for French (fr)
Once the device detects a wake word, it responds with audio:
- “Can I help you?” for English (en)
- “我可以帮你吗?” for Chinese (zh)
- “Kann ich Ihnen helfen?” for German (de)
- “Puis-je vous aider?”for French (fr)
Say a Smart Home command in Table 1. The device will respond “OK” in the accent of detected language.
1.5 Out-of-Box Demo #3 - Dialog
Press SW2 on the kit to switch from multilingual to dialog demo. Once it is changed, the kit will play audio “Dialog Demo”. Say the wake word “Hey, NXP” then the SLN-LOCAL2-IOT development kit will respond to your voice with audio “Can I help you?” and turn the LED blue while waiting for your dialog demo command.
Start with one of the following commands for oven’s temperature control:
- “Set Preheat”
- “Set Bake”
- “Set Broil”
The device will respond with audio “Say the temperature to be set”. Then you can say a temperature in fahrenheit (e.g., “two hundred fifty degrees”). If your voice command is recognized, the device will respond with audio “Temperature has been set”.
Similarly, for timer control, say the command “Set Timer”, you can say a time that you want to set. Figure 5 shows the flow of the dialog demo.

The available temperature and timer commands are listed as below:
- Temperature
- 200 ~ 500 degrees in 10 degree interval
- For example, “two hundred sixty degrees”, “three hundred degrees”, etc.
- Timer
- 1 ~10 minutes in 1 minute interval
- 10 ~60 minutes in 5 minute interval
- 90 minutes
- 2 hours
- 3 hours
- For example, “five minutes“, “ ten minutes”, “one hour”, “two hours”, etc.
1.6 Creating Custom Command and Wake Words
Please contact NXP’s EdgeReady local voice team (local-commands@nxp.com) when you are ready to create speech models for your own custom commands and wake words. We will send you an application note on this subject, and give you the choice to either email us the phrases you need so we can create models for you, or alternatively we can give you access to a PC (Windows™) based speech modeling tool to allow you to create the custom speech models yourself from text input. In either case there is no cost to create speech models for custom commands and wake words. The i.MX RT106S and i.MX RT105S solutions can support multiple wake words and more than 100 commands in over 40 different languages and dialects.
1.7 Demo Settings and Detection Results
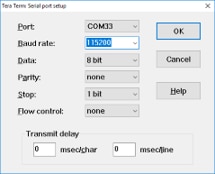
Connect a serial terminal application to the USB serial device interface that enumerates (115200-8-N-1). Figure 6 is a snapshot of serial terminal setup.
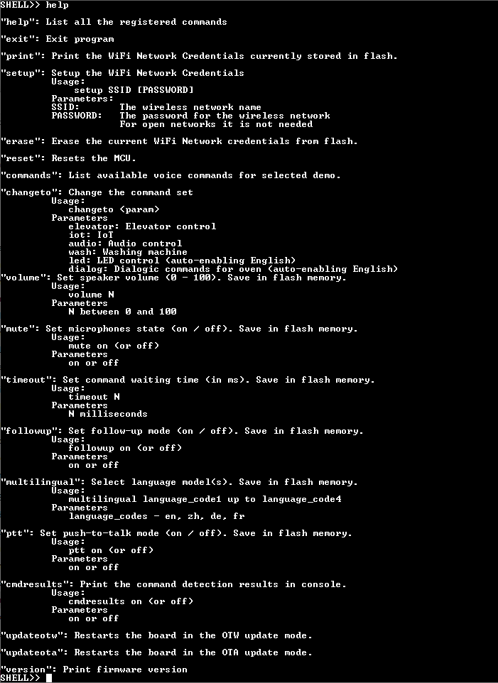
Press Enter on the keyboard and you will see the SHELL>> prompt. Type help to show the available commands. Figure 7 shows the available commands, with a description of each.
To switch the voice command group, use the changeto Shell command. Figure 8 shows that the current voice command group is set to Smart Home (IoT).
You can also select different command group such as Elevator (elevator), Audio Device Control (audio), and Washing Machine (wash) with the changeto shell command. Use the same shell command to switch demos as well.

To select languages, use the multilingual Shell command. Figure 9 shows the command to set English and German only.

Figure 10 shows the Shell command to set English (en), Chinese (zh), German (de) and French (fr).

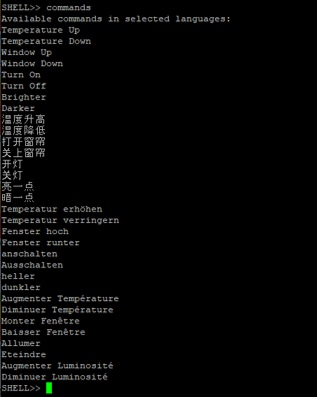
To list available voice commands, use the commands Shell command as shown in Figure 11.
If possible, do not enable unnecessary languages, as extra languages enabled could increase false triggers.
Now let’s test the Smart Home (IoT) demo in English, Chinese, German and French.
Say one of the wake words:
- “Hey, NXP” for English (en)
- “你好, 恩智浦” for Chinese (zh)
- “Hallo, NXP” for German (de)
- “Salut, NXP” for French (fr)
Once the device detects a wake word, it responds with audio:
- “Can I help you?” for English (en)
- “我可以帮你吗?” for Chinese (zh)
- “Kann ich Ihnen helfen?” for German (de)
- “Puis-je vous aider?” for French (fr)
Say a voice command in the list. The device will respond “OK” in the accent of detected language and print the detected command on the serial terminal. Figure 12 shows an example of English wake word “Hey, NXP” followed by a voice command “Brighter” and another example of German wake word “Hallo, NXP” followed by a command “Heller”.

2. Get Software
2.1 Jump Start Your Design with the MCUXpresso SDK
The MCUXpresso SDK is complimentary and includes full source code under a permissive open source license for all hardware abstraction and peripheral driver software.
Click below to download a pre-configured SDK release for the SLN-LOCAL2-IOT Development Kit.

2.2 Install Your Toolchain
NXP offers a complimentary toolchain called MCUXpresso IDE.

2.3 PC Configuration
Many of the example applications output data over the MCU UART so you'll want to make sure that the driver for the board's virtual COM port is installed. Before you run the driver installer, you MUST have the board plugged into your PC.
With the serial port driver installed, run your favorite terminal application to view the serial output from the MCU's UART. Configure the terminal to 115200 baud rate, 8 data bits, no parity and 1 stop bit. To determine the port number of the MIMXRT1060-EVK virtual COM port, open the device manager and look under the "Ports" group.
Not sure how to use a terminal application? Try one of these tutorials: Tera Term Tutorial, PuTTY Tutorial.
Note: If the EVK board exhibits intermittent operation, use a USB Y cable with two USB A to single micro B connector or an external power supply via the barrel jack (place a jumper across pins 1 and 2 of header J1) to power the board.
2.4 J-Link Debugger
SEGGER J-Link is a recommended debugger for the SLN-LOCAL2-IOT kit. Users need to make sure that the installed J-Link software version is V6.98 or later. The J-Link software and documentation pack for various operating systems can be downloaded from J-Link .
3. Build, Run
3.1 Importing SLN-LOCAL2-IOT SDK
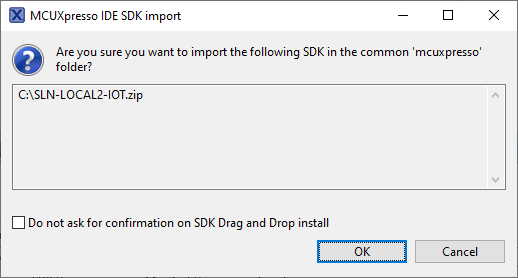
Before building the SLN-LOCAL2-IOT SDK example projects, the target SDK needs to be imported into MCUXpresso IDE by drag-and-dropping the target SDK archive into the “Installed SDKs” window as shown in Figure 13.
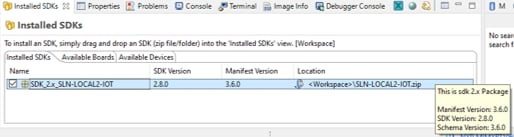
Click “OK” if the pop-up window shows up.
3.2 Importing Projects
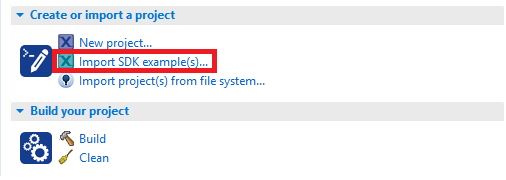
The installed SDK allows users to import example applications as a development starting point.
To import an example project, select Import SDK example(s)… from the Quickstart pane in the lower left corner of the IDE as shown in Figure 15.
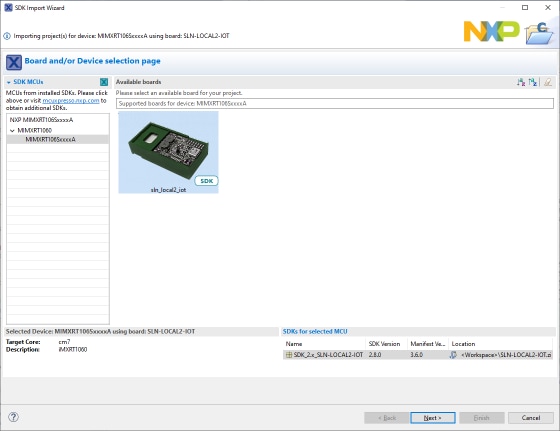
Users should see a pop-up window like Figure 16. Select the sln_local2_iot option and then proceed by selecting the Next button.
The import wizard, as shown in Figure 17, will then display all the projects that can be imported.
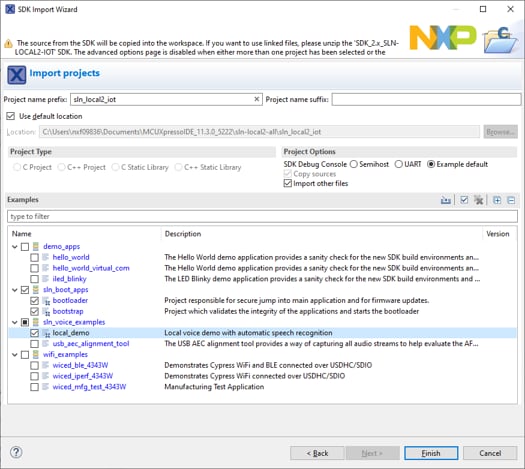
Select bootstrap, bootloader and local_demo.
Once the projects are successfully imported, they will be listed in the project explorer and ready to build and run.
3.3 Turning Off Bootstrap Image Verification
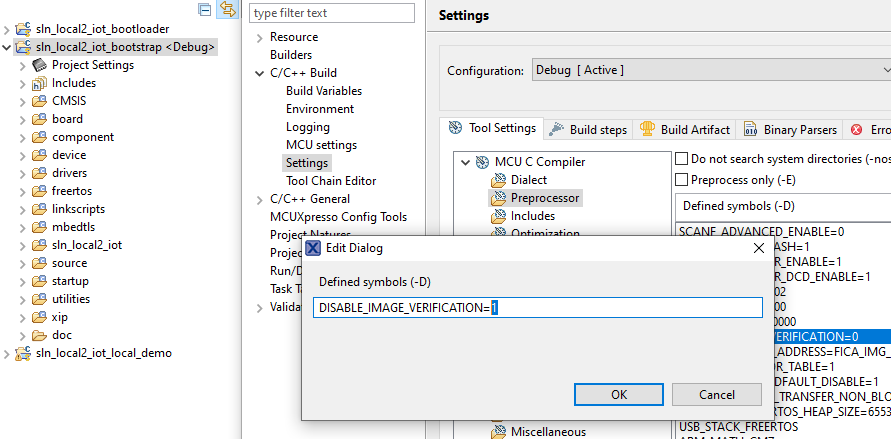
Within the MCUXpresso bootstrap project, right click on the root project and navigate to:
- Properties → C/C++ Build → Settings → Preprocessor.
Inside the Preprocessor section, change the MACRO “DISABLE_IMAGE_VERIFICATION” to “1” and press “Apply and Close” as shown in Figure 18.
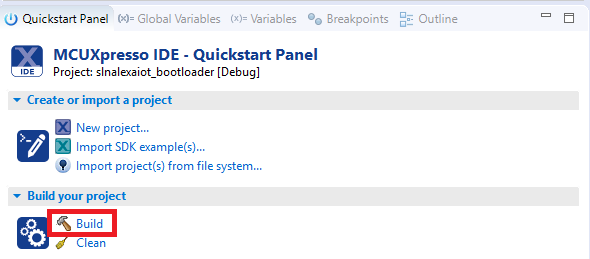
After that change, from the Quickstart Panel, select the option Build (as in Figure 19) to start the compilation and linking of the bootstrap.

3.4 Turning Off Bootloader Image Verification
Within the MCUXpresso bootloader project, right-click on the root project and navigate to:
- Properties → C/C++ Build → Settings → Preprocessor.
Inside the Preprocessor section, change the MACRO “DISABLE_IMAGE_VERIFICATION” to “1” and press “OK” as in Figure 20.


After that change, from the Quickstart Panel, select the option Build (as in Figure 21) to start the compilation and linking of the bootloader.
3.5 Building Projects
To build the bootstrap project, click on the project name in project explorer first. Select the Build option in the Quickstart pane as shown in Figure 22.
The other projects (bootloader and local_demo), if imported, can be built in the same way.
3.6 Programming the SLN-LOCAL2-IOT Development Kit
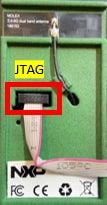
Make sure the 10-pin J-Link connector is connected to the i.MX RT JTAG header that is located on the backside of SLN-LOCAL2-IOT kit, as shown in Figure 23.
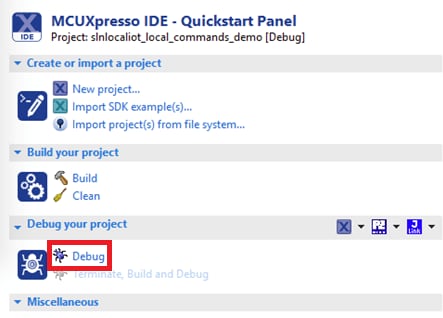
Click on the project name (bootstrap, bootloader, local_demo) that will be programed into the SLN-LOCAL2-IOT kit. Click on the Debug button in the Quickstart pane as shown in Figure 24.
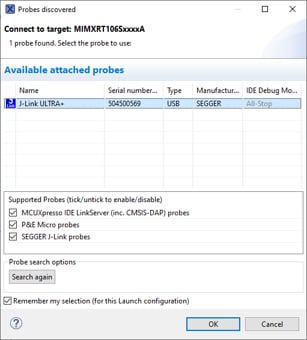
Users should see a pop-up window like Figure 25. Select the J-Link probe that is connected to the kit and press OK.
This will launch the flashing tool and proceed to load the image into the flash. The programming status is displayed on another pop-up window like Figure 26. When this is complete, the debugger will be launched and running. Users can then step, run or set breakpoints.

Learn
USB Mass Storage Device
The MSD feature allows the device to be updated without the SEGGER tool and instead, via USB. Only the “local_demo” can be updated while the bootloader and bootstrap remain the same. If the bootstrap and bootloader need updating, this will have to be done via SEGGER or the Factory Programming flow.
The MSD feature by default bypasses signature verification to allow an easier development flow as signing images can be a process not suitable for quick debugging and validation.
BYPASSING IMAGE VERIFICATION IS A SECURITY HOLE AND IT IS THE RESPONSIBILITY OF THE PRODUCT MAKER TO REMOVE THE VIOLATION.
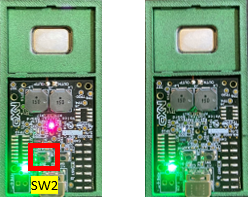
To put the device into MSD mode, hold down switch 2 (SW2) and power cycle the board until the purple LED (D2) blinks on and off 3 second cycles.
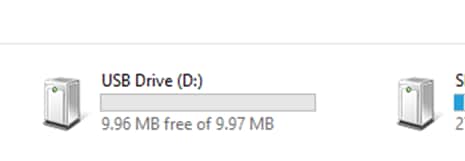
After observing the LED behavior, navigate to “My Computer” and confirm that the SLN-LOCAL2-IOT kit has mounted as a Mass Storage Device.
Take the compiled “local_demo” binary and drag the file into the MSD. This will start the download process and write the binary to flash.
After the image has been programmed into flash, the image that has been loaded will begin to execute.
If the image is compiled to run in the wrong application bank, an error will occur. The developer will be required to recompile the application to the bank the device is not running from. For more details, please refer to the developer’s guide document.
THIS REQUIRES AN LOCAL_DEMO BINARY THAT HAS BEEN COMPILED TO RUN IN THE OPPOSITE BANK THE CURRENT APPLICATION IS RUNNING IN.
Automated Manufacturing Tools
NXP provides a Factory Automation Environment that can be used for securely programming devices on the production line. This collection of scripts is called Ivaldi.
Ivaldi is a package that is responsible for manufacturing programming and reprogramming without needing J-Link. It uses the serial downloader mode of the i.MX RT106S’s boot ROM to communicate with an application called Flashloader that is programmed into the RT106S. Ivaldi was created to focus on the build infrastructure of a customer’s development and manufacturing cycle. Its primary focuses are:
- Factory programming and device setup
- Enabling High Assurance Booting (HAB)
- Signing images for Application Bank A or Bank B
- Writing and accessing One Time Programmable (OTP) fuses
For more details of the manufacturing tool, please review the development guide that can be downloaded from EdgeReady i.MX RT106V.
MCU-Based Local Voice Control
More resources including a developer guide, a user guide and the hardware and software design files can be found at EdgeReady i.MX RT106V. Please visit there and explore more about the MCU-based Local Voice Control solution.
Tera Term Tutorial
Tera Term Tutorial
Tera Term is a very popular open source terminal emulation application. This program can be used to display information sent from your NXP development platform's virtual serial port.
- Download Tera Term from SourceForge. After the download, run the installer and then return to this webpage to continue
-
Launch Tera Term. The first time it launches, it will show you the following
dialog. Select the serial option. Assuming your board is plugged in, there
should be a
COMport automatically populated in the list -
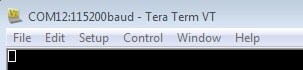
Configure the serial port settings (using the
COMport number identified earlier) to 115200 baud rate, 8 data bits, no parity and 1 stop bit. To do this, go to Setup → Serial Port and change the settings - Verify that the connection is open. If connected, Tera Term will show something like below in it's title bar
- You're ready to go

PuTTY Tutorial
PuTTY Tutorial
PuTTY is a popular terminal emulation application. This program can be used to display information sent from your NXP development platform's virtual serial port.
- Download PuTTY using the button below. After the download, run the installer and then return to this webpage to continue
- Launch PuTTY by either double clicking on the *.exe file you downloaded or from the Start menu, depending on the type of download you selected
-
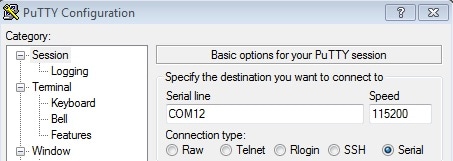
Configure In the window that launches, select the Serial radio button and
enter the
COMport number that you determined earlier. Also enter the baud rate, in this case 115200 -
Click Open to open the serial connection. Assuming the board is connected
and you entered the correct
COMport, the terminal window will open. If the configuration is not correct, PuTTY will alert you - You're ready to go
Design Resources
Chip Documents
Board Documents
Technical Documentation
- SLN-LOCAL2-IOT User’s Guide
- SLN-LOCAL2-IOT Developer’s Guide
- Reference Design: Hardware and Software Design Using i.MX RT106S MCU Based Solution for Local Voice Control for IoT
- MCU Local Voice Solution Technical Note for Power Consumption
- Audio Performance Requirements for Audio Front End of i.MX RT106A/L/S
- AN13212 - Speech Model Generation for i.MX RT10xS Local Voice Solution
Support
To learn what to do next, find your issue below. If you still need help, contact NXP Support.
Forums
Connect with other engineers and get expert advice on designing with the i.MX RT10xx on one of our community sites.
Product Forums:
On this page
- 1.1
Unboxing
- 1.2
Power On
- 1.3
Out-of-Box Demo #1 - LED Control
- 1.4
Out-of-Box Demo #2 - Multilingual
- 1.5
Out-of-Box Demo #3 - Dialog
- 1.6
Creating Custom Command and Wake Words
- 1.7
Demo Settings and Detection Results
- 2.1
Jump Start Your Design with the MCUXpresso SDK
- 2.2
Install Your Toolchain
- 2.3
PC Configuration
- 2.4
J-Link Debugger