Getting Started with FreeMASTER
Contents of this document
-
Set it Up
-
Build, Run
-
Create
-
Developer Experience
Sign in to save your progress. Don't have an account? Create one.
Purchase your FreeMASTER Run-Time Debugging Tool
1. Set it Up
1.1 Preparing FreeMASTER Environment
This guide will introduce you to FreeMASTER, NXP's real-time monitoring and data visualization software for industrial and automotive embedded applications. FreeMASTER provides you with clear visibility into system behavior during runtime, enabling efficient observation, analysis, tuning and validation of embedded software without disrupting application execution.
In addition to non-intrusive access to internal variables and system data, FreeMASTER offers flexible visualization capabilities that help you better understand and evaluate application performance throughout development and integration. These capabilities support faster troubleshooting, improved software quality and more efficient development workflows.
The FreeMASTER desktop application runs on Microsoft Windows operating systems (as outlined in Section 1.2). The installation package also includes FreeMASTER Lite, a lightweight service that can run on Windows and Linux platforms and serve as a communication interface between target microcontrollers (MCUs) and custom local or remote applications.
FreeMASTER Version 3 maintains backward compatibility with previous FreeMASTER 2.x and 1.x releases, as well as with the original PC Master 1.0 application, helping preserve existing workflows and project investments.
1.2 Minimum System Requirements
Before installing FreeMASTER software, it’s recommended that you confirm that your system can support it. To verify that you have a compatible system, please refer to the listed details below.
FreeMASTER
- Operating system: Windows 10
- System architecture: x86 and x64
- Hard drive space: 650 MB, or 1 GB when FreeMASTER Lite is selected
- Required hardware: Serial RS-232 port for local control, USB-to-serial converter, USB-to-controller area network (CAN) interface or a debugger interface
FreeMASTER Lite (for Windows)
- Operating system: Windows 10
- System architecture: x64
- Hard drive space: 460 MB
- Required hardware: Serial RS-232 port for local control, USB-to-serial converter, USB-to-CAN interface or a debugger interface
FreeMASTER Lite (for Linux)
- Operating system: Red Hat 8 (RHEL) or Ubuntu 22.04
- System architecture: x64
- Hard drive space: 230 MB
- Required hardware: Serial RS-232 port for local control or USB-to-serial converter
- Required software: Java Runtime Environment (JRE)
1.3 How to Install the FreeMASTER Software
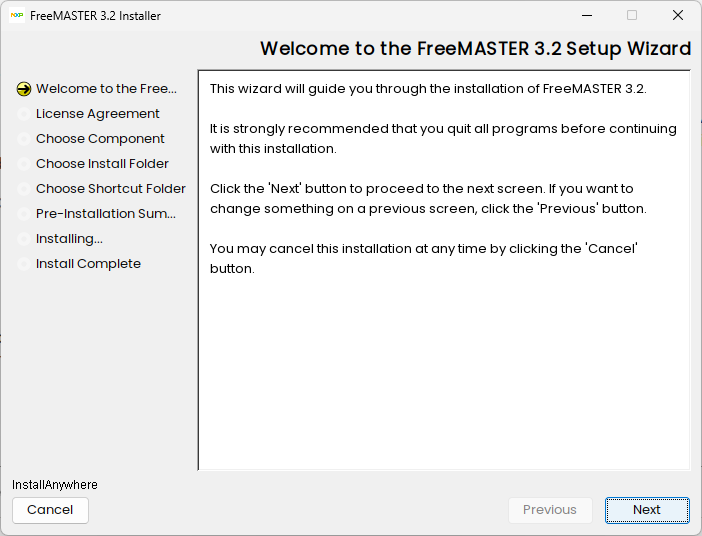
FreeMASTER is distributed as a standalone, single-file, self-extracting and executable file. This step will walk you through FreeMASTER installation. Screenshots are provided to further illustrate the written instructions.
- Select the latest or preferred installer file from the downloads section on the FreeMASTER homepage
- Once you accept the license agreement, the download will start automatically
- You will run the executable file you downloaded, and it is recommended that you run it as an administrator
- Read the "Welcome to the FreeMASTER Setup Wizard screen, then click "Next"
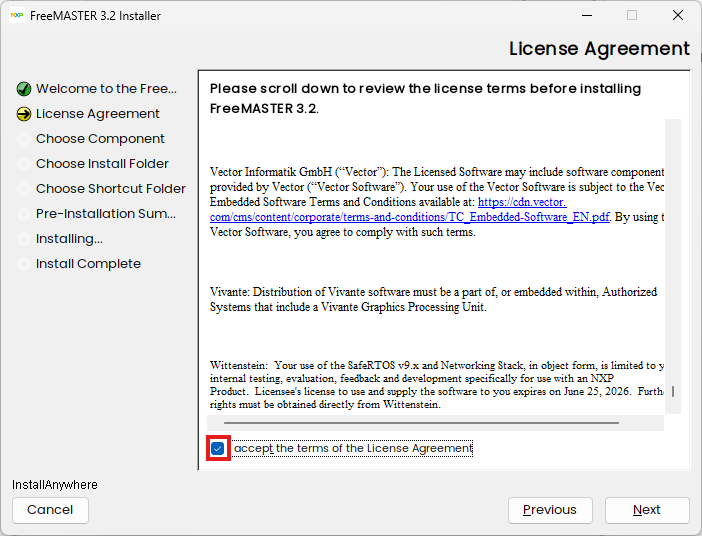
- To proceed with installing FreeMASTER, you will need to review and accept the license terms by scrolling through to the end where you will mark the "I accept the terms to the License Agreement" checkbox as shown below, then click "Next"
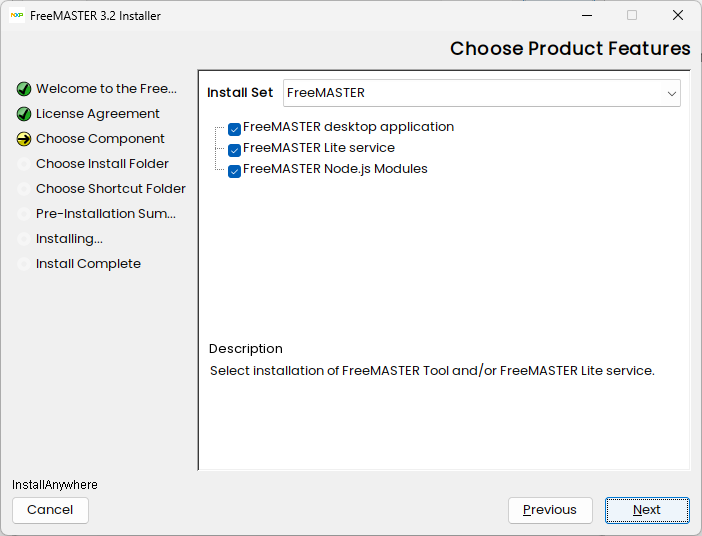
- Select preferred product features (as listed below) for installation, then click "Next"
- FreeMASTER desktop application
- FreeMASTER Lite service
- FreeMASTER Node.js Modules (includes FreeMASTER JavaScript Client and FreeMASTER Node Pallet for Node-RED both packed as NPM modules)
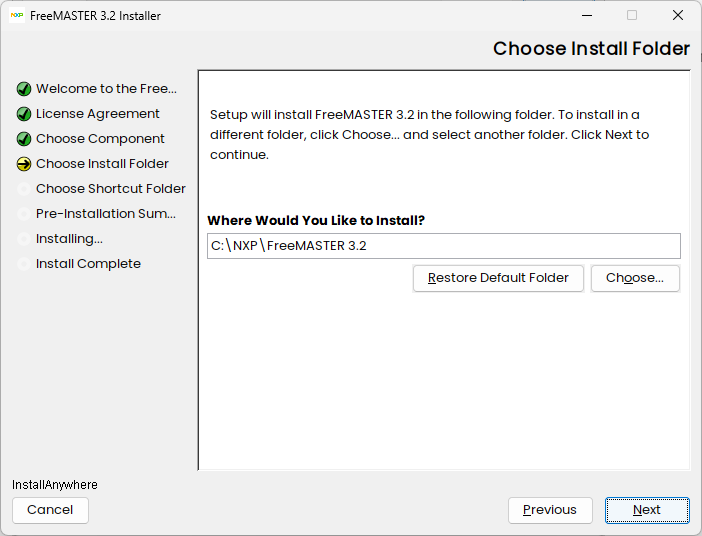
- Choose your folder for installation, then click "Next"
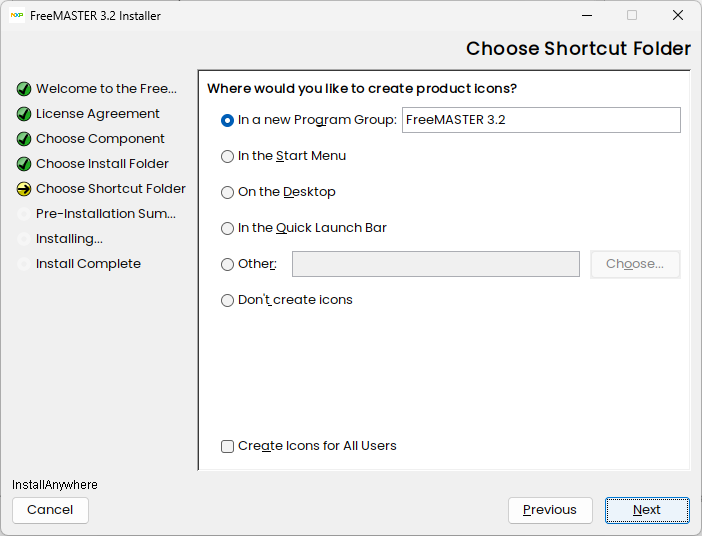
- Select where to create product icons, then click "Next"
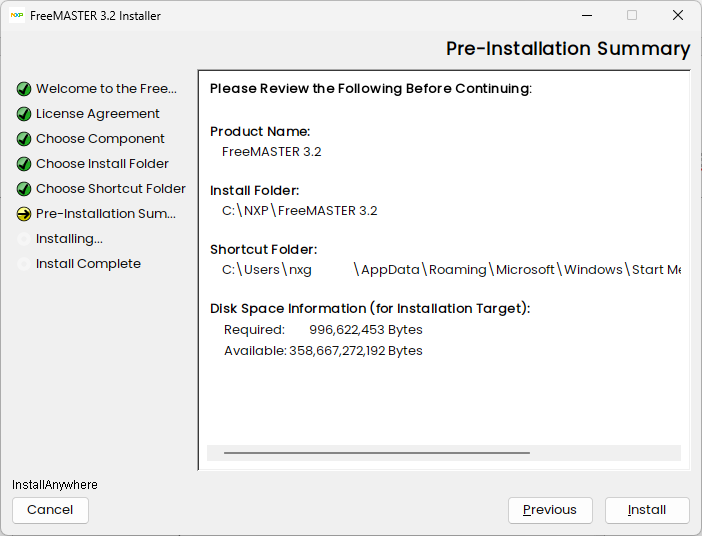
- Once you review pre-installation summary, you will click "Install" to begin installation, which will take a few minutes
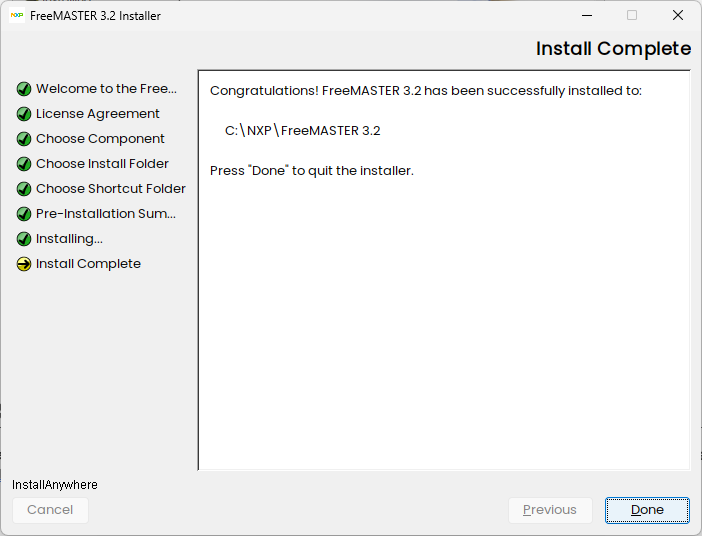
- Once you reach the screen that confirms the installation has been successful, click "Done"
1.4 Run Software
This step will provide directions on how to run both FreeMASTER and FreeMASTER Lite.
FreeMASTER
To run FreeMASTER, locate the icon created by the default Program Group or the icon you selected previously during installation (see step 8). FreeMASTER can be found under the "Apps" tab.
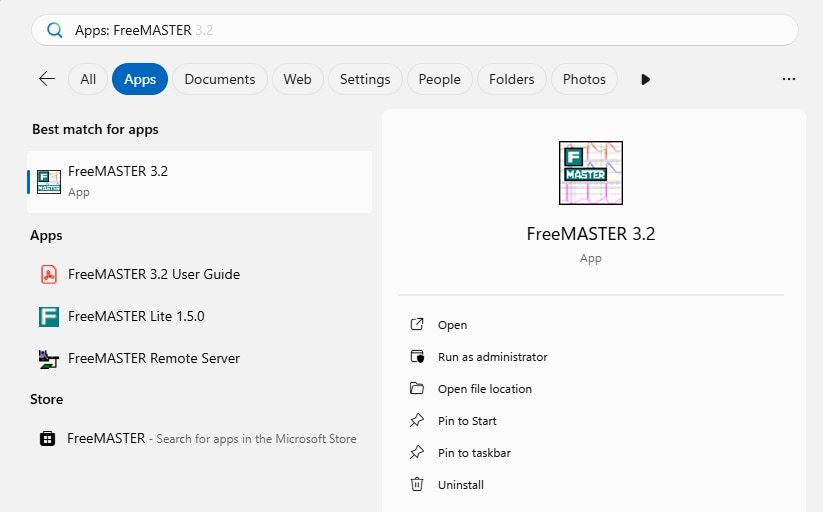
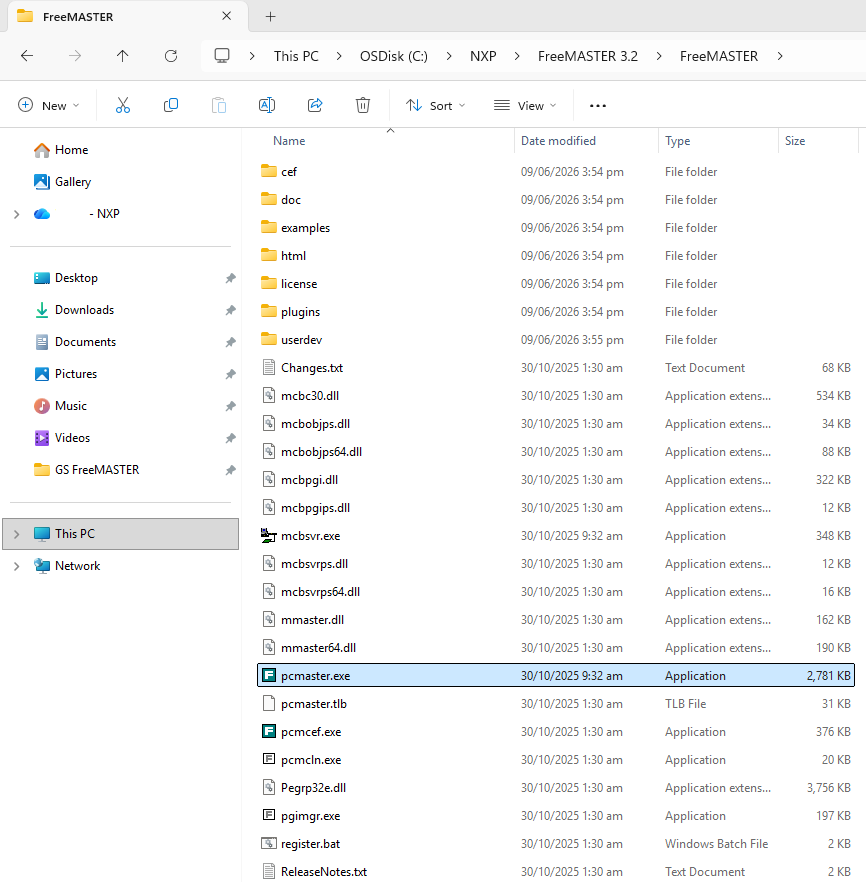
Another way to run the program is to go to the default location or go to folder you previously chose during
installation (see step 7) and find the file named pcmaster.exe under the path
C:\NXP\FreeMASTER 3.2\FreeMASTER\pcmaster.exe.
FreeMASTER Lite
To run FreeMASTER Lite, locate the icon created by the default Program Group or the icon you selected previously during installation (see step 8). FreeMASTER Lite can be found under the "Apps" tab.
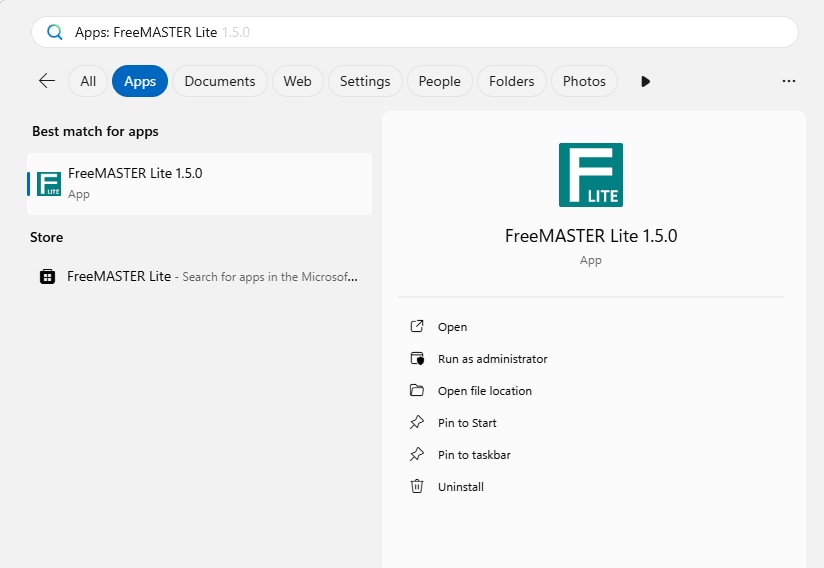
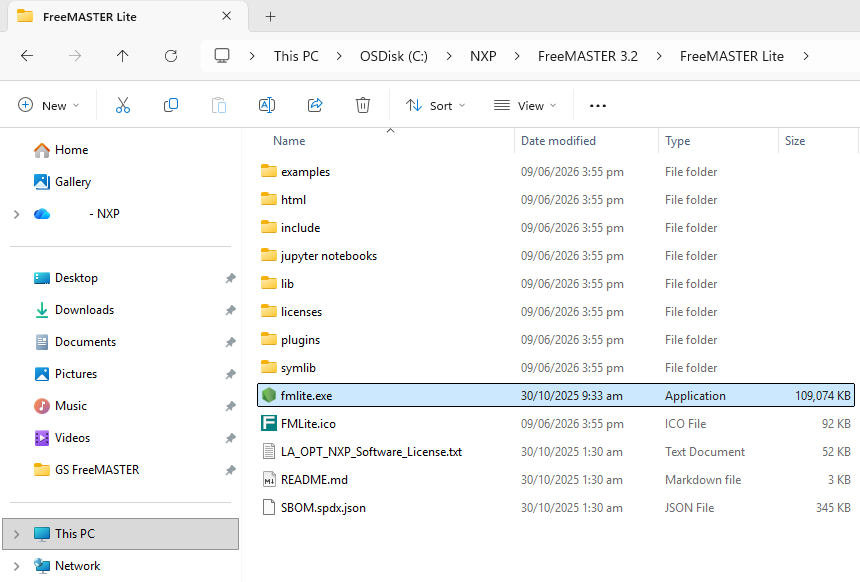
Another way to run the program is to go to the default location or go to folder you previously chose during
installation (see step 7) and find the file named fmlite.exe found under the path
C:\NXP\FreeMASTER 3.2\FreeMASTER Lite\fmlite.exe.
2. Build, Run
This section will walk you through how to import, build and run a Motion and Temperature Monitoring System example for the FRDM-A-S32K344 board using FreeMASTER and S32 Design Studio (DS). You will select the example, configure the build, compile the project, flash it to your board—all within the S32DS—and monitor variables within FreeMASTER environment.
By the end of this process, will have a working Motion and Temperature Monitoring System application running on your hardware, serving as a solid starting point for your own FreeMASTER projects. The example is taken directly from NXP Application Code Hub (ACH) where you can find additional relevant documentation.
The example is maintained by the ACH team and is subject to change without notice. If you notice that something is missing or broken, please report this issue through the Website Feedback option.
2.1 Requirements
This step will prepare you for the Build steps.
Software and Tools Requirements
First, you will download the FRDM Automotive Board Installation Package from the Automotive Software Package Manager. This bundle contains S32DS, FreeMASTER, Real-Time Drivers (RTDs) alongside additional software such as transmission control protocol/internet protocol (TCP/IP) stack, local interconnect network (LIN) stack and FreeRTOS. Software development kits (SDKs) and bundles are tested to guarantee interoperability and come with customer support.
For more instructions on how to use Automotive Software Package Manager refer to the next video:
You can also download software elements separately from the following pages:
Hardware Requirements
It is recommended that you have the following equipment before proceeding through the remaining steps.
- FRDM-A-S32K344 board
- Personal computer
- USB Type-C cable
2.2 Import
Next, you will import the project from ACH.
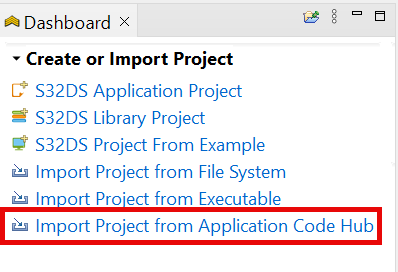
- Open S32DS integrated development environment (IDE). Under "Dashboard", choose "Import project from Application Code Hub"
- Find the demo named
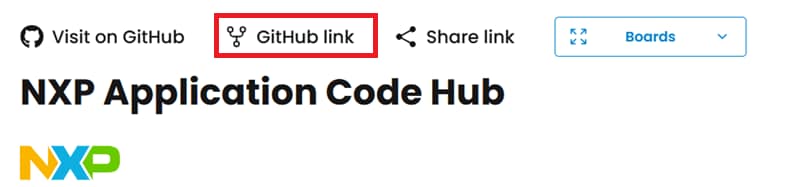
dm-motion-temperature-freemaster-s32k344 - Open the project and click the GitHub link and from there, the S32DS IDE will automatically retrieve the project attributes, then click "Next"
- Select the main branch, then click "Next"
- Select your local path for the repository in Destination>Directory and S32DS IDE will clone the repository into this path then click "Next"
- Select Import existing Eclipse projects then click "Next"
- Select the project in this repository then click "Finish" then the project will be automatically opened in Project Explorer tab
2.3 Build
This step will guide you though the build process. Follow the steps below.
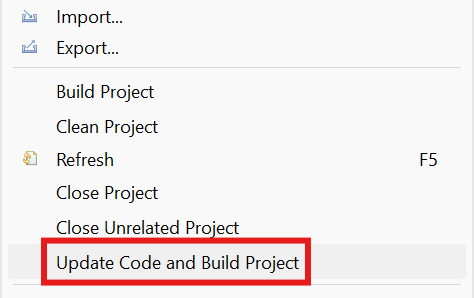
- In Project Explorer, right-click the project and select "Update Code and Build Project"
- A warning pop-up may appear about the configuration being made by an older version, then click "OK"
- This will generate the configuration—Pins, Clocks, Peripherals—to update the source code and build
the project using the active configuration (for example,
Debug_FLASH) - Make sure that the build completes successfully and the
*.elffile is generated without errors
- Connect the board via USB Type-C cable (that supports data transfer to a personal computer)
- There will be a debug configuration for this project using GNU debugger (GDB) PEMicro Interface Debugging
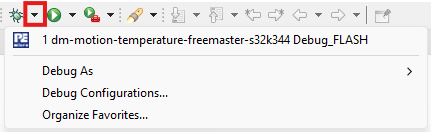
- Click on Debug icon and select the included Debug Configuration to automatically change to the Debug Perspective (if the board is connected)
- If another debug configuration is needed, select "Debug Configurations…," choose the desired debug configuration and click on Debug where it will change to the Debug Perspective
2.4 Run
In this step, you will run the example. Follow the steps below.
- Use the controls to control the application flow
- Click on Resume icon to run the application in free mode
- The clocks, peripherals and connection with FreeMASTER through low-power universal asynchronous receiver/transmitter 6 (LPUART6) will be configured and initialized
- Start FreeMASTER (the main window will be displayed on the screen) while the application is running
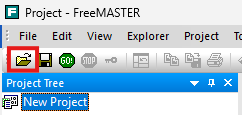
- Open FreeMASTER project by selecting File>Open Project or selecting the open icon. (you can also use the shortcut Ctrl+O)
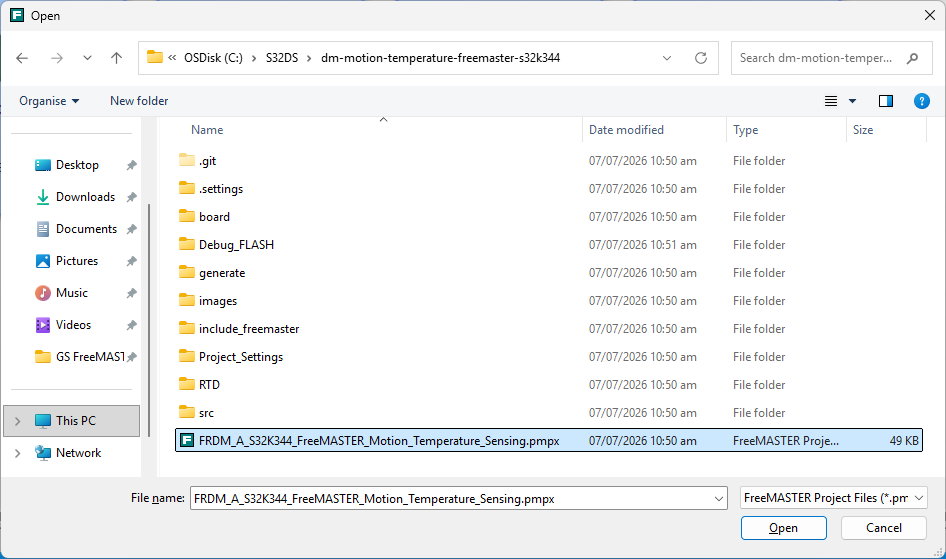
- Go to your local path where the application is saved by opening the file and selecting ".pmpx FreeMASTER project" then click "Open"
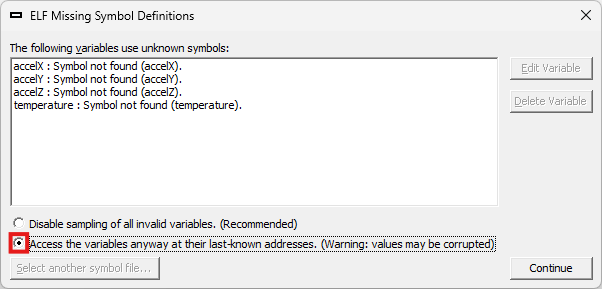
- A warning will appear if the name of the .elf file changes.
- Click "OK" to pop up a new window
- Select "Access the variables anyway at their last-know addresses" and click "Continue"
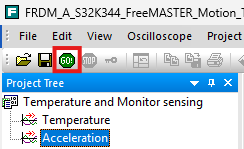
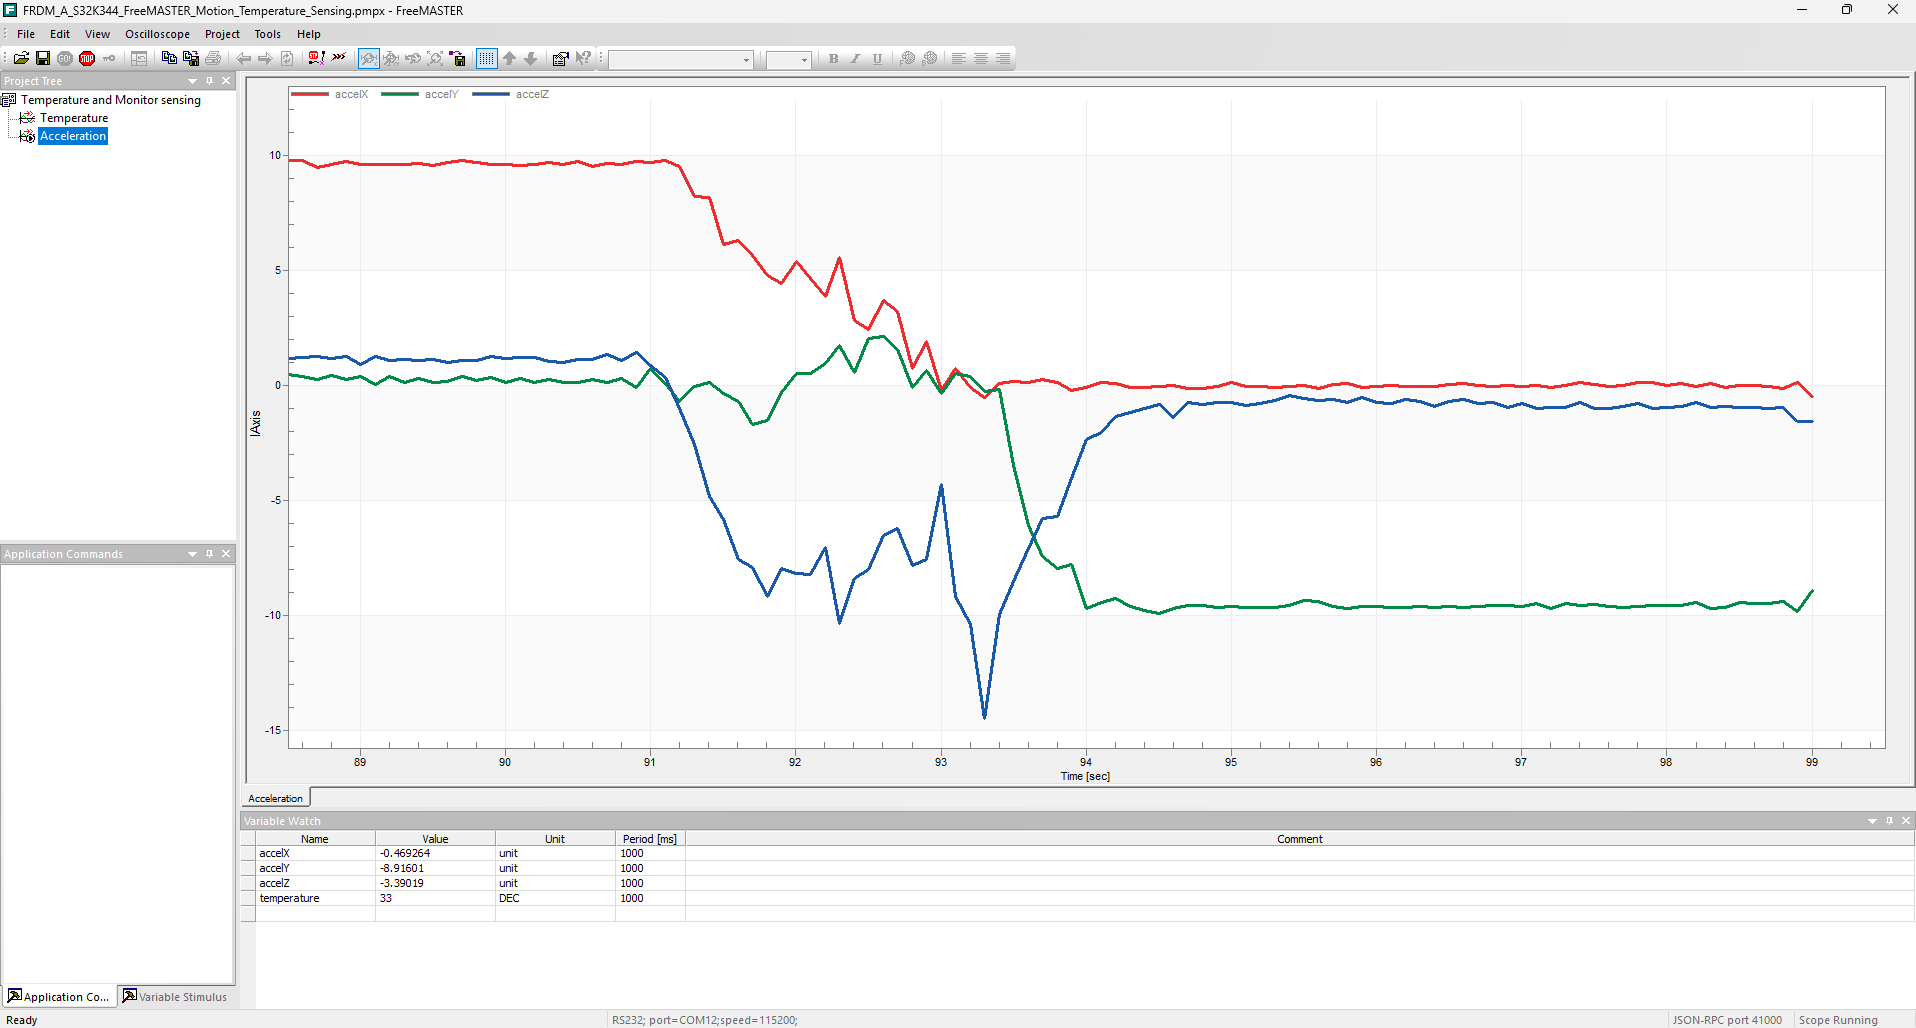
- The FreeMASTER project tree will contain a Temperature and Acceleration new oscilloscopes windows where you will select one and click the "GO!" icon to start visualizing the data in real time

3. Create
This section will walk you through how to integrate FreeMASTER into your own S32DS project to establish communication with your target hardware. The steps cover adding the FreeMASTER SDK, configuring universal asynchronous receiver/transmitter (UART)-based communication, enabling the required software components and initializing FreeMASTER within the application. You will also learn how to connect FreeMASTER to your running system, import application symbols and monitor or modify variables in real time to support debugging, validation and application tuning.
3.1 Add FreeMASTER SDK
In this step you will get the FreeMASTER SDK.
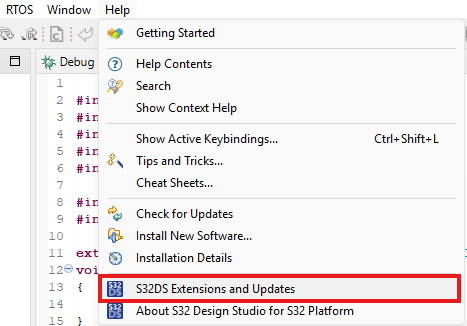
- Start S32DS. Click the "Help" tab and click "S32DS Extensions and Updates"
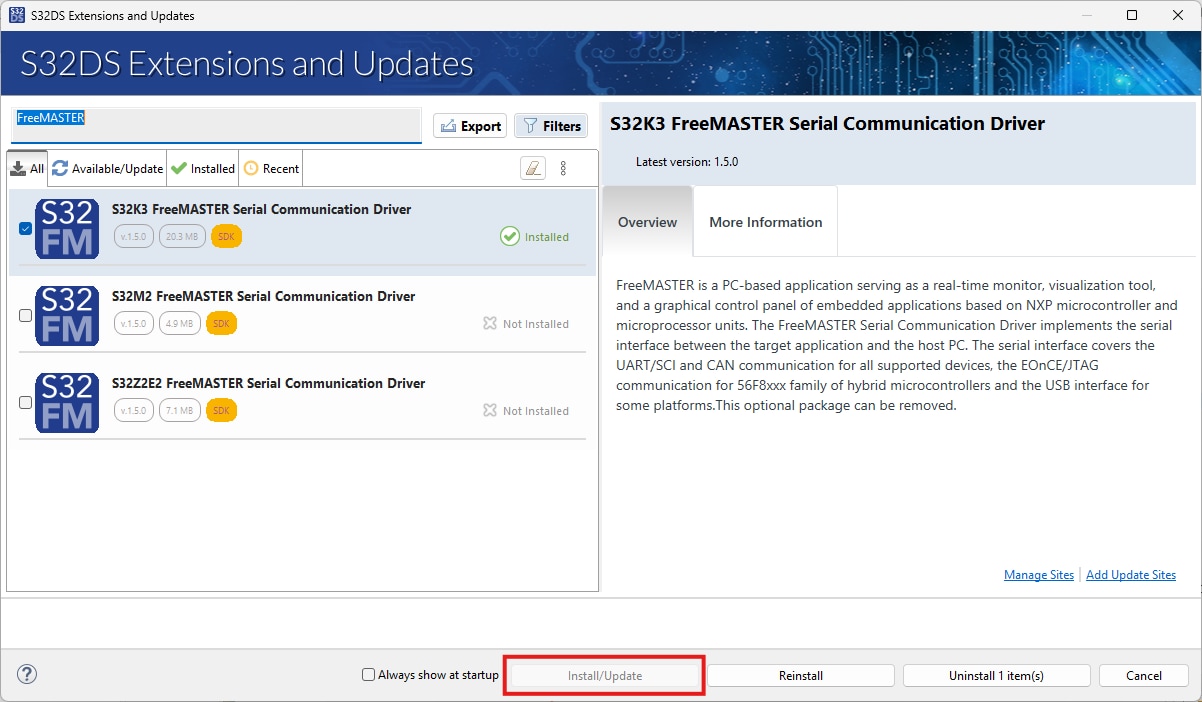
- Type "FreeMASTER" in the search bar and select communication driver for the selected family, then Install/Update
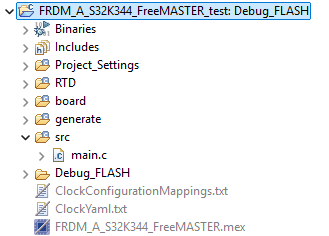
- Next, you will open a project in S32DS to add FreeMASTER by selecting it from the project folder
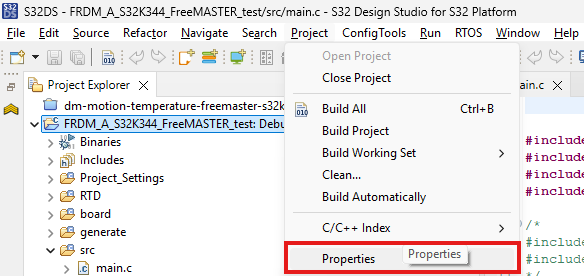
- Right-click project folder to open the ribbon, then scroll down and click "Properties" (Alt+Enter shortcut could also be used to open "Properties" directly)
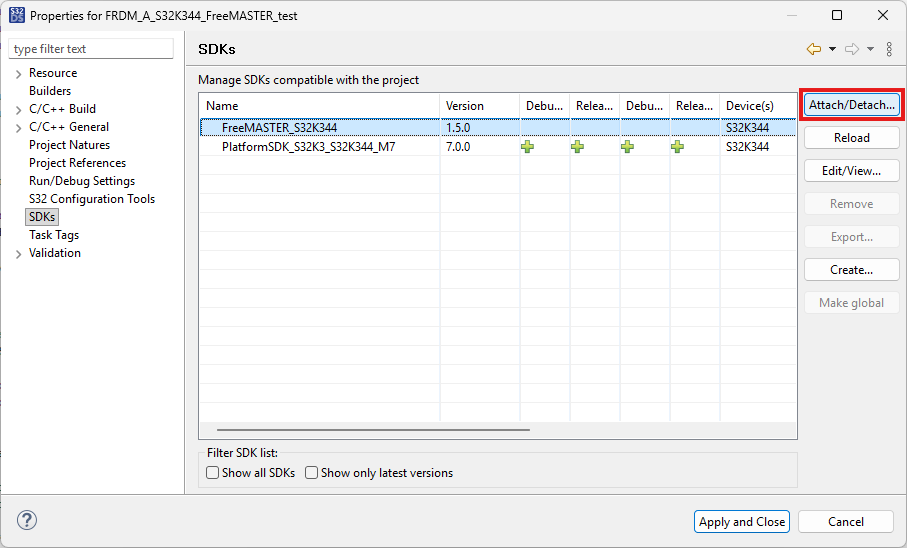
- Next, select SDKs (as shown below), select "FreeMASTER_S32" then click "Attach/Detach…."
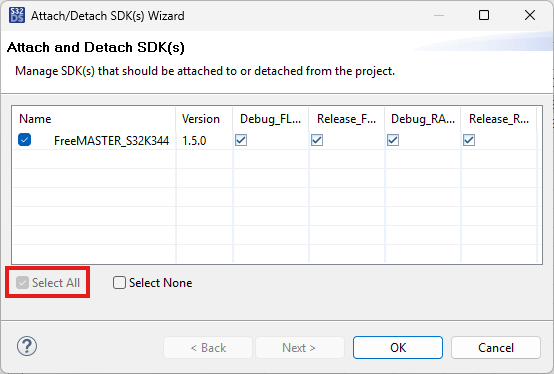
- In the next window, you mark the checkbox for "Select All" to select the FreeMASTER components that will be attached to the project, then click "OK"
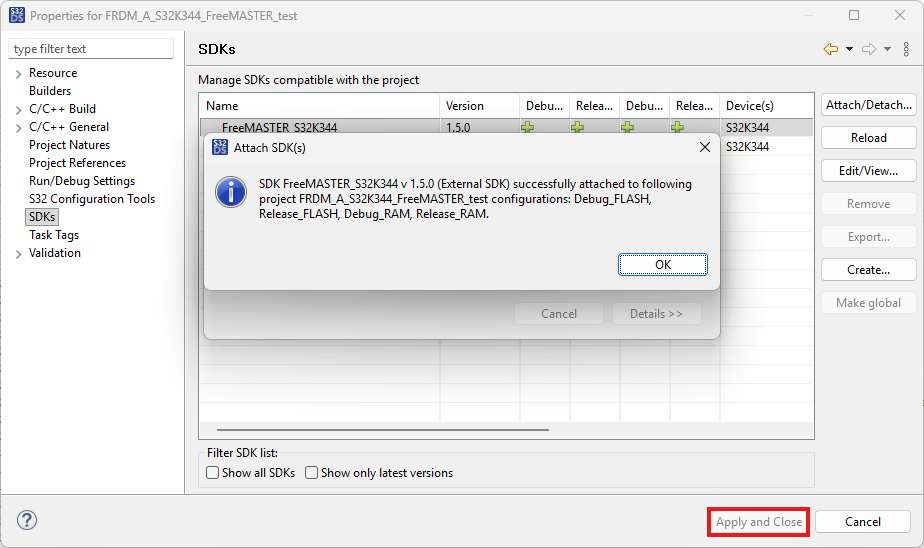
- Next, click "Apply and Close" to confirm your changes (a pop up should appear with a successful attachment)
3.2 Add FreeMASTER UART Communication
This step details how to obtain the UART.
- FreeMASTER does not configure the protocol communication within the application, so the S32 Configuration
Tools is provided to assist you
- UART communication will be used by this example
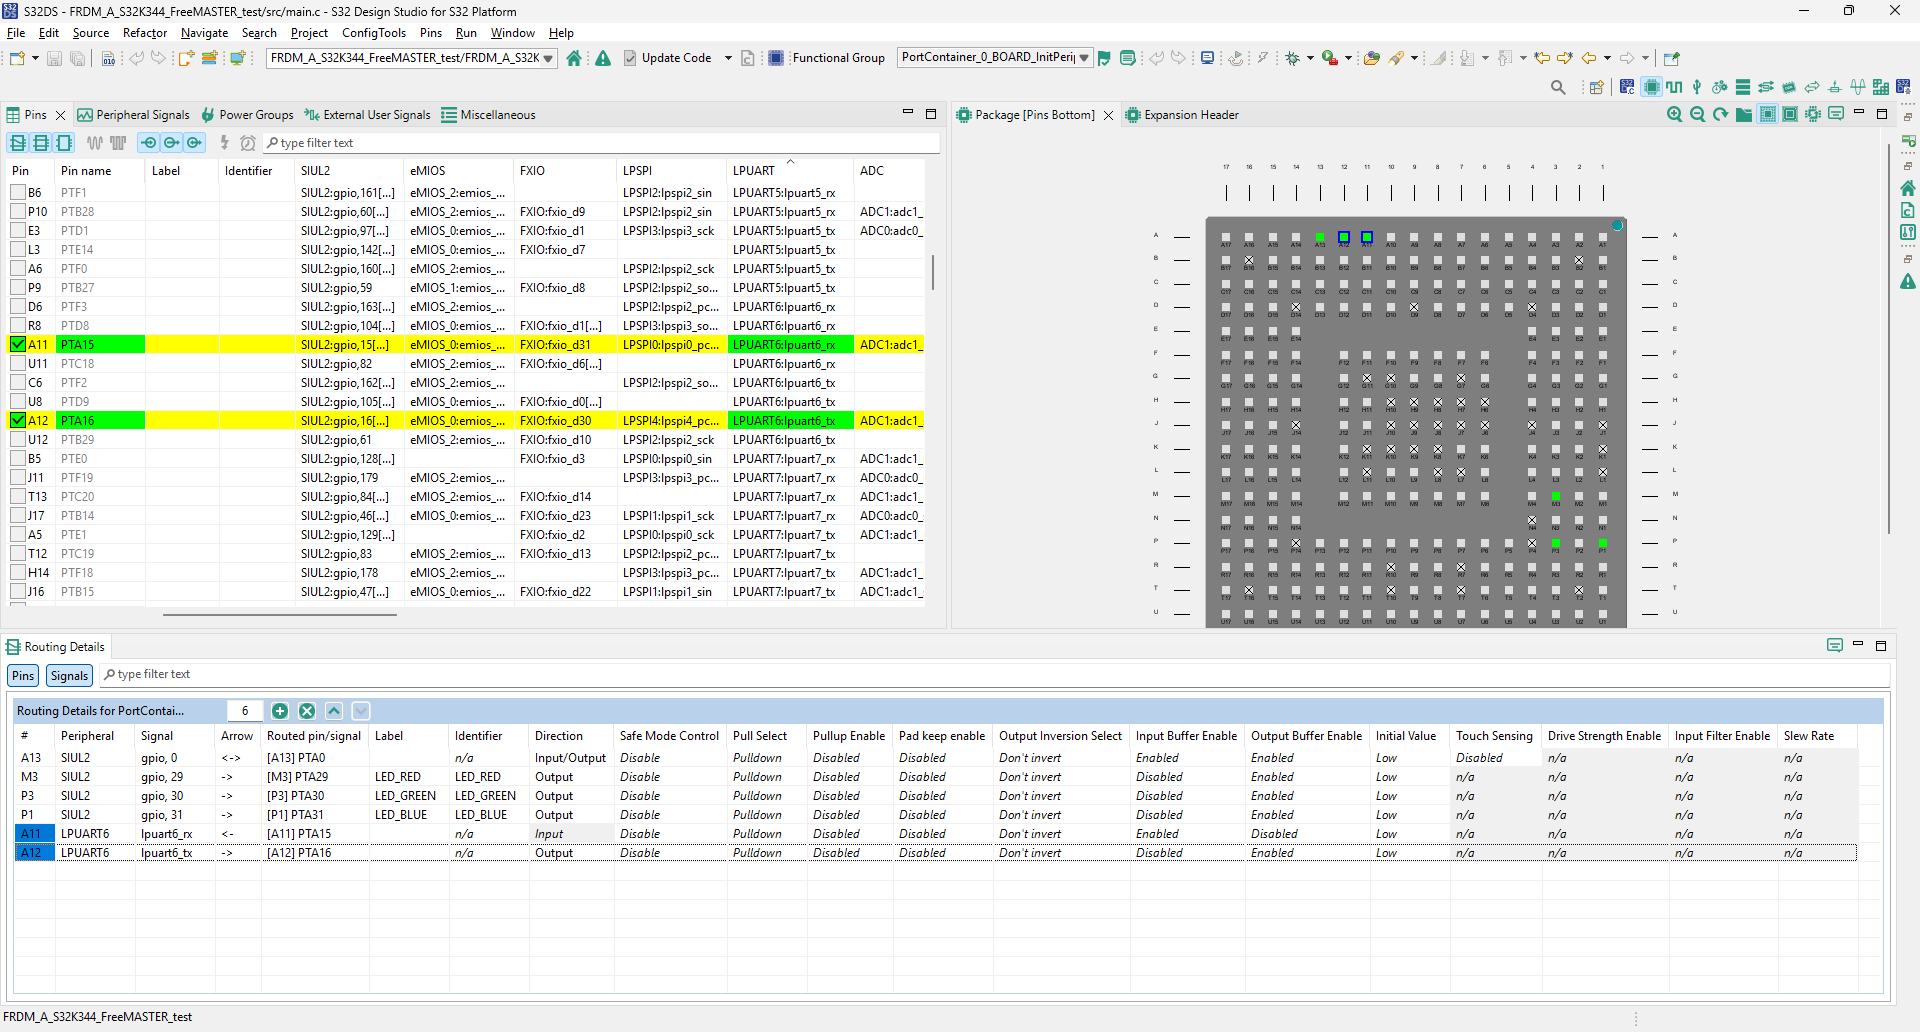
- Open S32 Configuration Tools by doing click on "Pins" icon
- Configure the LPUART receiver (RX) and transmitter (TX) pins for the selected board. (make sure that LPUART TX is configured as "Output")
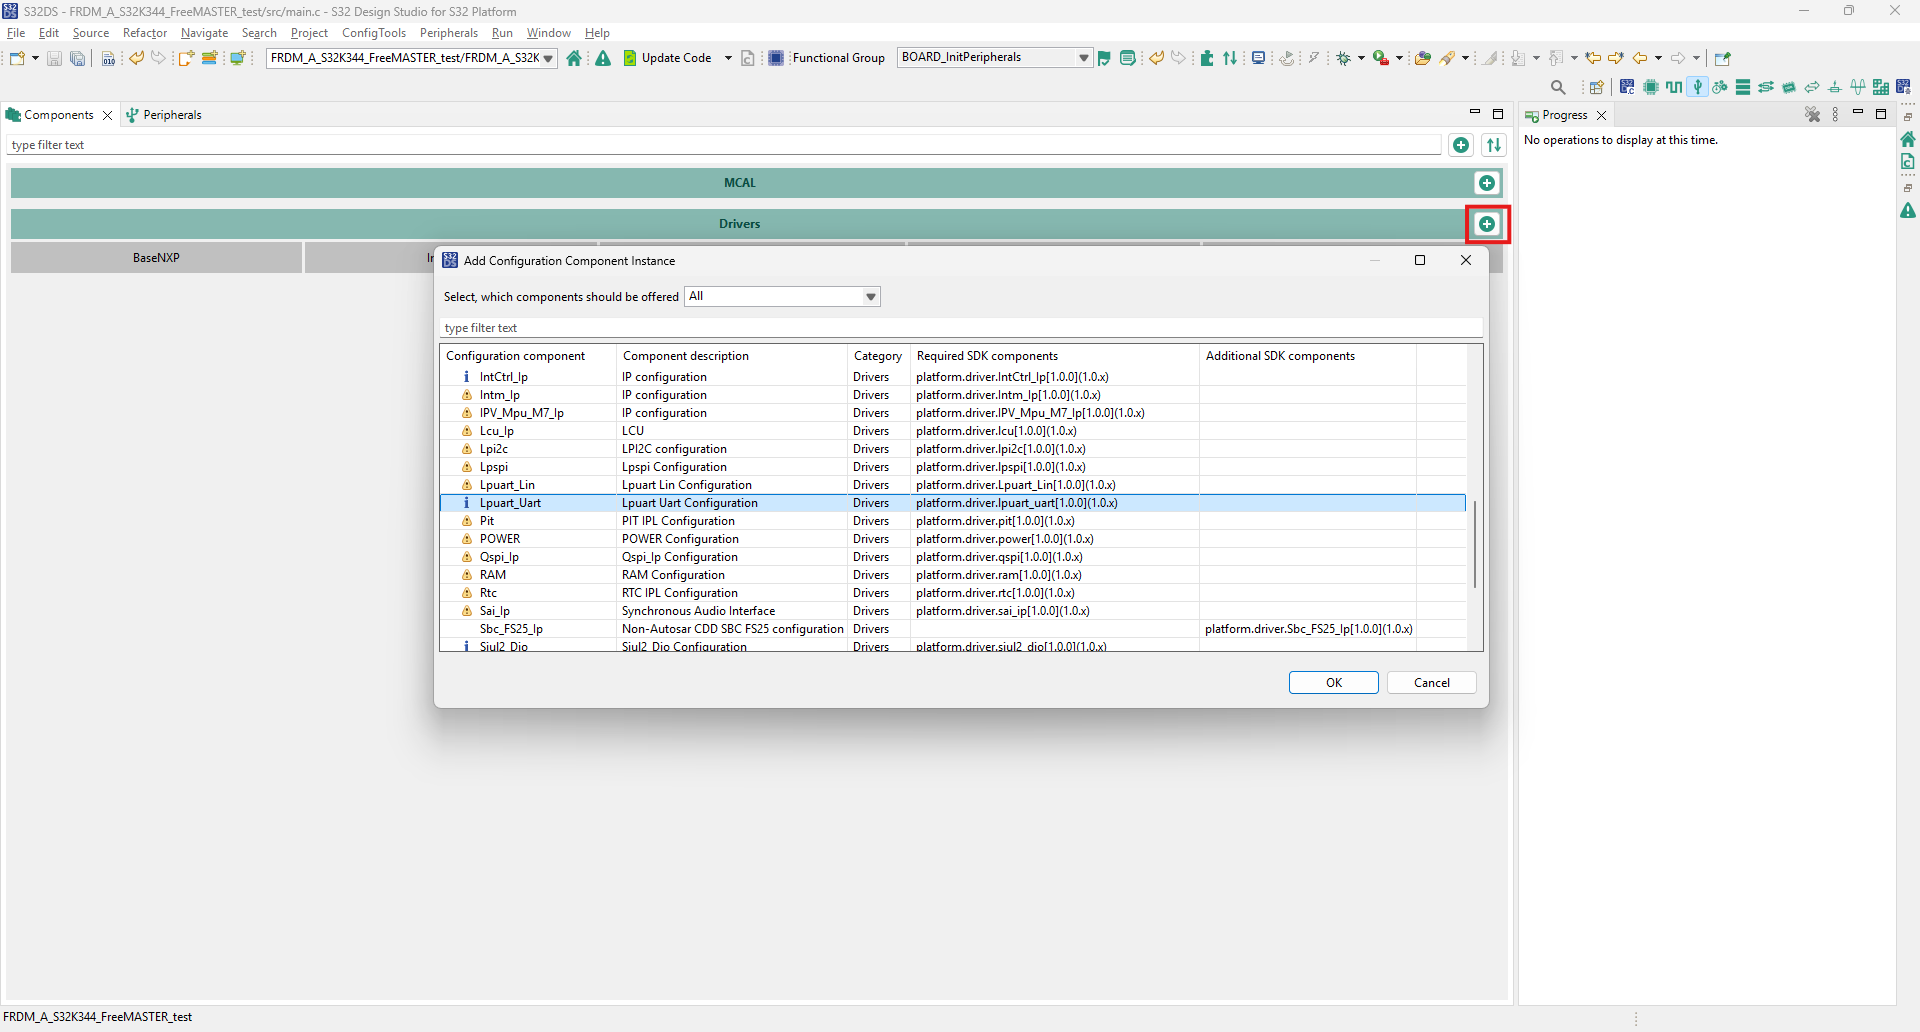
- Click on "Peripherals" icon
- Click on "drivers plus icon (+)," select the "Lpuart_Uart" component and click "OK"
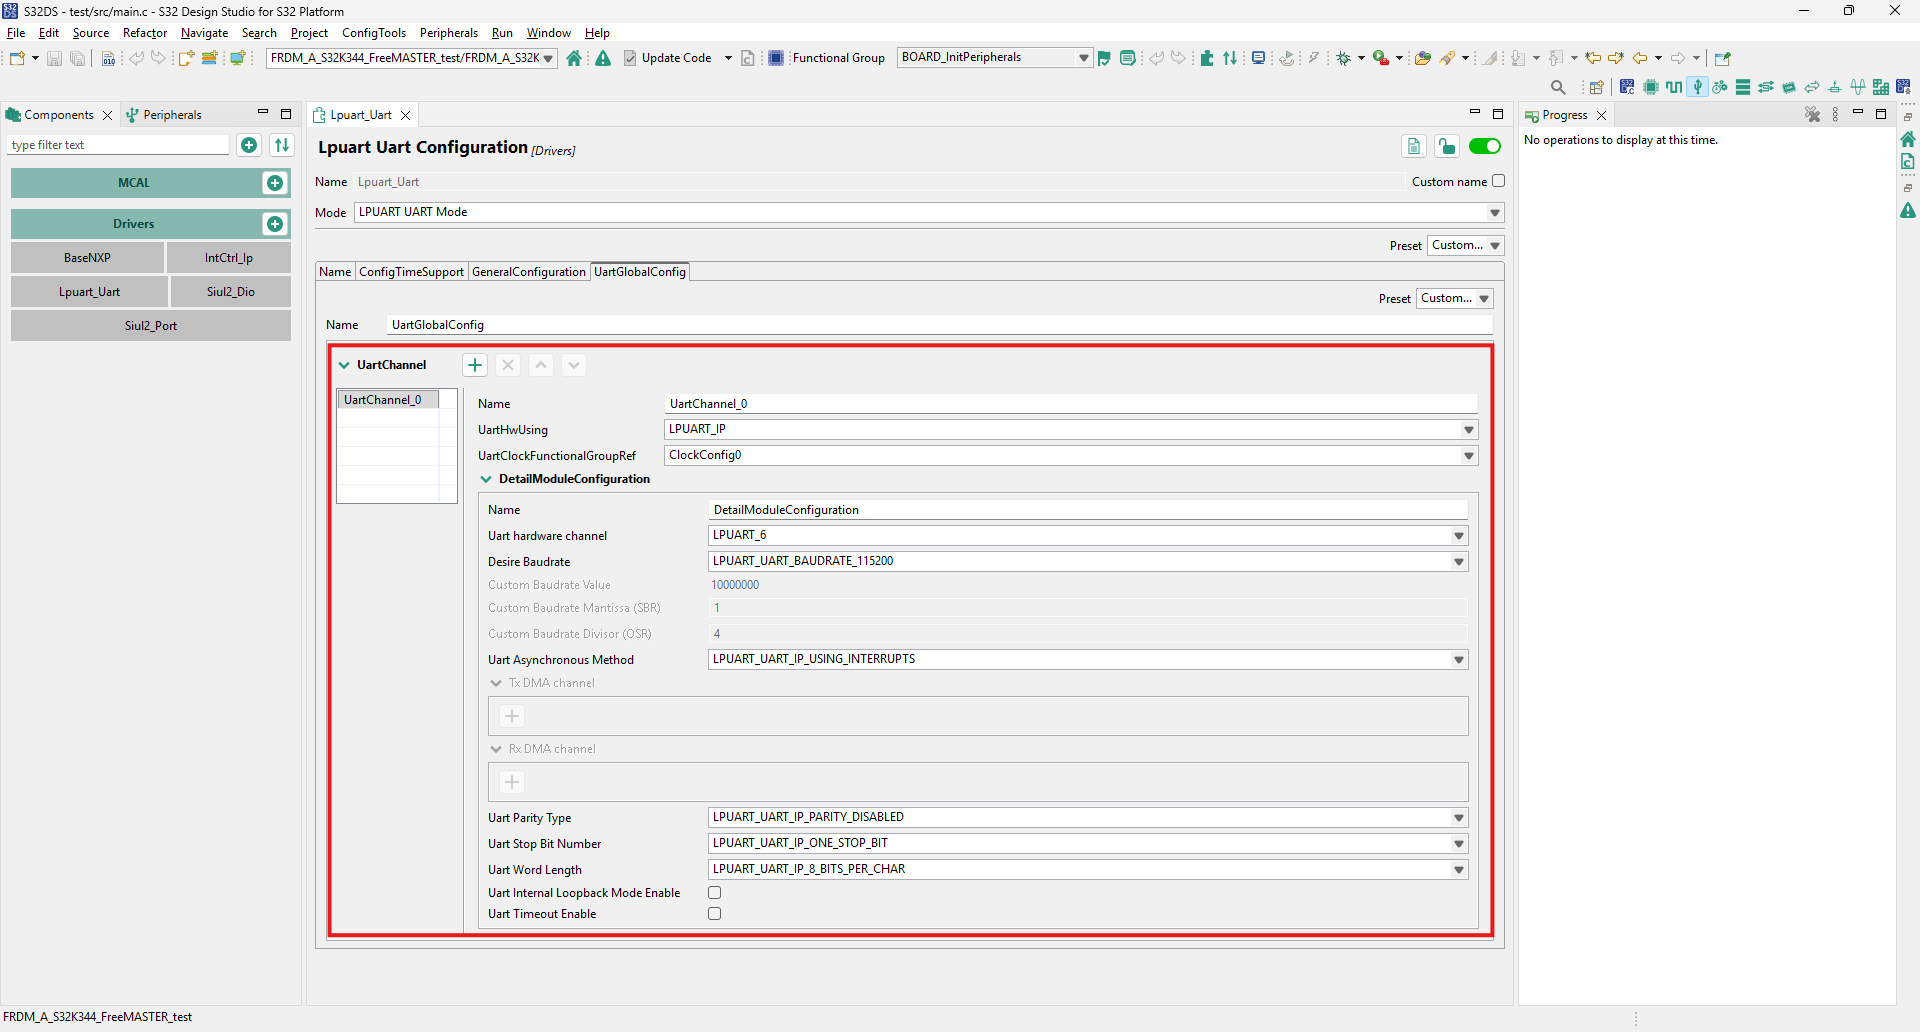
- Configure the UART peripheral as needed
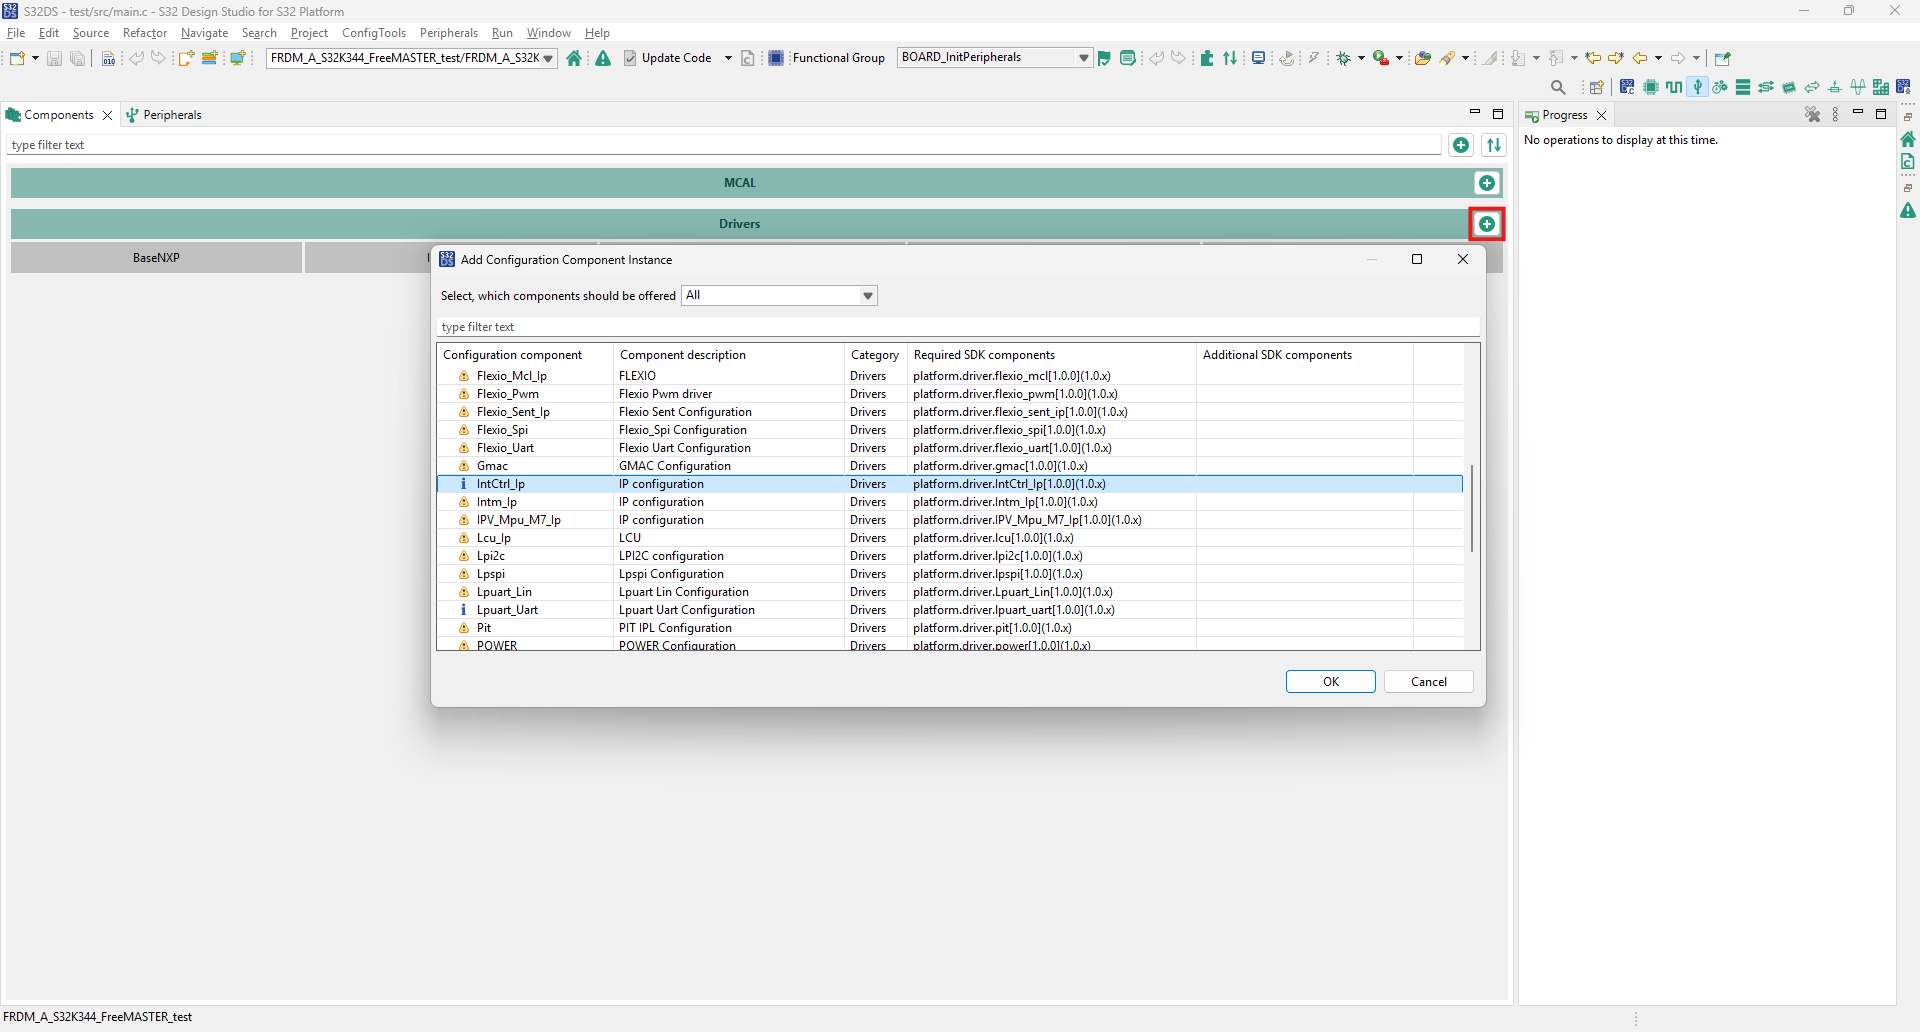
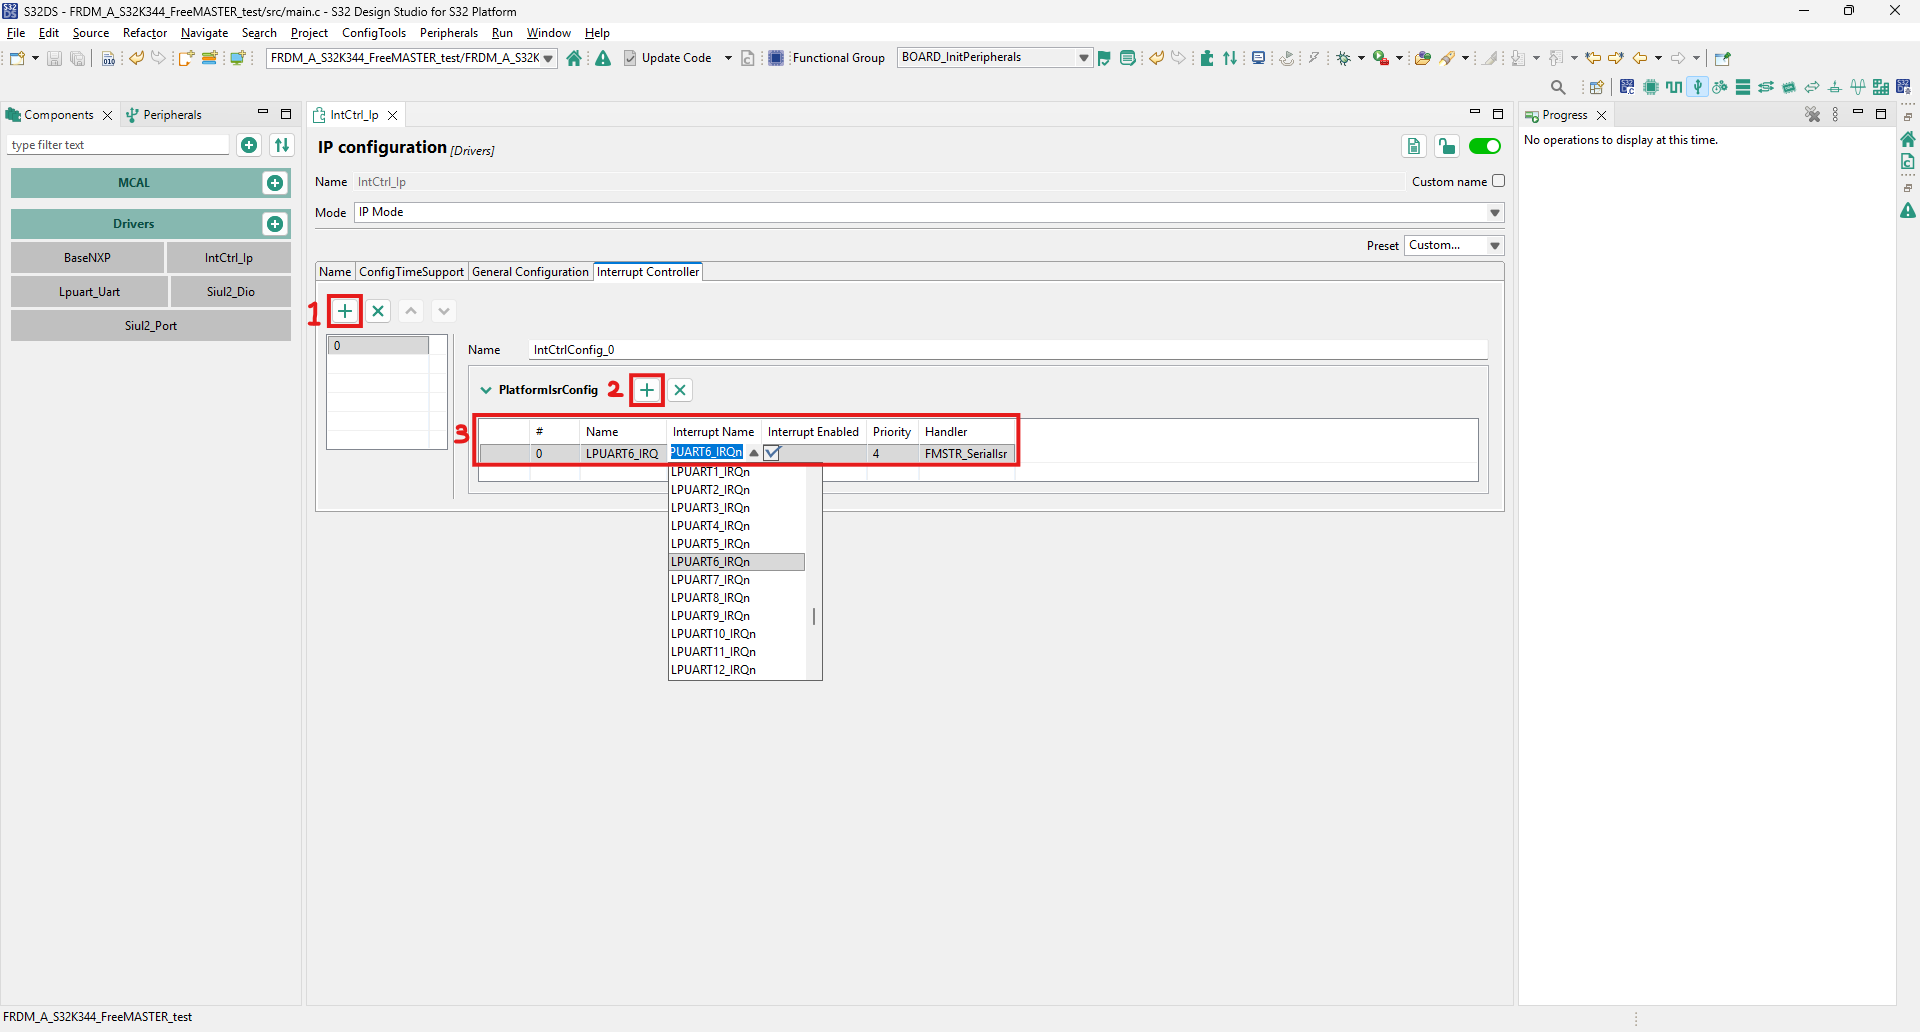
- Click on "Drivers plus icon (+)," then select the "IntCtrl_Ip" component and click "OK"
- Click on "Interrupt Controller plus" icon (+) then clock the "PlatformIsrConfig plus icon" (+) and complete
these fields:
- Type interruption name
- Select UART IRQ according to previous pins selection
- Enable interrupt checkbox
- Assign interruption priority level
- Define handler's name (it is highly recommended to type
FMSTR_SerialIsras the handler)
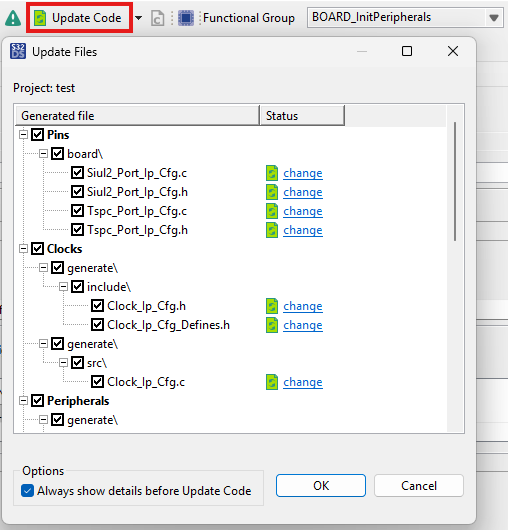
- Click "Update Code" then click "OK"
- Click on the "S32DS C/C++" icon to return to project view



3.3 Add FreeMASTER to Application
This step covers how to add FreeMASTER to the application. Follow the instructions below.
- Include FreeMASTER and FreeMASTER UART headers to the project as follows:
#include "freemaster.h"
#include "freemaster_s32_lpuart.h" - Initialize clocks, pins, UART and interruptions in the main function (if not added yet) as follows:
Clock_Ip_Init(&Clock_Ip_aClockConfig[0]);
OsIf_Init(NULL_PTR);
Siul2_Port_Ip_Init(NUM_OF_CONFIGURED_PINS_PortContainer_0_BOARD_InitPeripherals, g_pin_mux_InitConfigArr_PortContainer_0_BOARD_InitPeripherals);
Lpuart_Uart_Ip_Init(LPUART_UART_IP_INSTANCE_USING_6, &Lpuart_Uart_Ip_xHwConfigPB_6);
IntCtrl_Ip_Init(&IntCtrlConfig_0); - Initialize FreeMASTER serial communication after application initialization as follows:
FMSTR_SerialSetBaseAddress((FMSTR_ADDR)IP_LPUART_6_BASE);
FMSTR_Init(); - Add FreeMASTER polling function within the infinite loop in main as follows:
FMSTR_Poll(); - Open the
include_freemasterfolder and openfreemaster_cfg.hthen make the following changes:- Change
FMSTR_SHORT_INTRfrom 0 to 1 - Change
FMSTR_POLL_DRIVENfrom 1 to 0 // Select interrupt or poll-driven serial communication#define FMSTR_LONG_INTR 0 // Complete message processing in interrupt#define FMSTR_SHORT_INTR 1 // Queuing done in interrupt#define FMSTR_POLL_DRIVEN 0 // No interrupt needed, polling only
- Change
- Build and flash the application to ensure there are no compilation errors and the application launches successfully with no hard faults (For assistance, refer to the FreeMASTER community)
- FreeMASTER will now ready to be used for the project
You will continue to develop the application in S32DS as outlined in the next section
3.4 Add and Monitor Variables in FreeMASTER
This section details how to manage FreeMASTER variables.
- Start FreeMASTER after the application is running on the board
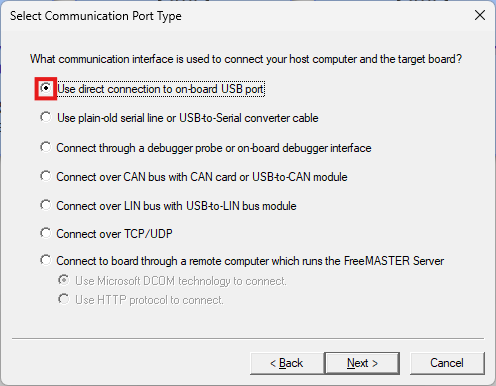
- Click on "Tools>Connection Wizard", then select "User direct connection to on-board USB port" and click "Next"
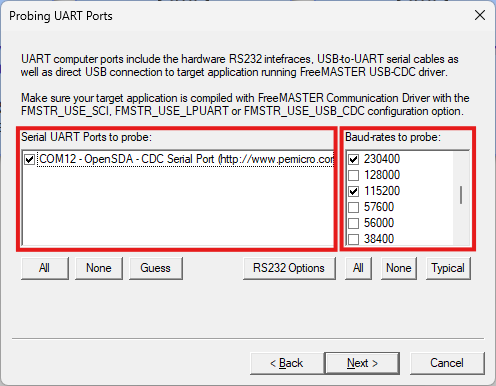
- Select "Serial USB Ports" and "Baud-rates" to be probed, then click "Next"
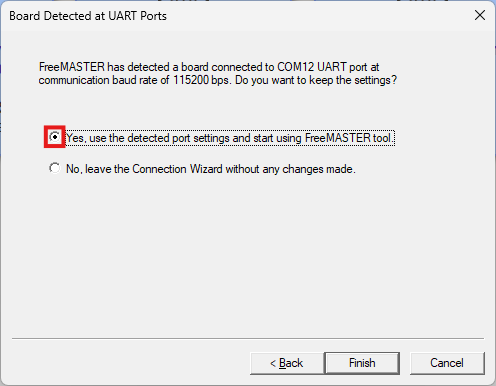
- If the board is powered and running, the Connection Wizard will automatically detect board and baud rate
used in the application
- Select "Yes, use the detected port settings and start using FreeMASTER tool" and click "Finish"
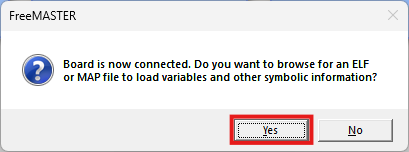
- Next, click "Yes" to accept FreeMASTER loading variables via .elf or .map file
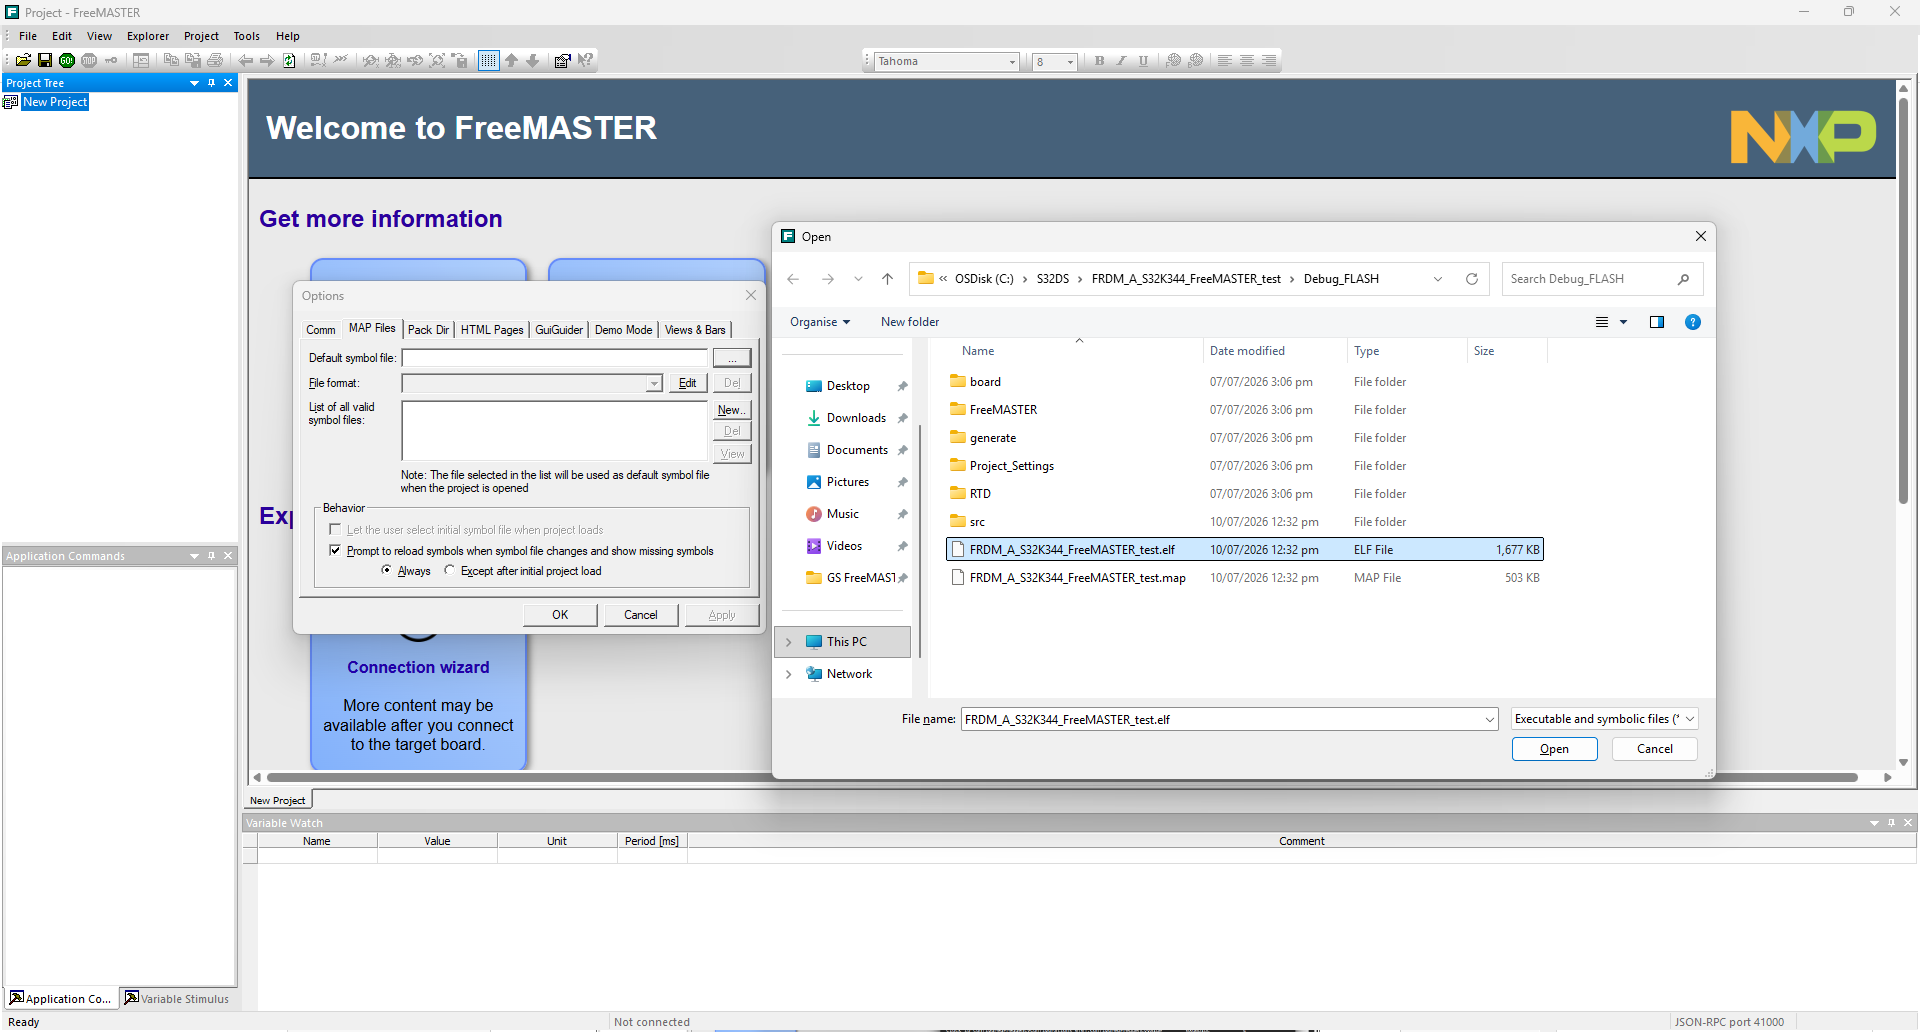
- Click on three dots (…), locate the same S32DS project folder as the application running and proceed as
follows:
- Open
Debug_FLASHfolder - click on
.elfor.mapfiles - Click "Open"
- Open
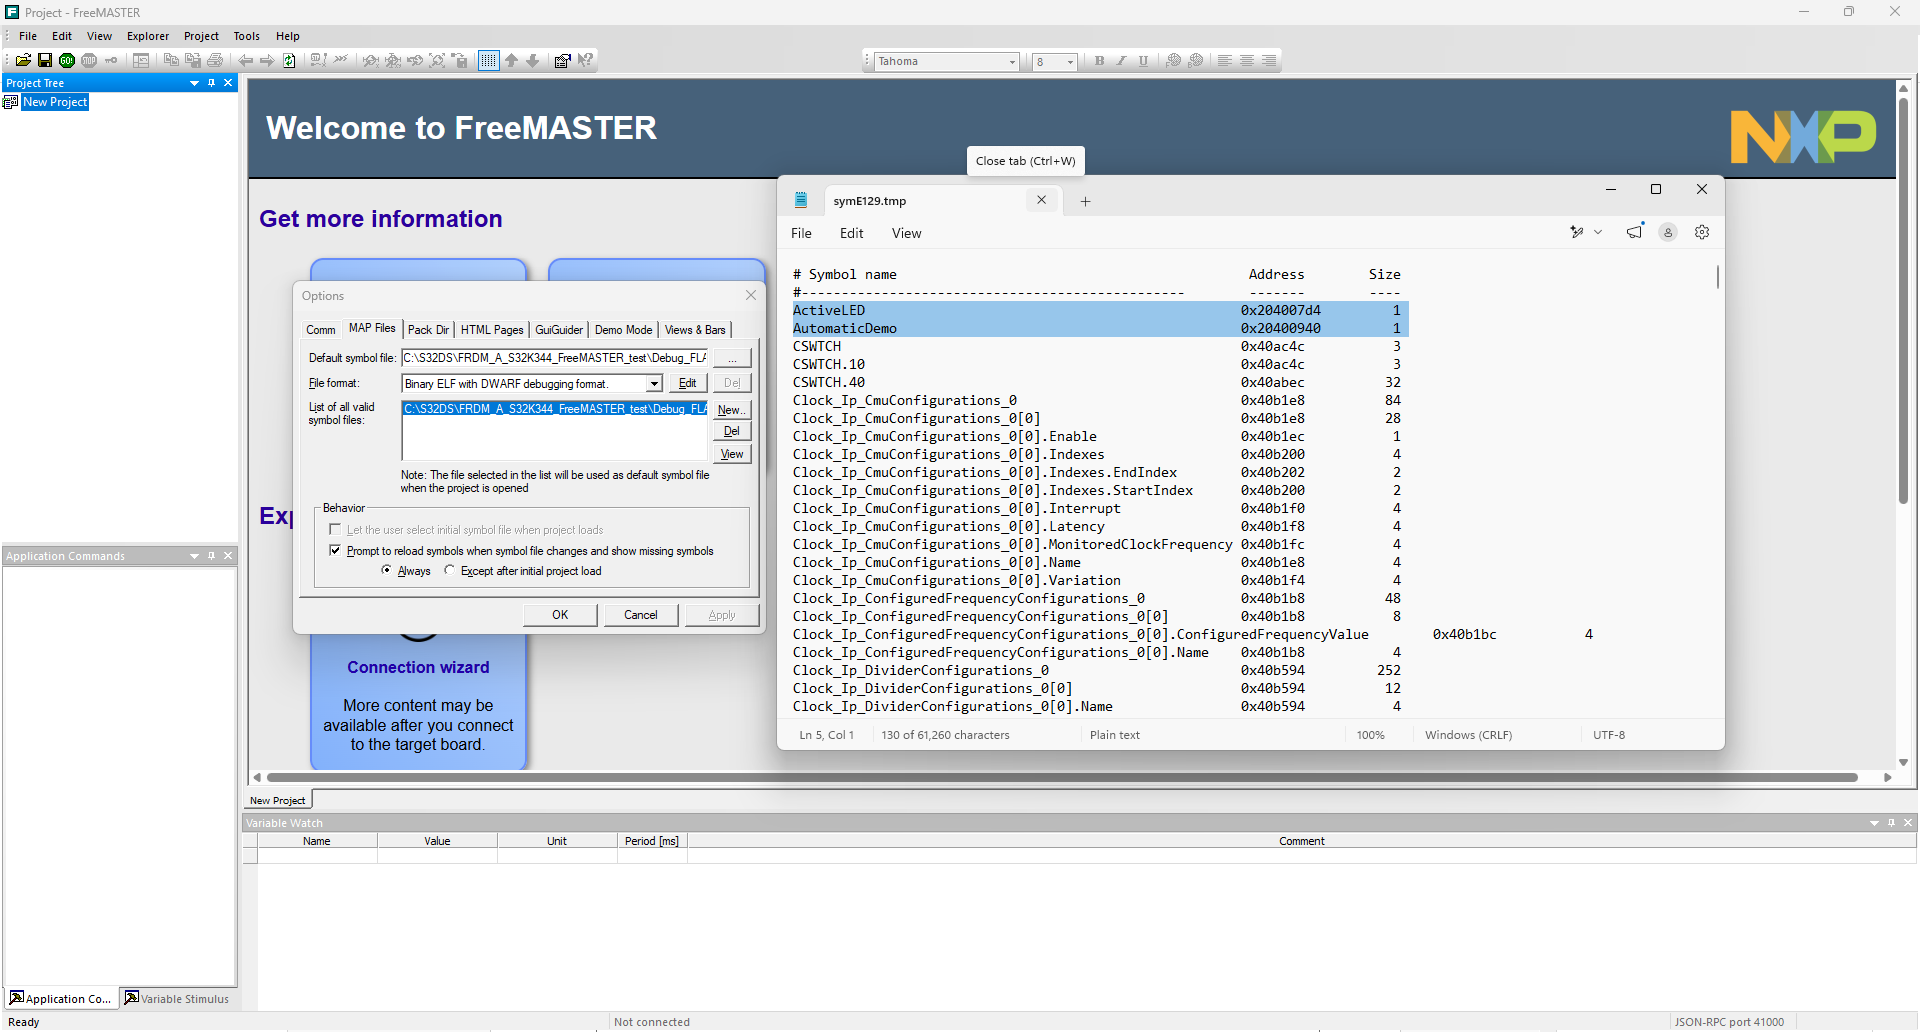
- Click "View" to verify which variables are available within the application then click "OK"
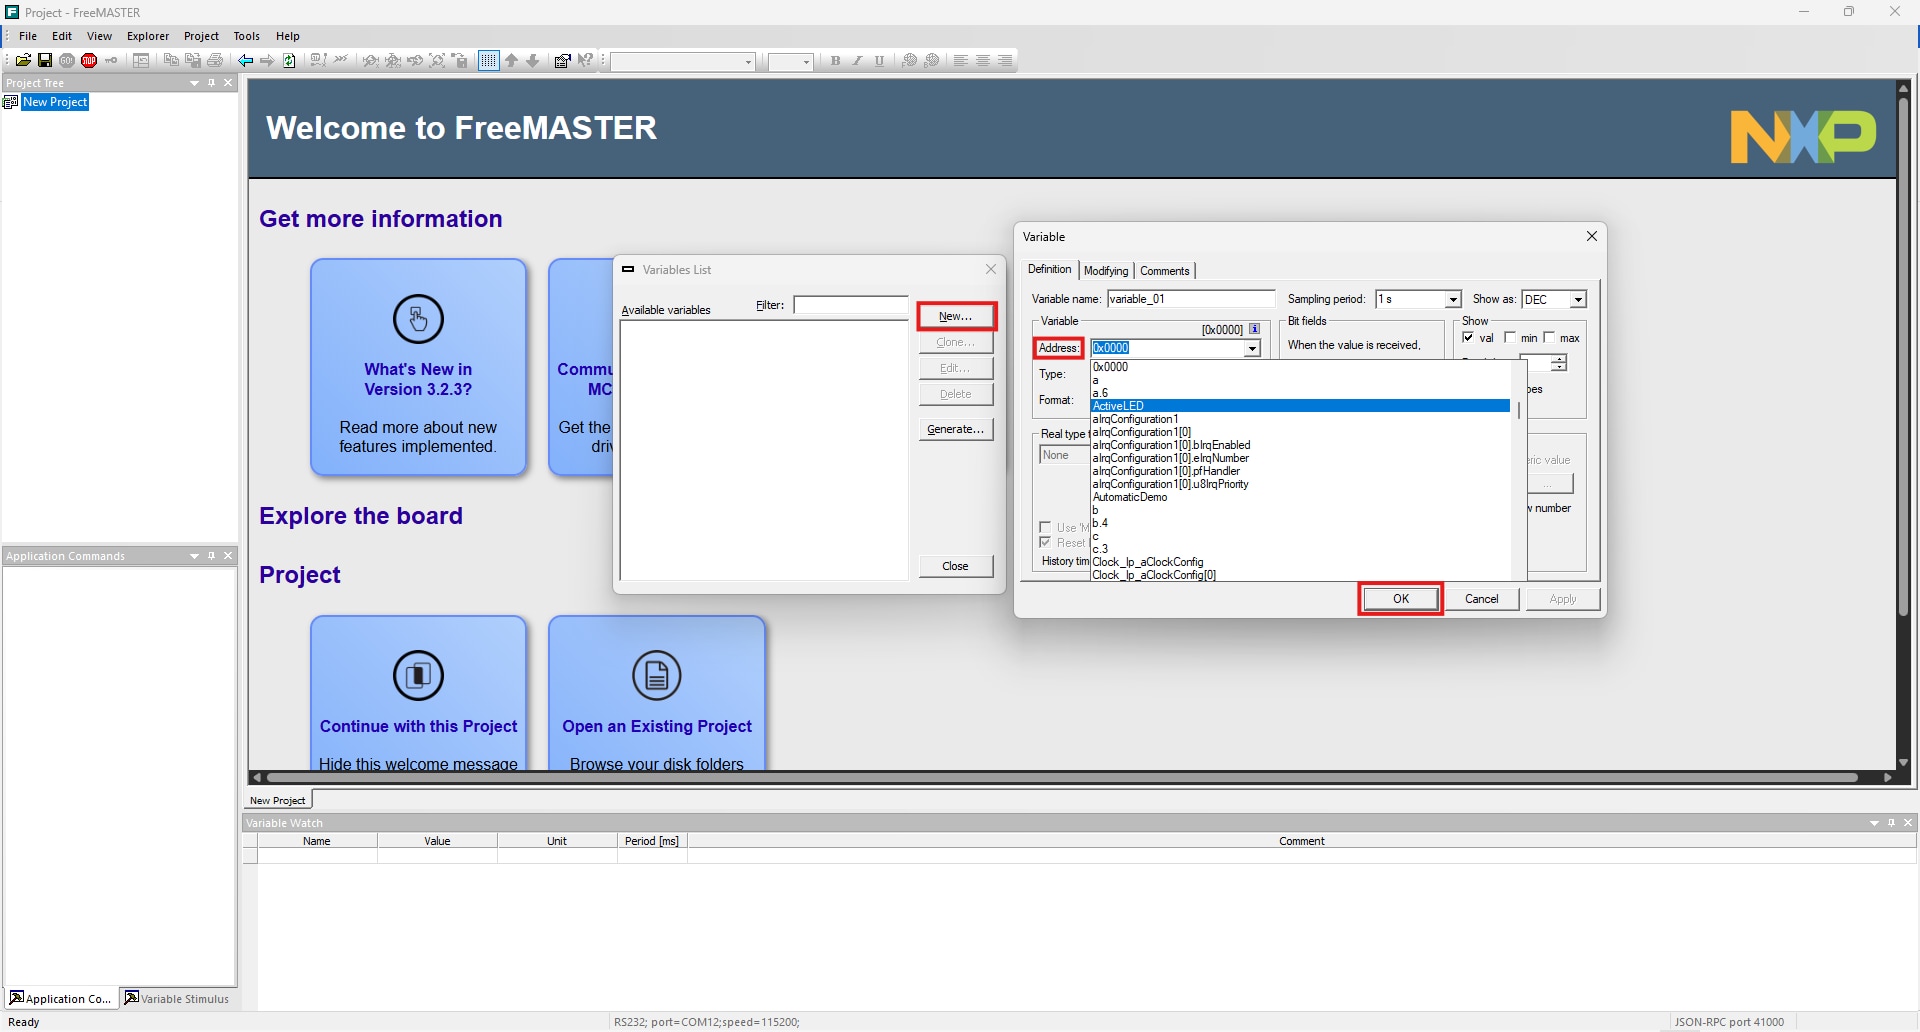
- Click "Project" in the ribbon then click "Variables" to add the variables to monitor
- Click on "New…" and search for the address of the variable of interest then click "OK," then proceed as
follows:
- Repeat this step until you have all the variables desired
- Once finished adding variables, click "Close" in the "Variables List" window
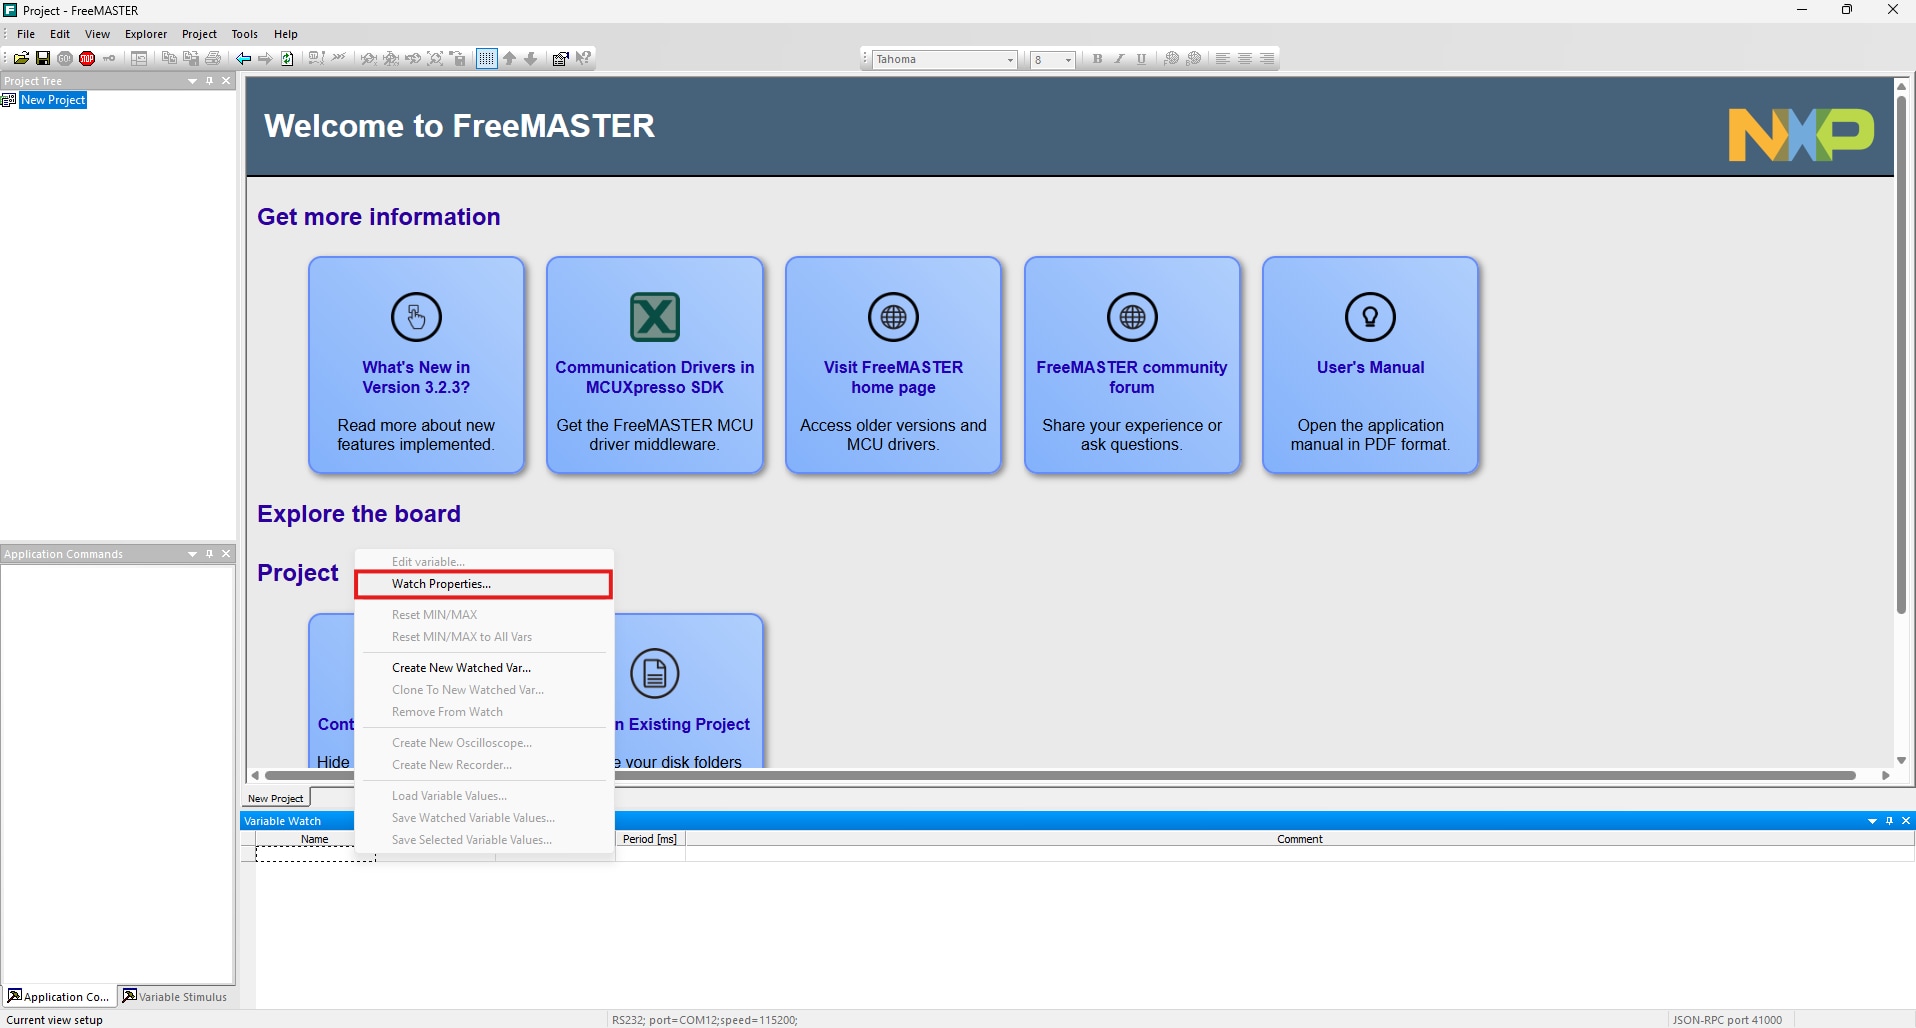
- Right-click in "Variable Watch" space and click "Watch Properties…."
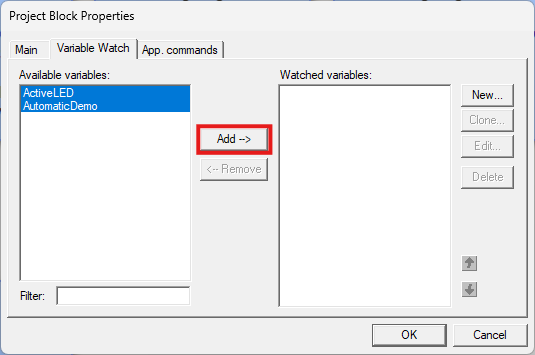
- Select the available variables and click "Add ->" (as shown below) then click OK once finished
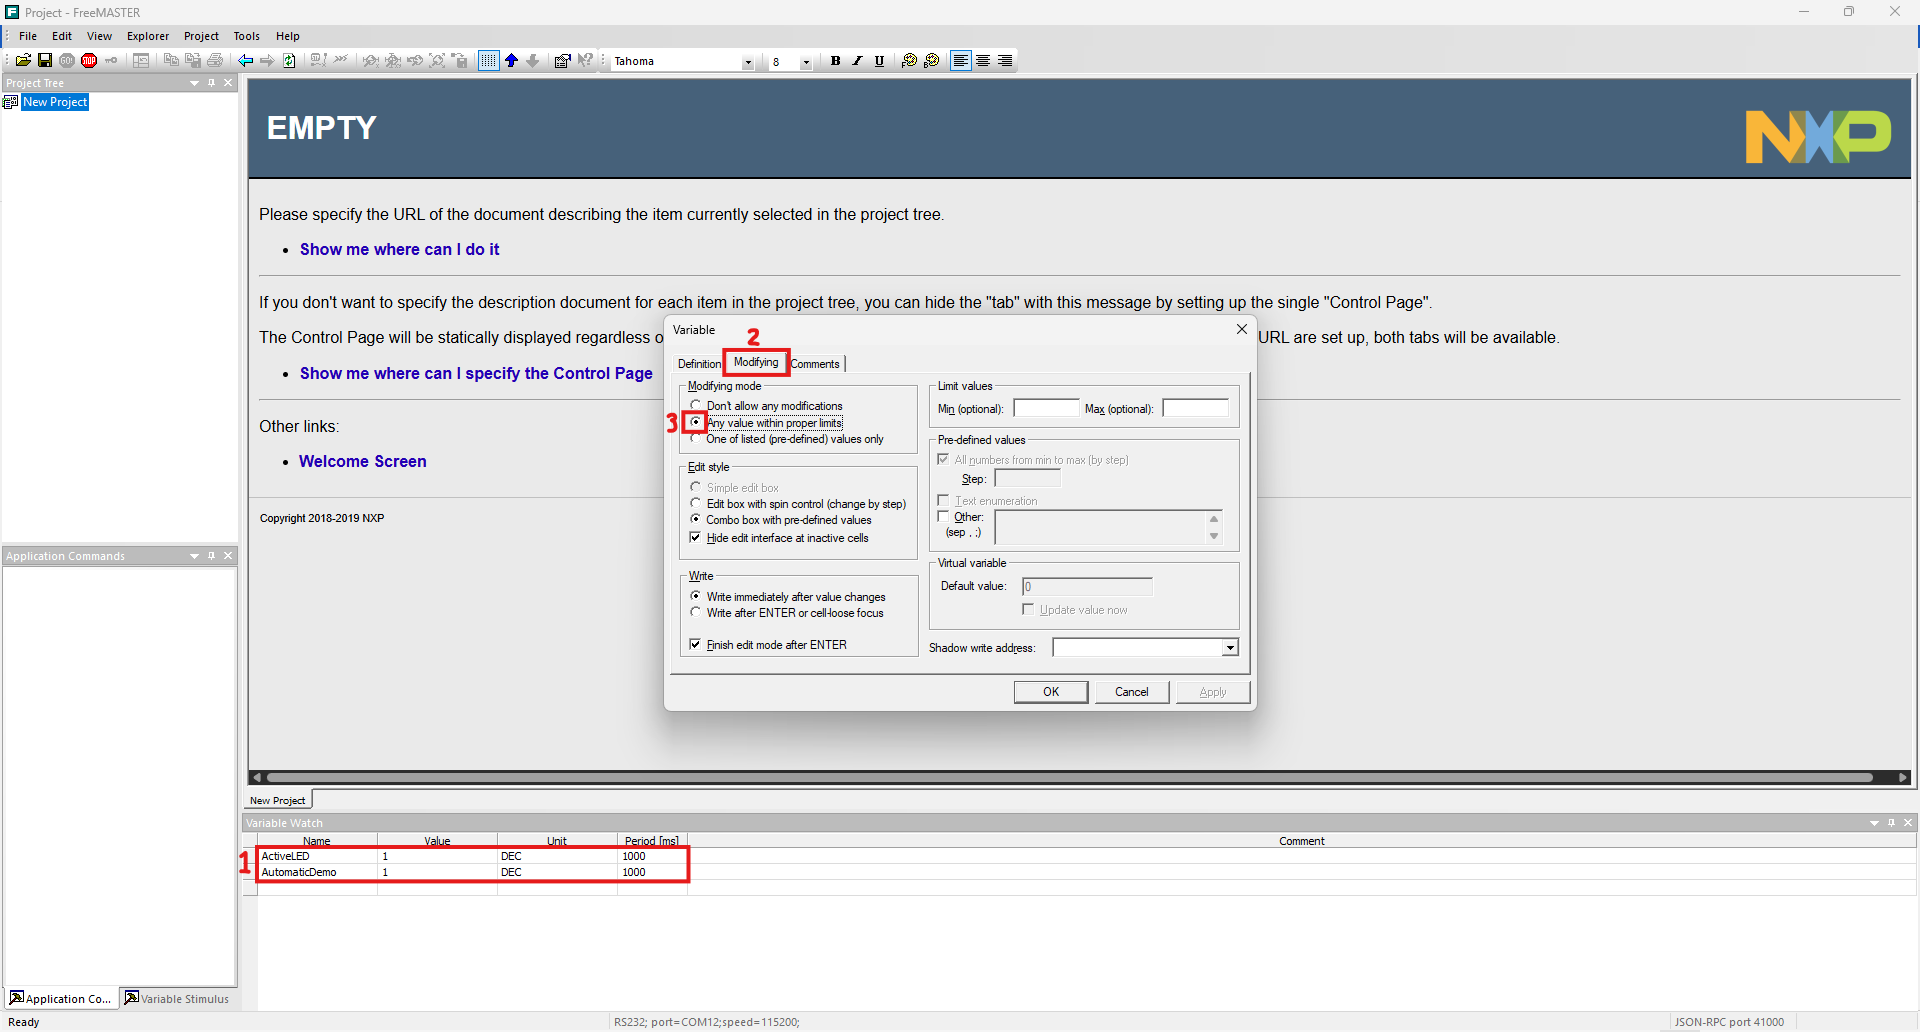
- Selected variables will now be available in the "Variable Watch" space
- To modify variable value, double-click on the desired variable, go to the "Modifying" tab and select the "Any value within proper limits" option
- Optionally, you may define limit values and steps
- Click the "GO!" icon to start visualizing and modifying variables in real time (configuration can be saved as a project in application folder to access it later)
To learn more about intermediate and advanced FreeMASTER features go to FreeMASTER Community.
4. Developer Experience
4.1 Developer Experience
This page covers the fundamentals of getting started with FreeMASTER, but there is much more to explore. To further expand your knowledge, discover advanced use cases and learn from real-world applications, visit the FreeMASTER Community. There, you can access technical discussions, ask questions, share experiences, find examples and best practices and connect directly with other developers and NXP experts.
Whether you are building automotive, industrial, or general embedded solutions, the FreeMASTER Community is a valuable resource for enhancing your development workflow and getting the most from FreeMASTER.
Join the FreeMASTER Community.
Design Resources
Additional References
Trainings
- What's New In FreeMASTER?
- FreeMASTER Lite 1.1 + Node-RED Integration
- Tips for Enhancing Embedded Applications with MBDT and FreeMASTER
- NXP Software and Tools Solutions for Motor Control Applications in Automotive
- MCAT 2.0 Next-Generation Motor Control Tuning
- Motor Control Application Tuning (MCAT) Tool – PMSM Servo Tuning
- How To Use the Automotive Software Package Manager