Getting Started with S32E288-975EVB
Contents of this document
-
Out of the Box
-
Get Software
-
Build, Run
Sign in to save your progress. Don't have an account? Create one.
Purchase your S32E288-975EVB Evaluation Board
1. Out of the Box
NXP S32E288-975EVB evaluation board 12 V power supply with universal adapters Board standoffs
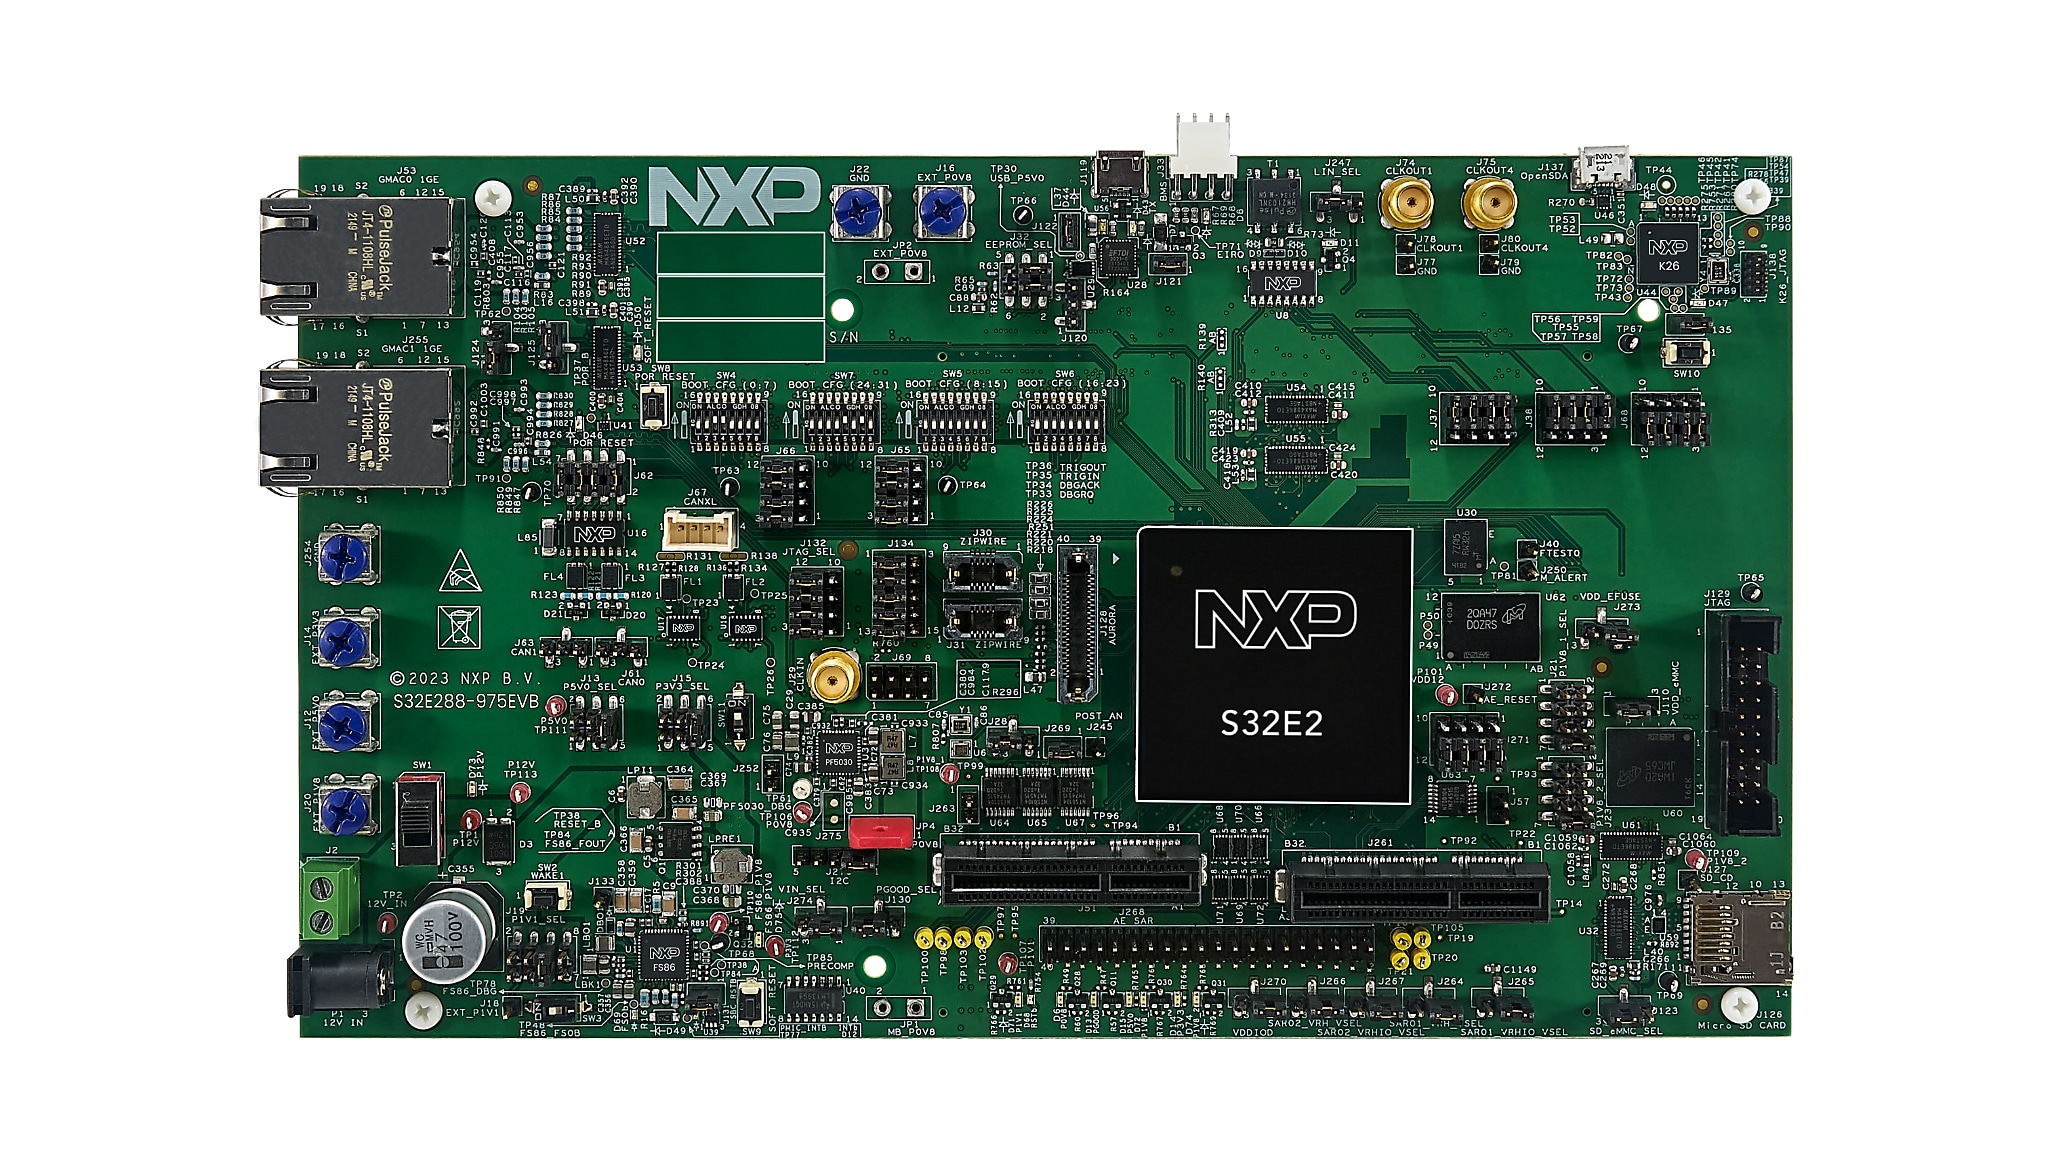
1.1 Get to Know the Hardware
The S32E288-975EVB provides a platform for evaluation and development of S32E2 high-performance real-time automotive processors, facilitating hardware and software development and providing robust debug capabilities. NXP provides Real Time Drivers (RTD) to be installed on top of the S32 Design Studio IDE, which the RTD consists of example software applications for various features and peripherals of the EVB.
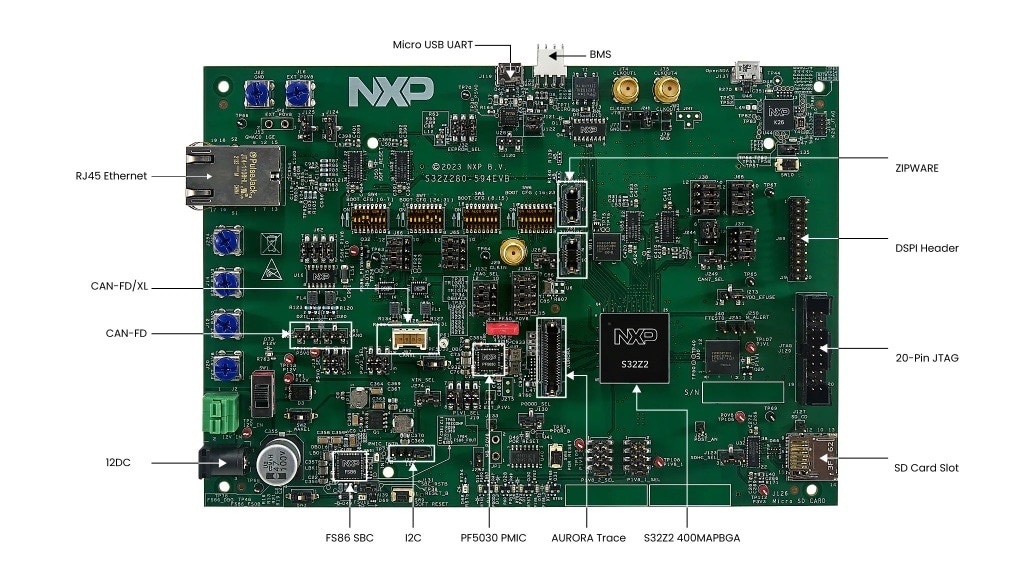

1.3 Board Features
- USB to UART interface
- 2 x RCON Controller for custom boot settings
- 1 Kb EEPROM
- JTAG debug connector
- Quad flash
- 1 x 5 Mbit/S CAN-FD and 2 x 8 Mbit/S CAN-FD interfaces
- 1 x Micro-SD card socket
- 512 Mb + 64 Mb flash
- LPDDR4 flash
- BMS, Aurora Trace, Zipwire connectors
- Automotive ethernet and LIN
- 2 x Motor Controll Connectors
- User LEDs
- Option to connect to the S32X-MB motherboard to extend I/O capabilities
1.4 Software Preparation
- S32 Design Studio IDE
- S32ZE Real Time Drivers Version 2.x.x
- FTDI VCP driver (required if the user wants to use UART interface)
2. Get Software
2.1 Download S32 Design Studio
Download and install the S32 Design Studio for S32 Platform.
Download S32 Design Studio IDE
2.2 Install the Real Time Drivers (RTD)
Download the S32ZE Real Time Drivers Version 2.x.x updatesite.zip. Open the S32 Design Studio. Go to Help →S32DS Extensions and Updates →Add Update Sites, and choose the downloaded updatesite.zip.
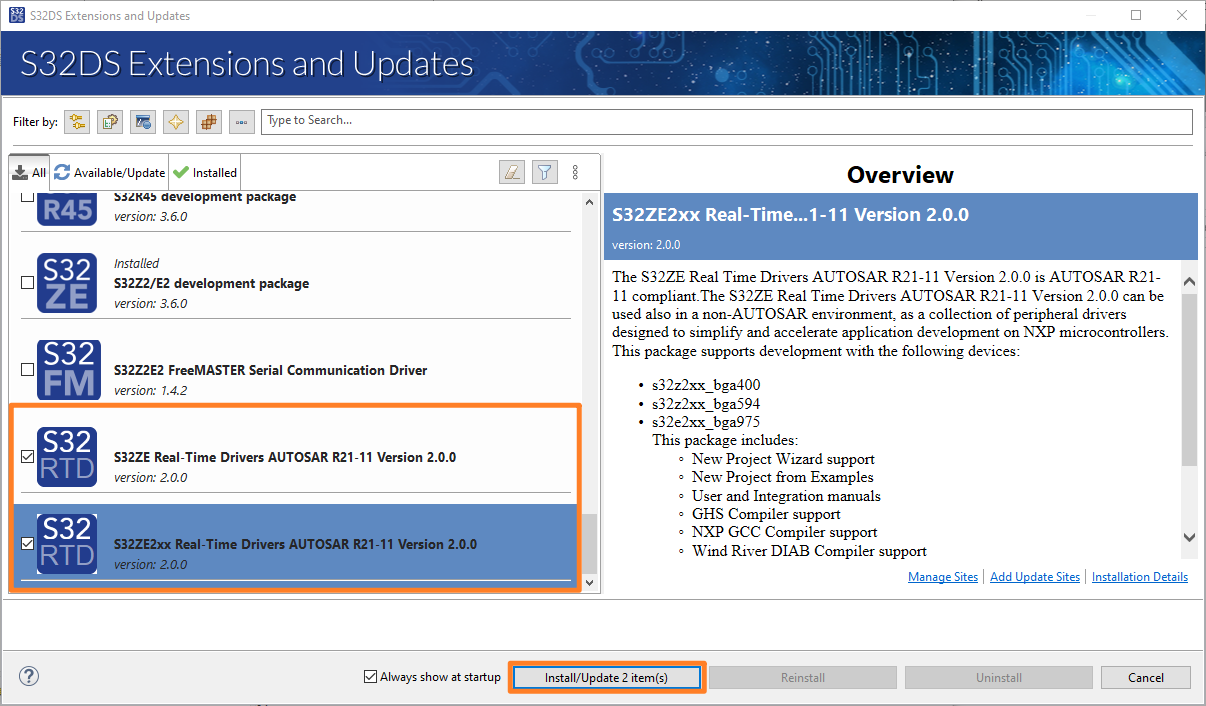
Find and select the two S32ZE Real-Time Drivers options from the list on the S32DS Extensions and Updates window, and click Install/Update.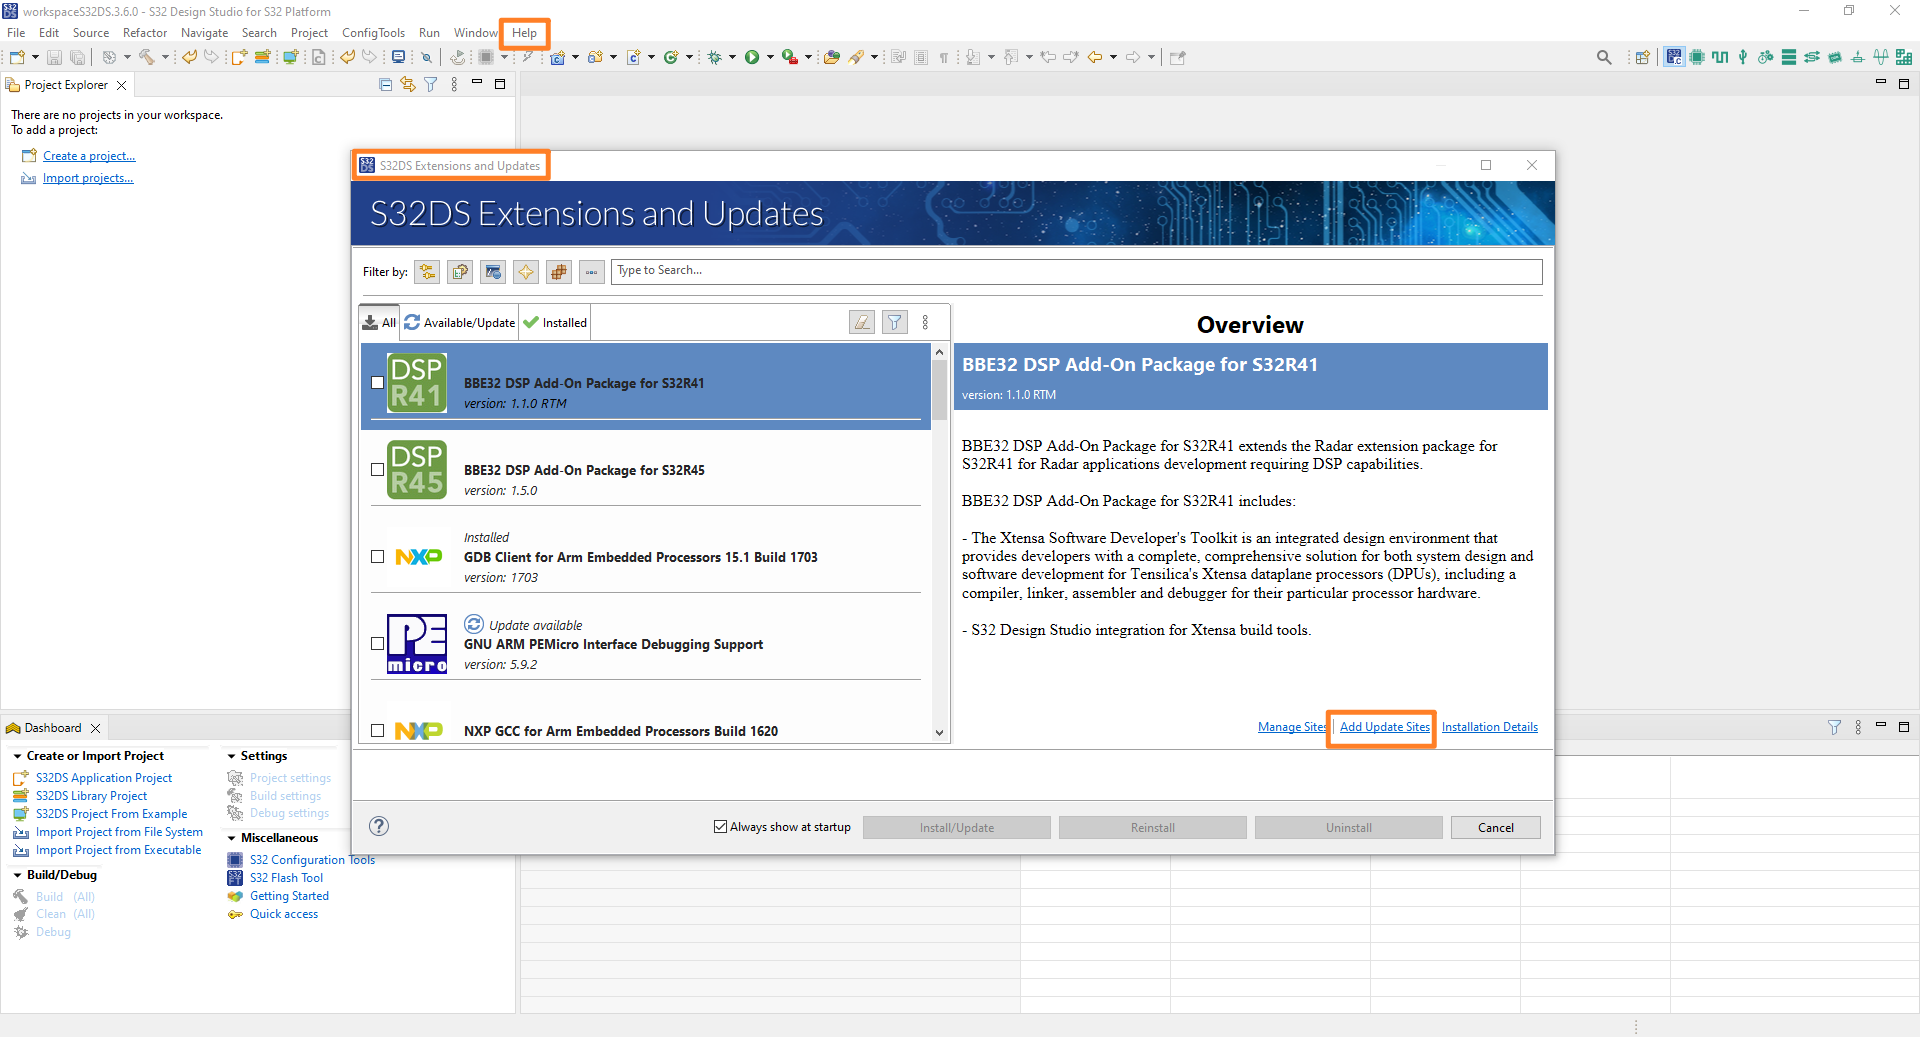
3. Build, Run
3.1 Running an Example Application
- Open the S32 Design Studio 3.6.x or above
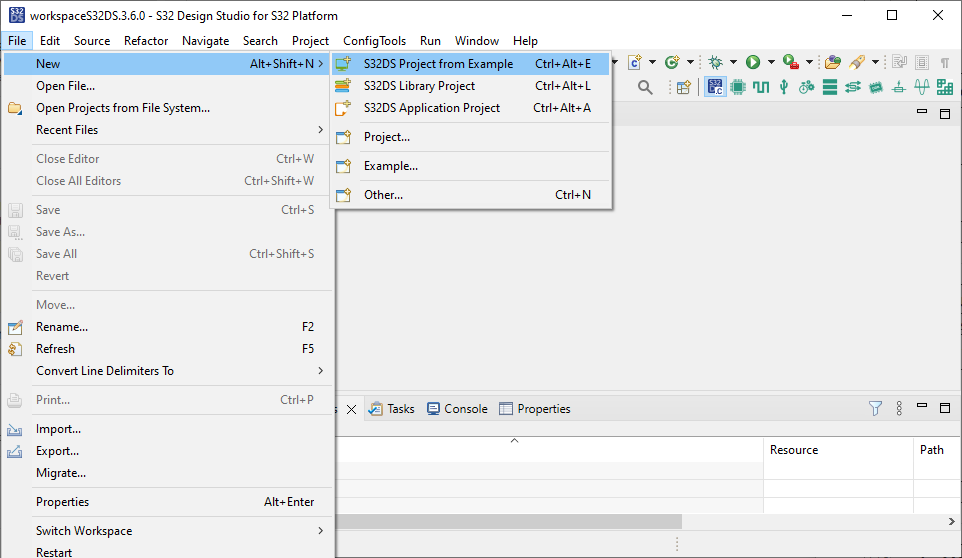
- Go to File → New → S32DS Project from Example
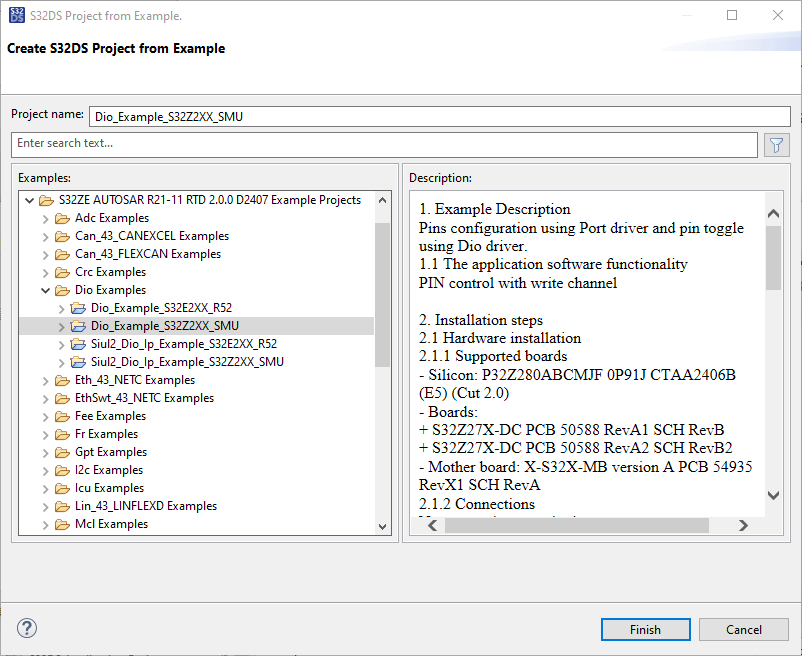
- Select from Dio Examples the
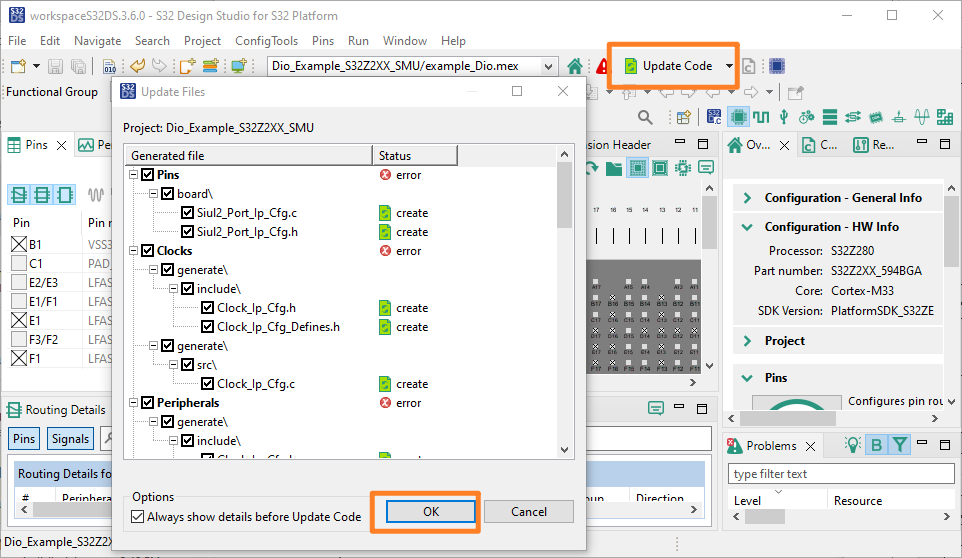
"Dio_Example_S32E2XX_R52" - Double click the
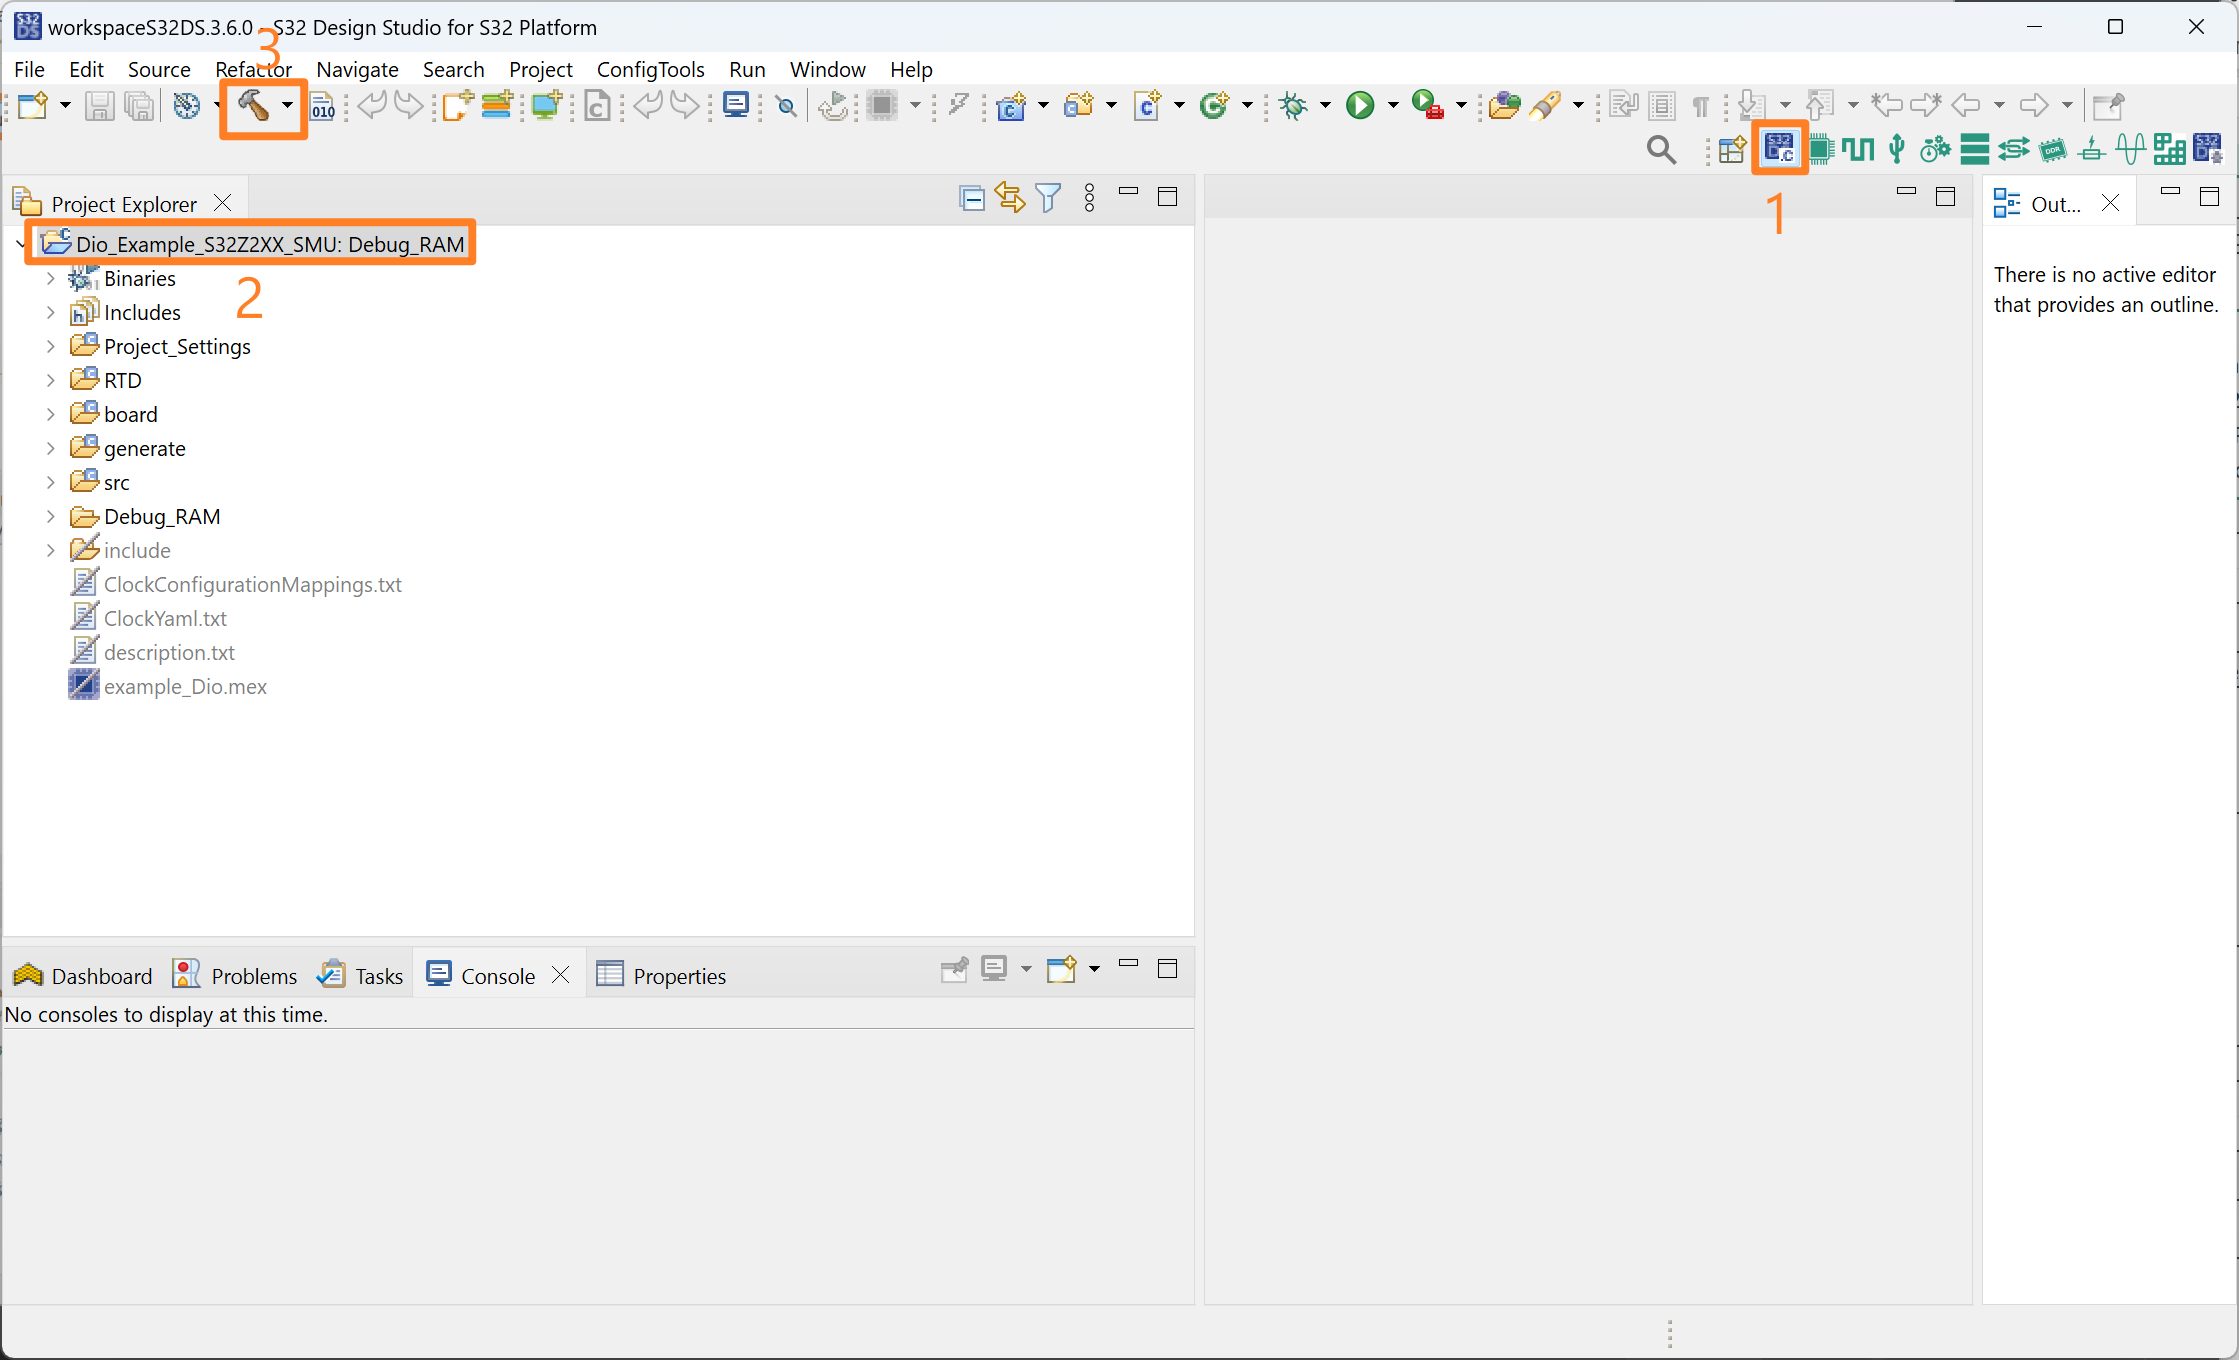
example_Dio.mexfile from the Project Explorer, click Update Code → OK - Click on the S32DS C/C++ icon, select the project and click the Build icon
- Connect the EVB to the 12V power supply. Connect the S32 Debug Probe to the PC via USB, and connect the JTAG cable between the EVB and the S32 Debug Probe. Turn on the EVB using
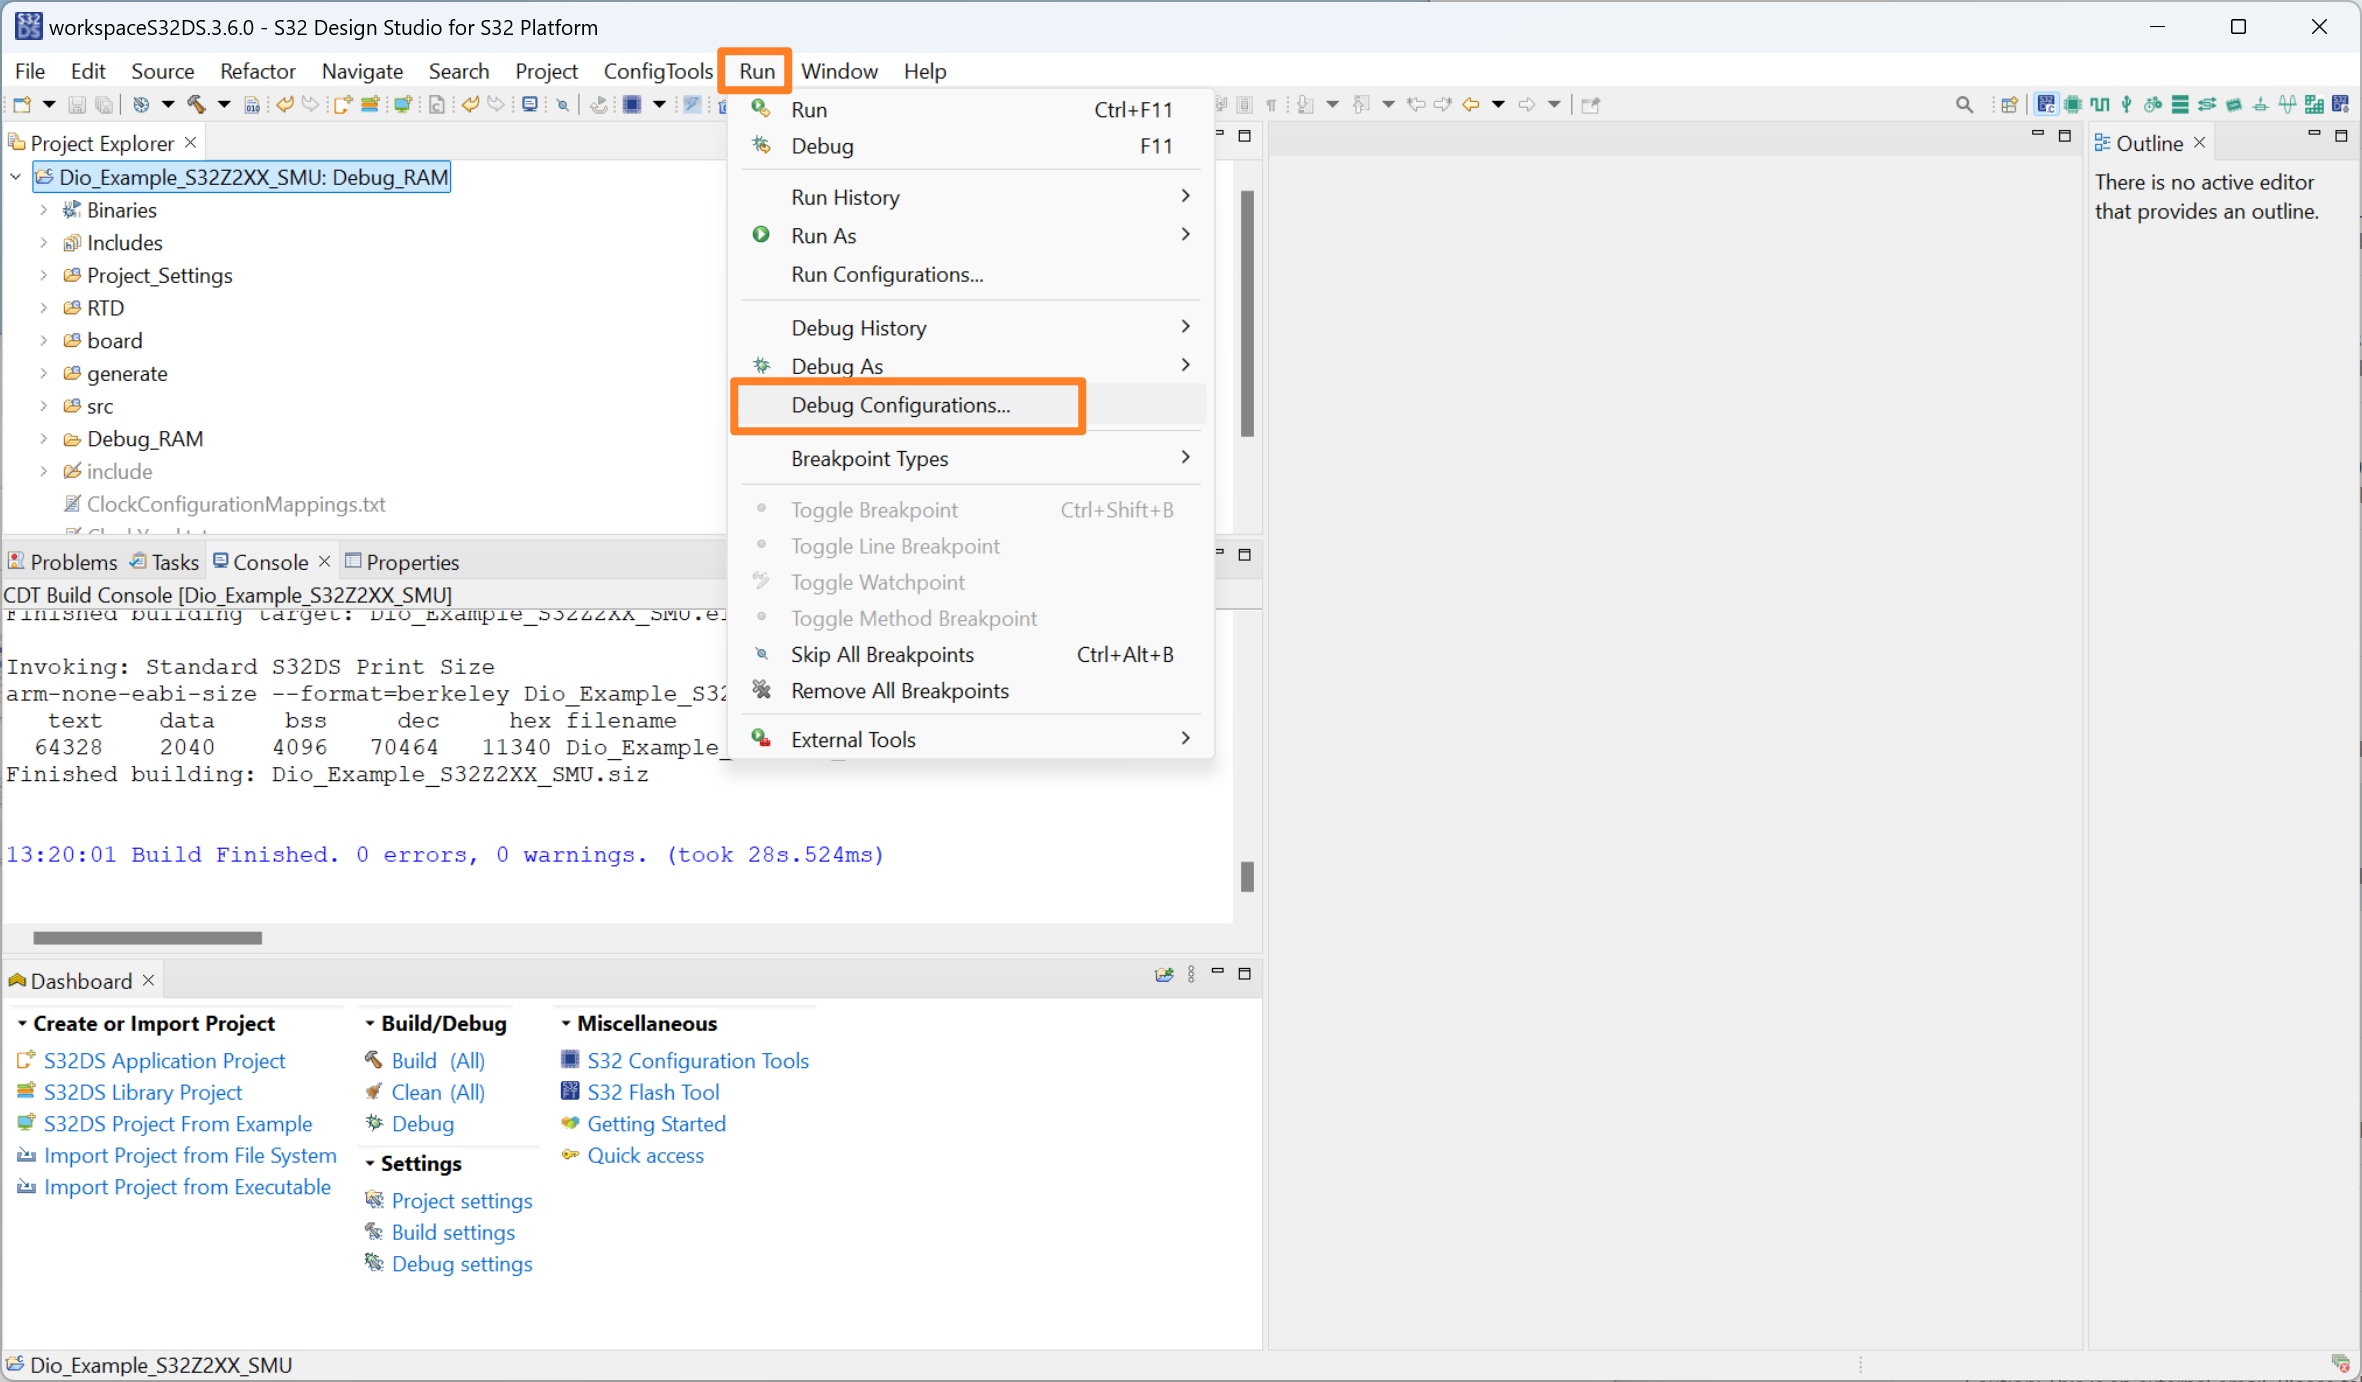
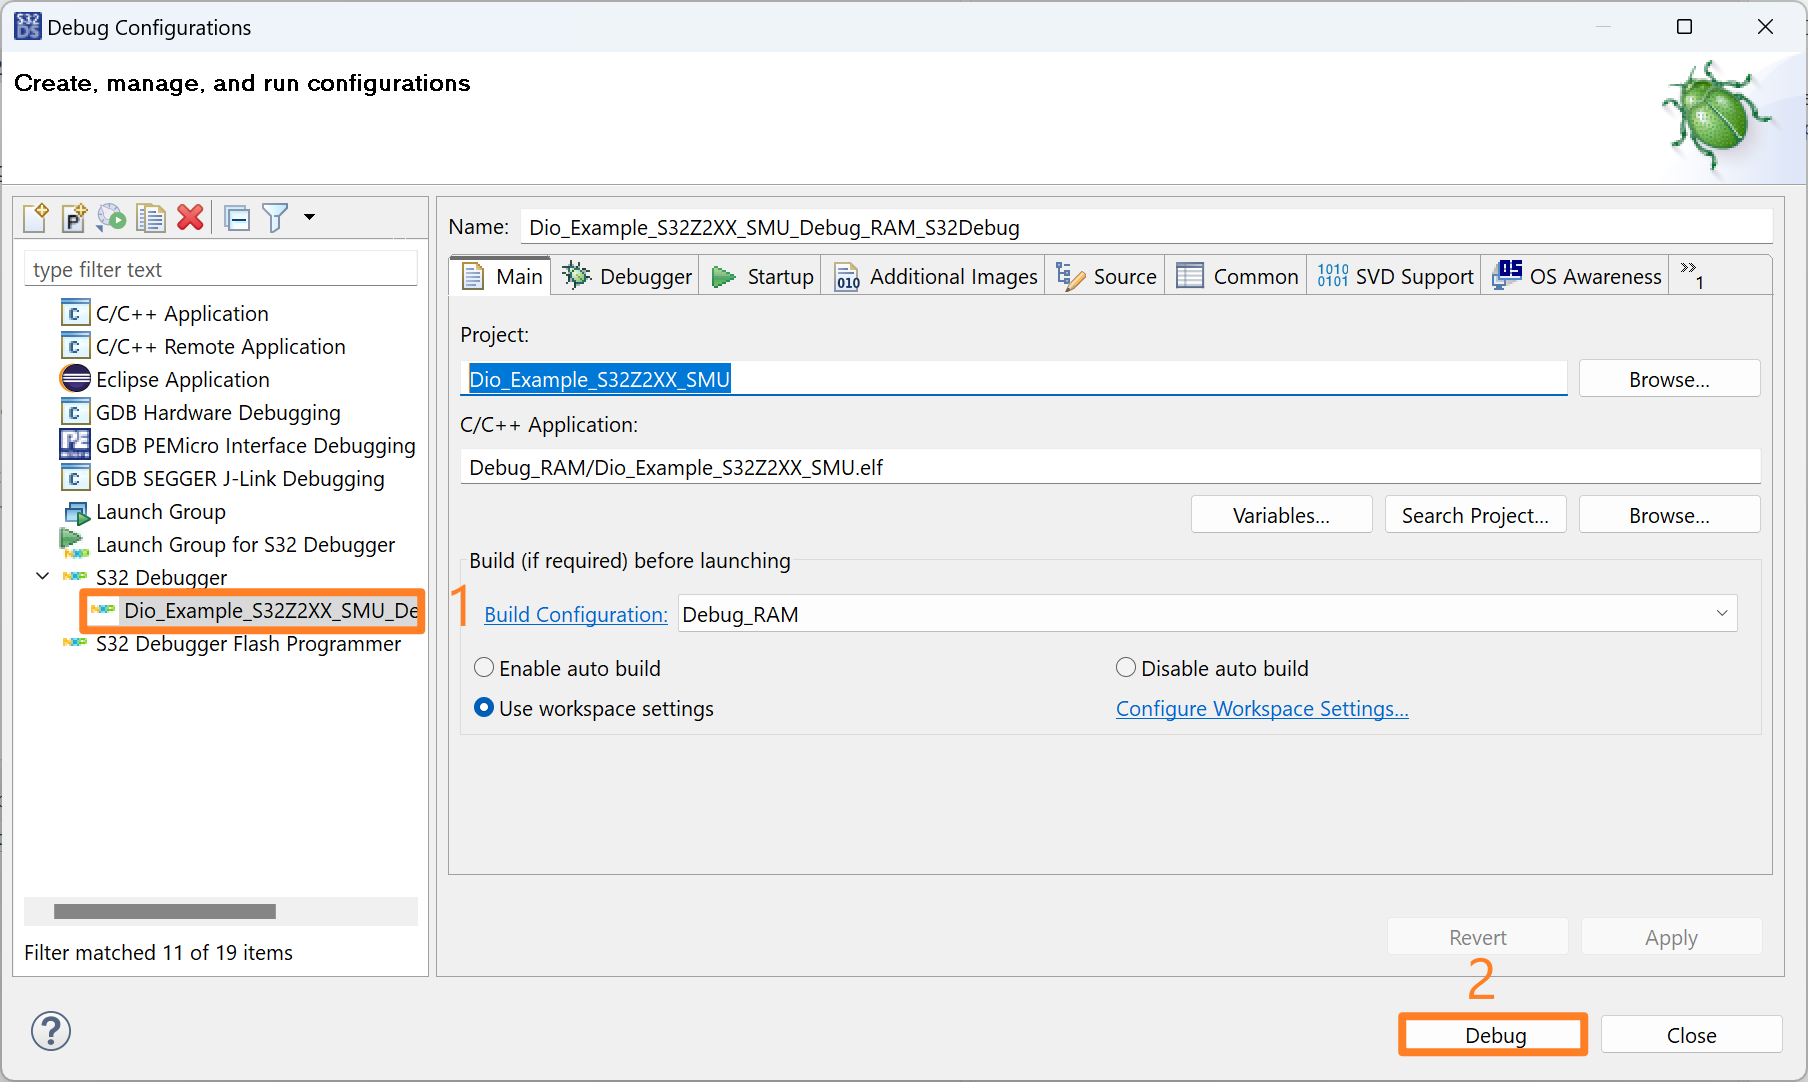
SW1 - Click on the Run → Debug Configurations
- Choose the
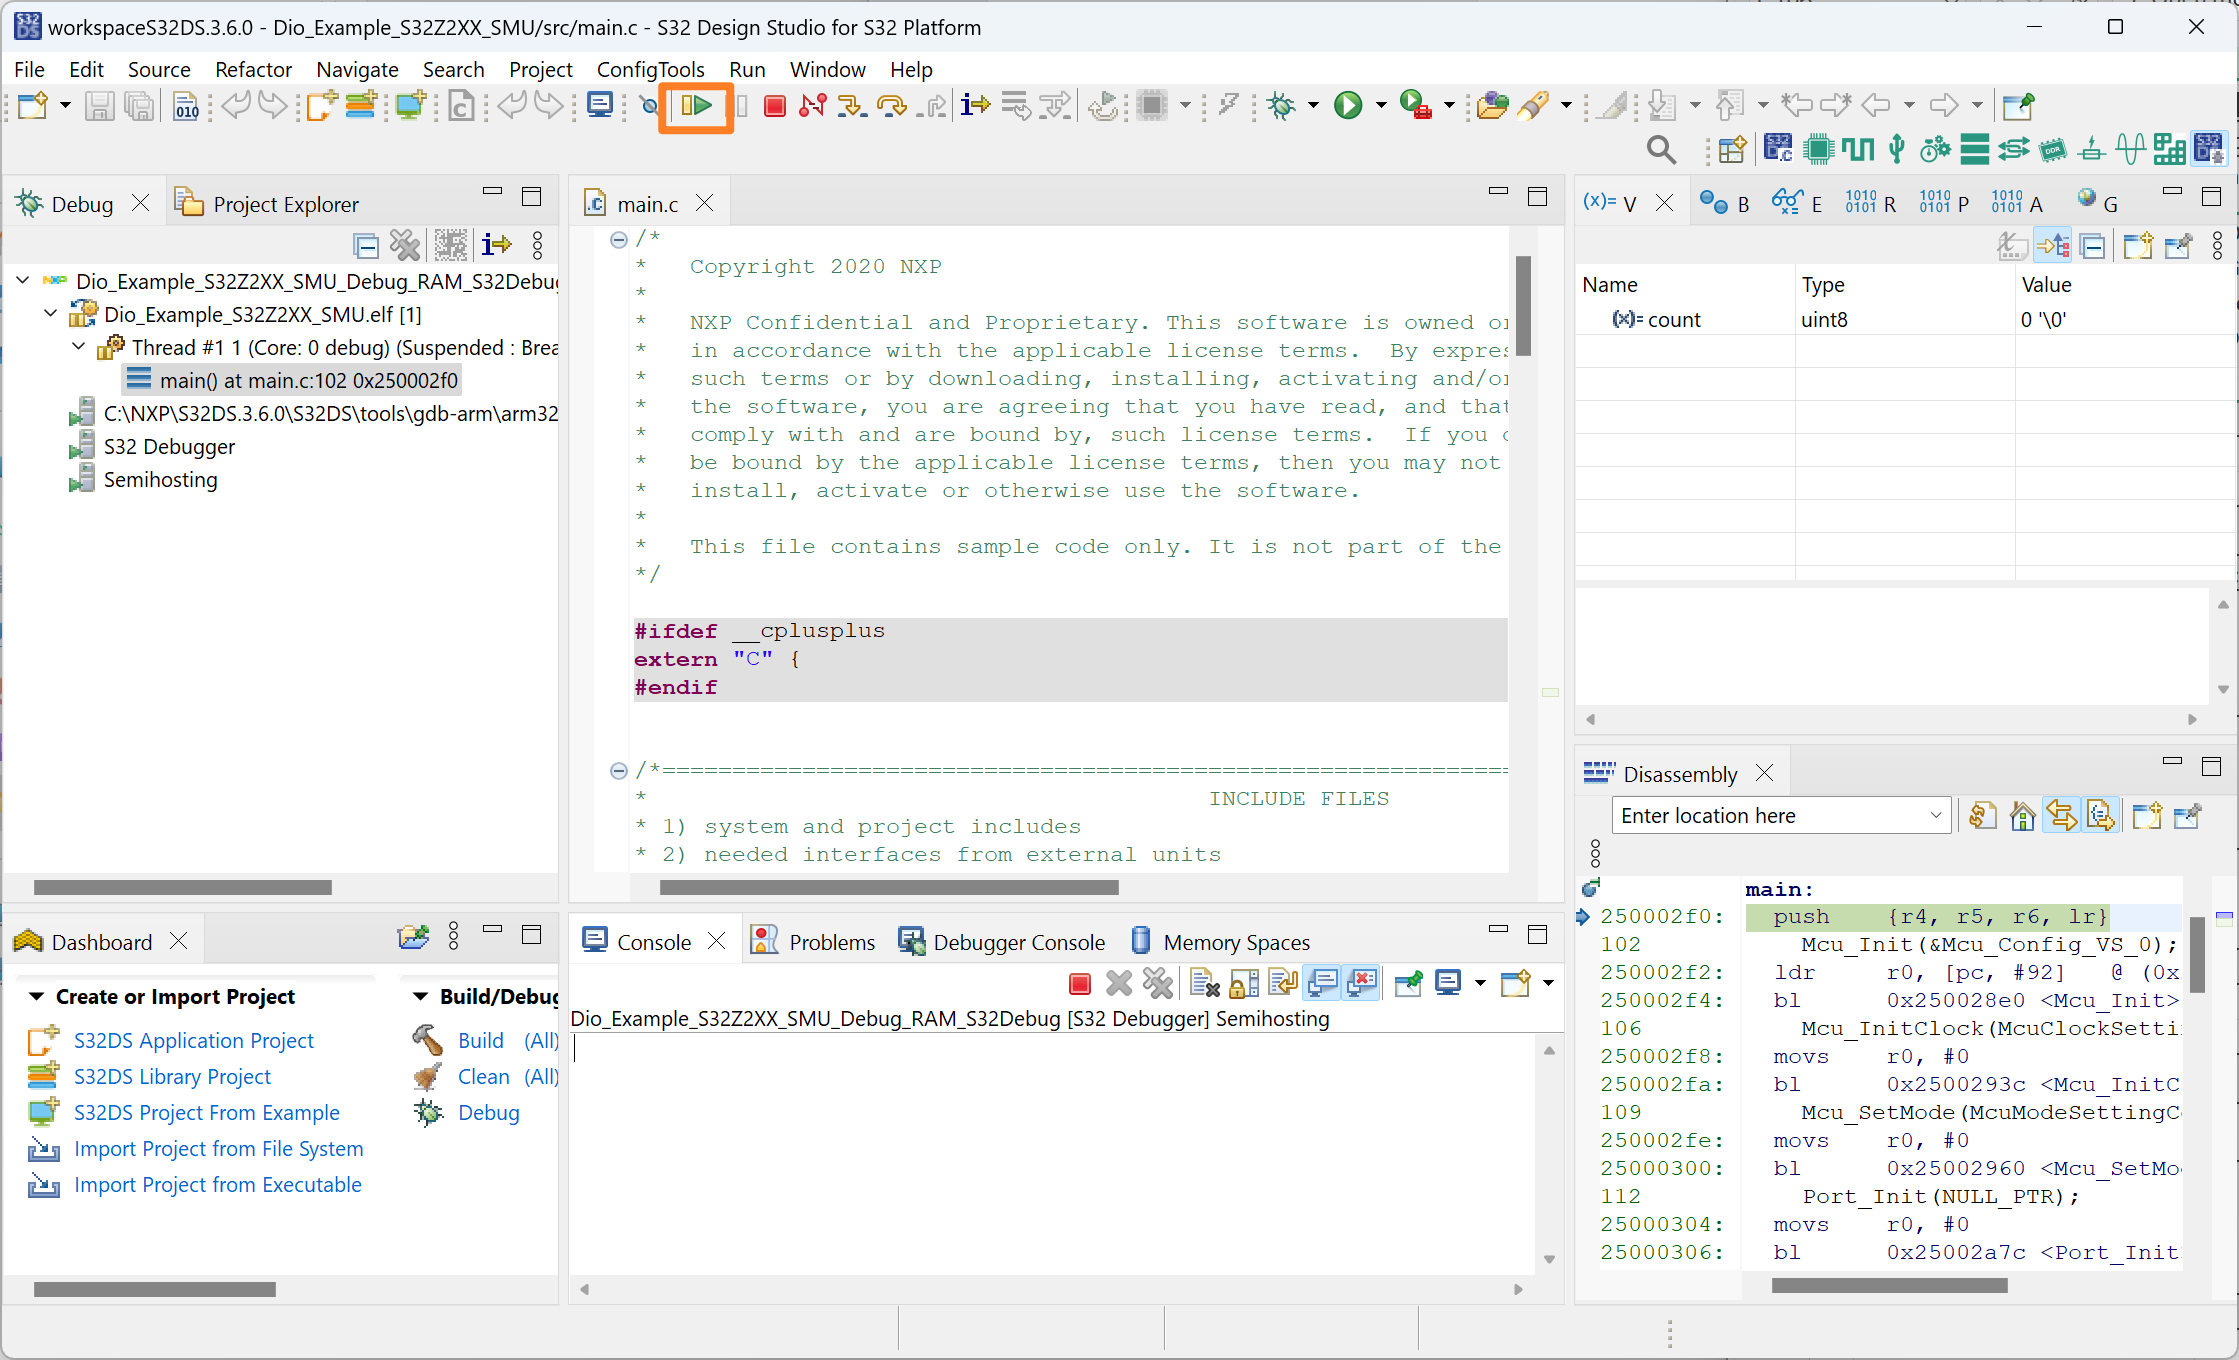
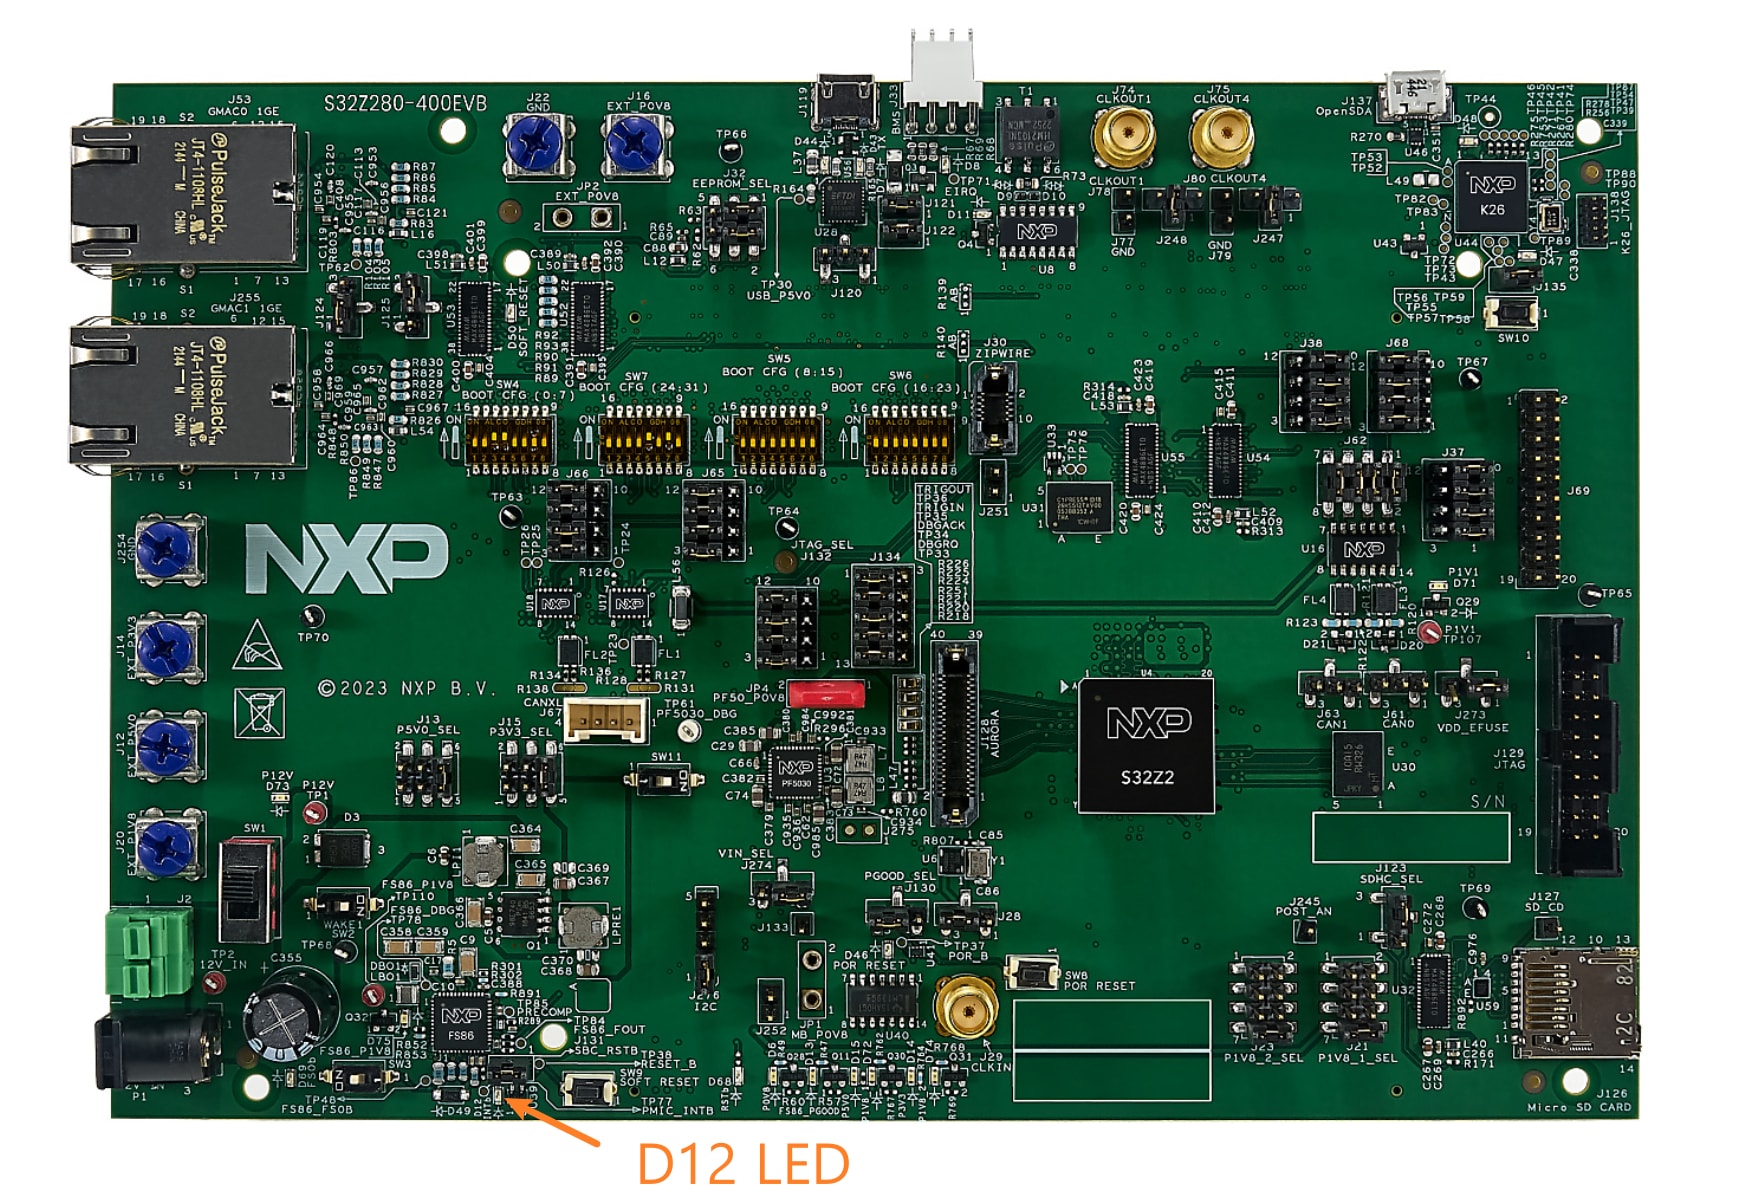
Dio_Example_S32E2XX_R52project and click Debug - Resume the code and watch
D12on the EVB to start blinking. By default themain.cis configured to letD12blink for 10 times
RTD Examples
Kickstart your RTD journey with these handy examples. We've rounded up some of the most common use cases to get you inspired and moving forward.
Users can copy the path directly into their window once the RTD is downloaded.
RTD Examples
ADC
C:\NXP\S32DS.3.6.1\S32DS\software\PlatformSDK_S32ZE\RTD\Adc_TS_T31D53M20I1R0\examples\S32DS\Adc_example_S32E2XX_R52ADC SAR CTU IP
C:\NXP\S32DS.3.6.1\S32DS\software\PlatformSDK_S32ZE\RTD\Adc_TS_T31D53M20I1R0\examples\S32DS\Adc_Sar_Ctu_Ip_example_S32E2XX_R52DIO
C:\NXP\S32DS.3.6.1\S32DS\software\PlatformSDK_S32ZE\RTD\Dio_TS_T31D53M20I1R0\examples\S32DS\Dio_Example_S32E2XX_R52SIUL2 DIO IP
C:\NXP\S32DS.3.6.1\S32DS\software\PlatformSDK_S32ZE\RTD\Dio_TS_T31D53M20I1R0\examples\S32DS\Siul2_Dio_Ip_Example_S32E2XX_R52FEE
C:\NXP\S32DS.3.6.1\S32DS\software\PlatformSDK_S32ZE\RTD\Fee_TS_T31D53M20I1R0\examples\S32DS\Fee_Example_S32E2XX_R52GPT
C:\NXP\S32DS.3.6.1\S32DS\software\PlatformSDK_S32ZE\RTD\Gpt_TS_T31D53M20I1R0\examples\S32DS\Gpt_example_S32E2XX_R52STM IP
C:\NXP\S32DS.3.6.1\S32DS\software\PlatformSDK_S32ZE\RTD\Gpt_TS_T31D53M20I1R0\examples\S32DS\Stm_Ip_example_S32E2XX_R52GTM
C:\NXP\S32DS.3.6.1\S32DS\software\PlatformSDK_S32ZE\RTD\Gtm_TS_T31D53M20I1R0\examples\S32DS\Gtm_Example_S32E2XX_R52GTM IP
C:\NXP\S32DS.3.6.1\S32DS\software\PlatformSDK_S32ZE\RTD\Gtm_TS_T31D53M20I1R0\examples\S32DS\Gtm_Ip_Example_S32E2XX_R52EMIOS ICU IP
C:\NXP\S32DS.3.6.1\S32DS\software\PlatformSDK_S32ZE\RTD\Icu_TS_T31D53M20I1R0\examples\S32DS\Emios_Icu_Ip_BlinkLed_S32E2XX_R52ETIMER ICU IP
C:\NXP\S32DS.3.6.1\S32DS\software\PlatformSDK_S32ZE\RTD\Icu_TS_T31D53M20I1R0\examples\S32DS\Etimer_Icu_Ip_BlinkLed_S32E2XX_R52GTM ICU IP
C:\NXP\S32DS.3.6.1\S32DS\software\PlatformSDK_S32ZE\RTD\Icu_TS_T31D53M20I1R0\examples\S32DS\Gtm_Icu_Ip_Example_S32E2XX_R52ICU
C:\NXP\S32DS.3.6.1\S32DS\software\PlatformSDK_S32ZE\RTD\Icu_TS_T31D53M20I1R0\examples\S32DS\Icu_Example_S32E2XX_R52SIUL2 ICU IP
C:\NXP\S32DS.3.6.1\S32DS\software\PlatformSDK_S32ZE\RTD\Icu_TS_T31D53M20I1R0\examples\S32DS\Siul2_Icu_Ip_BlinkLed_S32E2XX_R52DMA IP
C:\NXP\S32DS.3.6.1\S32DS\software\PlatformSDK_S32ZE\RTD\Mcl_TS_T31D53M20I1R0\examples\S32DS\Dma_Ip_DmaTransfer_AE_S32E2XX_R52MCL
C:\NXP\S32DS.3.6.1\S32DS\software\PlatformSDK_S32ZE\RTD\Mcl_TS_T31D53M20I1R0\examples\S32DS\Mcl_DmaTransfer_AE_S32E2XX_R52CLOCK IP
C:\NXP\S32DS.3.6.1\S32DS\software\PlatformSDK_S32ZE\RTD\Mcu_TS_T31D53M20I1R0\examples\S32DS\Clock_Ip_Example_S32E2XX_R52MCU
C:\NXP\S32DS.3.6.1\S32DS\software\PlatformSDK_S32ZE\RTD\Mcu_TS_T31D53M20I1R0\examples\S32DS\Mcu_Example_S32E2XX_R52POWER IP
C:\NXP\S32DS.3.6.1\S32DS\software\PlatformSDK_S32ZE\RTD\Mcu_TS_T31D53M20I1R0\examples\S32DS\Power_Ip_Example_S32E2XX_R52C55 IP
C:\NXP\S32DS.3.6.1\S32DS\software\PlatformSDK_S32ZE\RTD\Mem_43_INFLS_TS_T31D53M20I1R0\examples\S32DS\C55_Ip_Example_S32E2XX_R52MEM
C:\NXP\S32DS.3.6.1\S32DS\software\PlatformSDK_S32ZE\RTD\Mem_43_INFLS_TS_T31D53M20I1R0\examples\S32DS\Mem_43_INFLS_Example_S32E2XX_R52MEM ACC
C:\NXP\S32DS.3.6.1\S32DS\software\PlatformSDK_S32ZE\RTD\MemAcc_TS_T31D53M20I1R0\examples\S32DS\MemAcc_Example_S32E2XX_R52EMIOS OCU IP
C:\NXP\S32DS.3.6.1\S32DS\software\PlatformSDK_S32ZE\RTD\Ocu_TS_T31D53M20I1R0\examples\S32DS\eMios_Ocu_Ip_Example_S32E2XX_R52ETIMER OCU IP
C:\NXP\S32DS.3.6.1\S32DS\software\PlatformSDK_S32ZE\RTD\Ocu_TS_T31D53M20I1R0\examples\S32DS\eTimer_Ocu_Ip_Example_S32E2XX_R52GTM OCU IP
C:\NXP\S32DS.3.6.1\S32DS\software\PlatformSDK_S32ZE\RTD\Ocu_TS_T31D53M20I1R0\examples\S32DS\Gtm_Ocu_Ip_Example_S32E2XX_R52OCU
C:\NXP\S32DS.3.6.1\S32DS\software\PlatformSDK_S32ZE\RTD\Ocu_TS_T31D53M20I1R0\examples\S32DS\Ocu_Example_S32E2XX_R52PLATFORM DDR INIT
C:\NXP\S32DS.3.6.1\S32DS\software\PlatformSDK_S32ZE\RTD\Platform_TS_T31D53M20I1R0\examples\S32DS\Platform_DDR_INIT_Example_S32E2XX_R52PLATFORM HLD MPU
C:\NXP\S32DS.3.6.1\S32DS\software\PlatformSDK_S32ZE\RTD\Platform_TS_T31D53M20I1R0\examples\S32DS\Platform_HLD_Mpu_Example_S32E2XX_R52PLATFORM HLD MPU (SMU)
C:\NXP\S32DS.3.6.1\S32DS\software\PlatformSDK_S32ZE\RTD\Platform_TS_T31D53M20I1R0\examples\S32DS\Platform_HLD_Mpu_Example_S32E2XX_SMUPLATFORM IP DDR INIT
C:\NXP\S32DS.3.6.1\S32DS\software\PlatformSDK_S32ZE\RTD\Platform_TS_T31D53M20I1R0\examples\S32DS\Platform_Ip_DDR_INIT_Example_S32E2XX_R52PLATFORM IP MPU
C:\NXP\S32DS.3.6.1\S32DS\software\PlatformSDK_S32ZE\RTD\Platform_TS_T31D53M20I1R0\examples\S32DS\Platform_IP_Mpu_Example_S32E2XX_R52PLATFORM IP MPU (SMU)
C:\NXP\S32DS.3.6.1\S32DS\software\PlatformSDK_S32ZE\RTD\Platform_TS_T31D53M20I1R0\examples\S32DS\Platform_IP_Mpu_Example_S32E2XX_SMUPORT
C:\NXP\S32DS.3.6.1\S32DS\software\PlatformSDK_S32ZE\RTD\Port_TS_T31D53M20I1R0\examples\S32DS\Port_Example_S32E2XX_R52PORT IP
C:\NXP\S32DS.3.6.1\S32DS\software\PlatformSDK_S32ZE\RTD\Port_TS_T31D53M20I1R0\examples\S32DS\Siul2_Port_Ip_Example_S32E2XX_R52EMIOS PWM IP
C:\NXP\S32DS.3.6.1\S32DS\software\PlatformSDK_S32ZE\RTD\Pwm_TS_T31D53M20I1R0\examples\S32DS\Emios_Pwm_Ip_Example_S32E2XX_R52ETIMER PWM IP
C:\NXP\S32DS.3.6.1\S32DS\software\PlatformSDK_S32ZE\RTD\Pwm_TS_T31D53M20I1R0\examples\S32DS\Etimer_Pwm_Ip_Example_S32E2XX_R52FLEXPWM PWM IP
C:\NXP\S32DS.3.6.1\S32DS\software\PlatformSDK_S32ZE\RTD\Pwm_TS_T31D53M20I1R0\examples\S32DS\FlexPwm_Pwm_Ip_Example_S32E2XX_R52GTM PWM IP
C:\NXP\S32DS.3.6.1\S32DS\software\PlatformSDK_S32ZE\RTD\Pwm_TS_T31D53M20I1R0\examples\S32DS\Gtm_Pwm_Ip_Example_S32E2XX_R52PWM
C:\NXP\S32DS.3.6.1\S32DS\software\PlatformSDK_S32ZE\RTD\Pwm_TS_T31D53M20I1R0\examples\S32DS\Pwm_Example_S32E2XX_R52RM
C:\NXP\S32DS.3.6.1\S32DS\software\PlatformSDK_S32ZE\RTD\Rm_TS_T31D53M20I1R0\examples\S32DS\Rm_Example_S32E2XX_R52Design Resources
Board Information
Chip Documents
- S32E2 Safe and Secure High-performance Real-time Processors with Actuation Support - Fact Sheet
-
S32Z/E Real-Time Processors Product Brief
-
S32E2 Real-Time Processors Reference Manual
-
S32Z/E Real-Time Processors GTM Subsystem Reference Manual
-
S32Z/E Real-Time Processors (NETC) Complex Reference Manual
Software
Additonal Resources
- GreenBox 3 Real-Time Development Platform
- S32Z/E Vehicle Integration Platform (GreenVIP)
- How To Use the Automotive Software Package Manager
- Introducing the S32K3 Automotive MCU Family
- Twelve-Phase PMSM or Multimotor Applications with S32K3 MCU
- Body Domain Controller Solution with the S32K3 MCU, FS26 SBC, SJA1105 Transceiver and CD1030 MSDI
- High-voltage BMS Solution Using the S32K3 MCU, FS26 SBC and MC3377x Cell Controller
- High Voltage Battery Management System NXPLive Demo
- How To Use the Automotive Software Package Manager
Support
Forums
Connect with other engineers and get expert advice on designing with the S32E288-975EVB evaluation board using our community sites.