Getting Started with Zephyr
Contents of this document
-
Set it up
-
Build, Run
-
Create
-
Developer Experience
Sign in to save your progress. Don't have an account? Create one.

Purchase your Zephyr™ OS for Edge Connected Devices
1. Set it up
Visit FRDM-MCXN236, add the board to your cart, and enter code ATWQBE0T at checkout.
Buy options1.1 Preparing Zephyr Environment
This video walks you through the essential steps to get your Zephyr development environment up and running on a Windows operating system using Visual Studio Code (VS Code) and the MCUXpresso extension.
This presentation aims to make setup quick and easy, so you can start developing your application now without getting bogged down in the details.
- Download and Install VS Code
Get the latest version of VS Code for Windows. - Install the MCUXpresso extension for VS Code
Add NXP’s official extension to enable embedded development features - Run the MCUXpresso installer
Use the installer to set up the software development kit (SDK), toolchain and environment - Install the Zephyr Repository
Clone and configure the Zephyr repo to complete your setup - Install MCUXpresso Config Tools
Pin tool support for Zephyr is available for version 25.03 and higher - Install MCUXpresso Secure Provisioning Tool
1.2 Install Your Toolchain
NXP offers a complimentary extension for VSCode called MCUXpresso for VS Code.
Download VS Code to access the extension library.
Learn how to install VS Code for your host PC with the following tutorial
1.3 Jump Start Your Design with Zephyr Developer
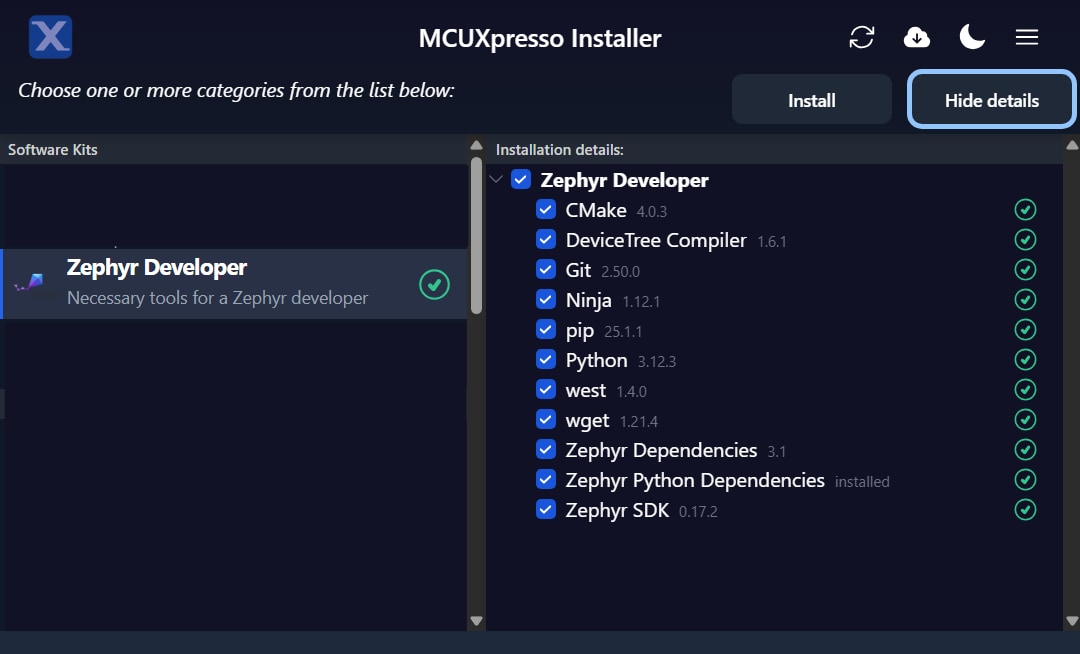
The MCUXpresso Installer includes an option called the 'Zephyr Developer', allowing you to download all necessary components, tools and dependencies needed in addition to the Zephyr SDK. The Zephyr SDK contains toolchains for each of Zephyr its supported architectures, which include a compiler, assembler, linker and other programs required to build Zephyr applications.
Find the MCUXpresso Installer inside the "Quickstart Panel" of the MCUXpresso for VSCode
1.4 MCUXpresso Config Tools
The MCUXpresso Config Tool is an integrated suite of configuration tools that guides users in creating new MCUXpresso SDK project it also includes pin and clock tools to generate initialization C code for custom board support. The Pins Tool has a Graphic User Interface (GUI) to help select all the desired signals used by the application, and configure the PinMux and pin settings. Starting with release v25.03, the Config Tool can generate Zephyr board pinctrl files for the i.MX RT1xxx and MCX devices. Zephyr uses pinctrl to configure the pins and PinMux settings of an system on chip (SOC).
Click the Get MCUXpresso Config Tools button below to get the Config Tools installer.
1.5 Programming and Provisioning Tools
The MCUXpresso Secure Provisioning (SEC) Tool is a GUI-based application provided to simplify the generation and provisioning of bootable executables on NXP microcontroller unit (MCU) devices. We recommend all users to begin with the MCUXpresso SEC tool for trial run and mass production use. It supports secure programming and device provisioning on NXP's microcontrollers at the production stage. After downloading the tool, you can find the user guide under the ‘Help’ tab. Follow the instructions for your board in the ‘Processor-specific workflow’ chapter.

1.6 Get Familiar with MCUXpresso for VS Code
Key Features to Know in MCUXpresso for VS Code
When getting started with MCUXpresso for VS Code, it helps to be aware of a few key features and tools that can streamline your development experience. This section gives you a high-level overview — rather than a deep dive—so you can get oriented quickly.
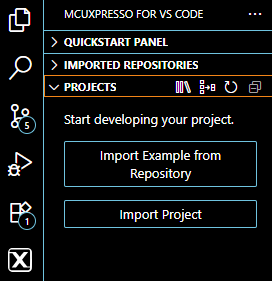
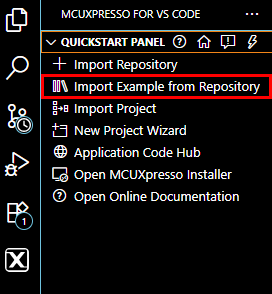
Quickstart Panel
The quickstart panel is your launchpad for creating, importing and managing projects. It provides shortcuts to common tasks. Here, the most commonly shortcuts are "Import Example from Repository" and "Open MCUXpresso Installer".
Projects View
This is where your workspace and project files are organized. Understanding how the Zephyr projects are structured will help you navigate and manage your code more effectively.
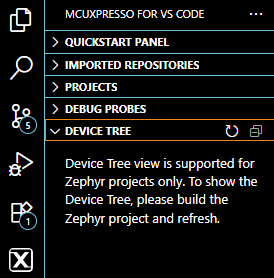
Device Tree
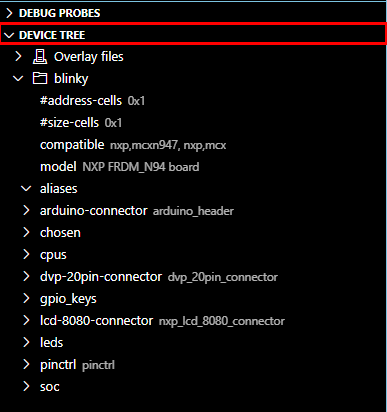
The device tree describes the hardware layout and configuration. After compiling the Zephyr Project and refreshing the DEVICE TREE view, it will be populated with a tree-like view of the project hardware hierarchy. You also can inspect the nodes and their associated values.
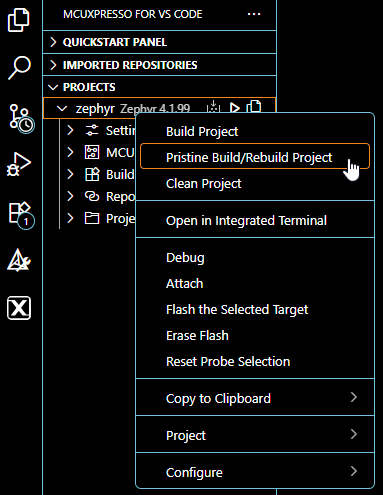
Pristine Build
Pristine build is used to clean and rebuild your project from scratch. It’s especially useful when switching configurations or resolving build issues.
Debug
MCUXpresso for VSCode integrates with various debuggers. With it you can learn how to set breakpoints, step through code and inspect variables to troubleshoot effectively.
Terminal and Serial Monitor
The terminal is designed to enable command-line interactions with the imported repositories. The serial terminal allows you to interact with your board via UART. This is great for logging, debugging and real-time communication.

1.7 Preparing the Hardware
This steps guides will walk you through how to get started with Zephyr using the FRDM-MCXN947 board as an example. However, you can follow the same general process with the different evaluation board of your choice.
-
Choose Your Evaluation Board
While this guide uses the FRDM-MCXN947, you may substitute it with another supported board, but make sure to:
- Confirm Zephyr support for your board
- Check for any board-specific setup instructions
-
Update On-Board Debugger Firmware
Most evaluation boards come with an on-board debugger. To ensure compatibility and stability: Verify that your board’s debugger firmware is up to date.
Download the latest firmware from the LinkServer firmware page. Choose the appropriate firmware type:
- Cortex Microcontroller Software Interface Stardard-Debug Access Port (CMSIS-DAP)
- Segger J-Link
If your board does not have an on-board debugger, connect an external debugger to your target board.
-
Powering the Board
You’ll need to power your board during development. Common methods include:
- USB cable (most common)
- Barrel jack connector (for some boards)
- Plug in Your Board
2. Build, Run
In this section, you'll learn how to import and build a Blinky LED example for the FRDM-MCXN947 board using MCUXpresso for VS Code. This process will walk you through selecting the example, configuring the build, compiling the project and flashing it to your board—all within the VS Code environment. By the end, you’ll have a working LED blink application running on your hardware, giving you a solid starting point for your own Zephyr-based projects.
You may follow the same steps using a different board. Check out the supported boards page.
2.1 Importing and Building a Zephyr Blinky Example
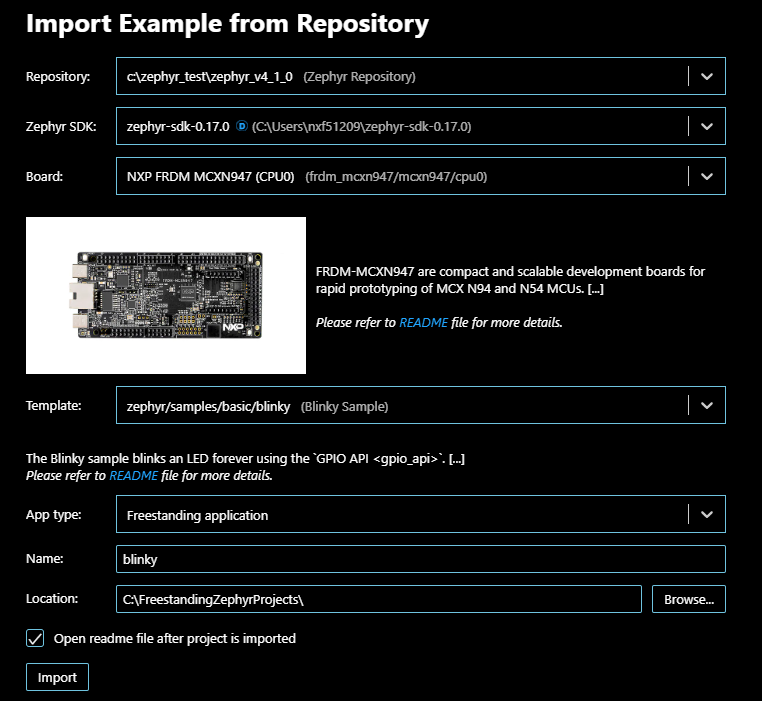
- Open VS Code and Launch MCUXpresso Extension
- To import the Blinky Example, complete the dialog screen as follows:
- Repository: Select Zephyr Repository
- Zephyr SDK: Choose latest version available
- Board:
FRDM-MCXN947 CPU0 - Template: Blinky Sample
- App Type: Freestanding application
- Name: blinky
- Location:
C:\FreestandingZephyrProjects\ - Click Import to import the project
- Build the Project
- Debug the Board
- Connect your FRDM-MCXN947 via USB (Type-C)
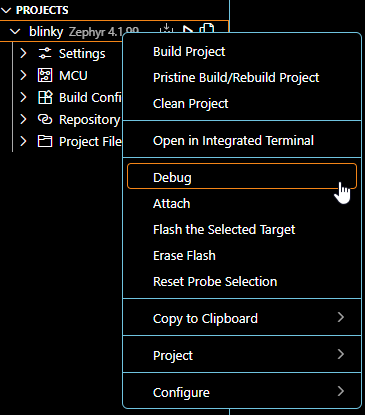
- In the Projects View, right-click the imported project folder
- Select "Debug". This will intiate a debug session, in which you can start the application, step over instructions, step into or out of functions, pause or exit the debug session
- Pressing the "Play/Continue" button will execute the application. The LED on the board should start blinking
Expand the MCUXpresso Quickstart Panel (usually on the left sidebar)
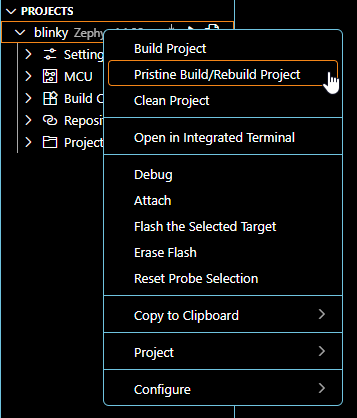
In the Projects View, right-click the imported project folder then select "Pristine Build/Rebuild Project"
You should see the build process complete successfully in the terminal output
3. Create
3.1 Creating a New Configuration for Zephyr Real Time Operating System (RTOS) Using Device Tree Editor
- Launch the DeviceTree Editor on the bottom left side of the MCUXpresso extension in VSCode then click on the refresh icon to load the configuration
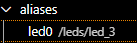
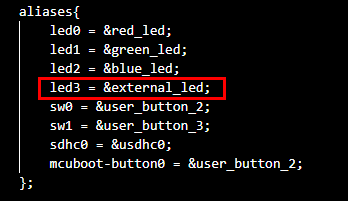
- Navigate to the 'alias' section
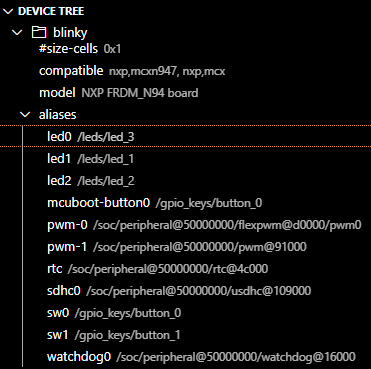
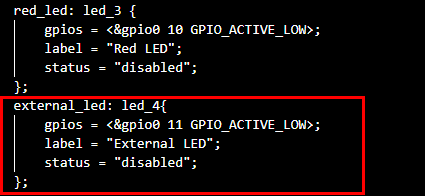
- Follow the alias to the actual LED node in this example we see that
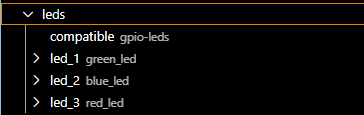
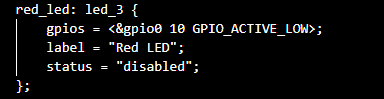
led0isled_3Open the 'leds' section and click onled_3to view the code - This is where the
GPIO 0 pin 10is defined for the Red LED - Here we will add an additional general purpose input/output (GPIO) pin
- Go back to the alias section and add an alias for reference on our new external pin
- Go to the main.c source under the project files in the src folder and let's replace
led0withled3which is our new external LED - Rebuild the project
- Debug or flash the device
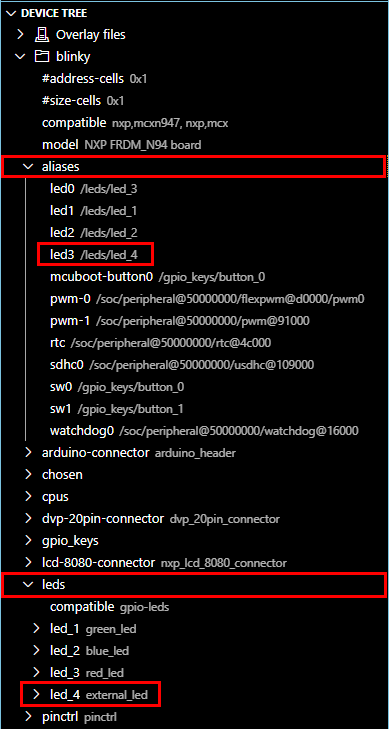
When clicking a node or property, the MCUXpresso Device Tree viewer will open the source location where that node is defined or a property is set
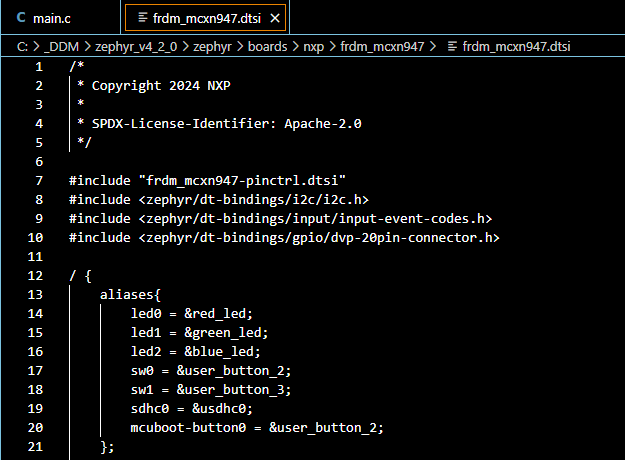
However, lets use a different pin that we can connect to an external LED, a voltmeter or an oscilloscope that we can use to visualize the LED blinking
In this example I'll use GPIO 0 pin15 which is routed to J4 pin10 of the Arduino header on the FRDM-MCXN947

Now, before running, you can see in the device tree viewer that the additions are now visible
Connect an external LED, a multimeter or an oscilloscope on the pin of the board to verify that it is toggling on and off as expected
4.Developer Experience
4.1 Zephyr Developer Experience
Zephyr Portability Featuring MCX and i.MX RT Series
This video highlights the portability benefits of Zephyr by demonstrating how it optimizes two distinct MCU architectures. Using a face detection demo, it runs on both the MCX N947, which features a neural processing unit and basic display, and the i.MX RT1060, which has a built-in display interface. The tutorial explains how platform abstraction is achieved, with the application remaining unchanged across both versions. Click the link for the full video.
Design Resources
Additional References
Trainings
- Accelerate Development with Zephyr™ OS Features and Modules
- Application Portability Made Easy With Zephyr™ OS and NXP
- NXP and SEGGER: Debug, Visualize and Analyze Zephyr™ OS Applications with Ease
- Should I Care About Zephyr OS? - Real Experiences of an RTOS Expert
- NXP and Zephyr OS: Unlocking Innovation with an Open-Source RTOS
- Navigating the Future: The Importance of Zephyr in Multi-OS Environments
- Zephyr Portability Featuring MCX and i.MX RT Series
- OTA Device Management with Golioth Cloud Platform Using Zephyr RTOS and NXP i.MX RT
- Designing for Low Power Using Zephyr® Project: A Smartwatch Example