Getting Started with IMXRT685-AUD-EVK Development Platform
Contents of this document
-
Plug It In
-
Get Software
-
Build, Run
-
Modify an SDK example
Sign in to save your progress. Don't have an account? Create one.
Purchase your i.MX RT600 Audio Evaluation Kit
1. Plug It In
Let's take your IMXRT685-AUD-EVK for a test drive. You have the choice of watching a series of short videos at the beginning of each section or following the detailed instructions outlined below each video.
1.1 Get Started with IMXRT685-AUD-EVK Development Platform
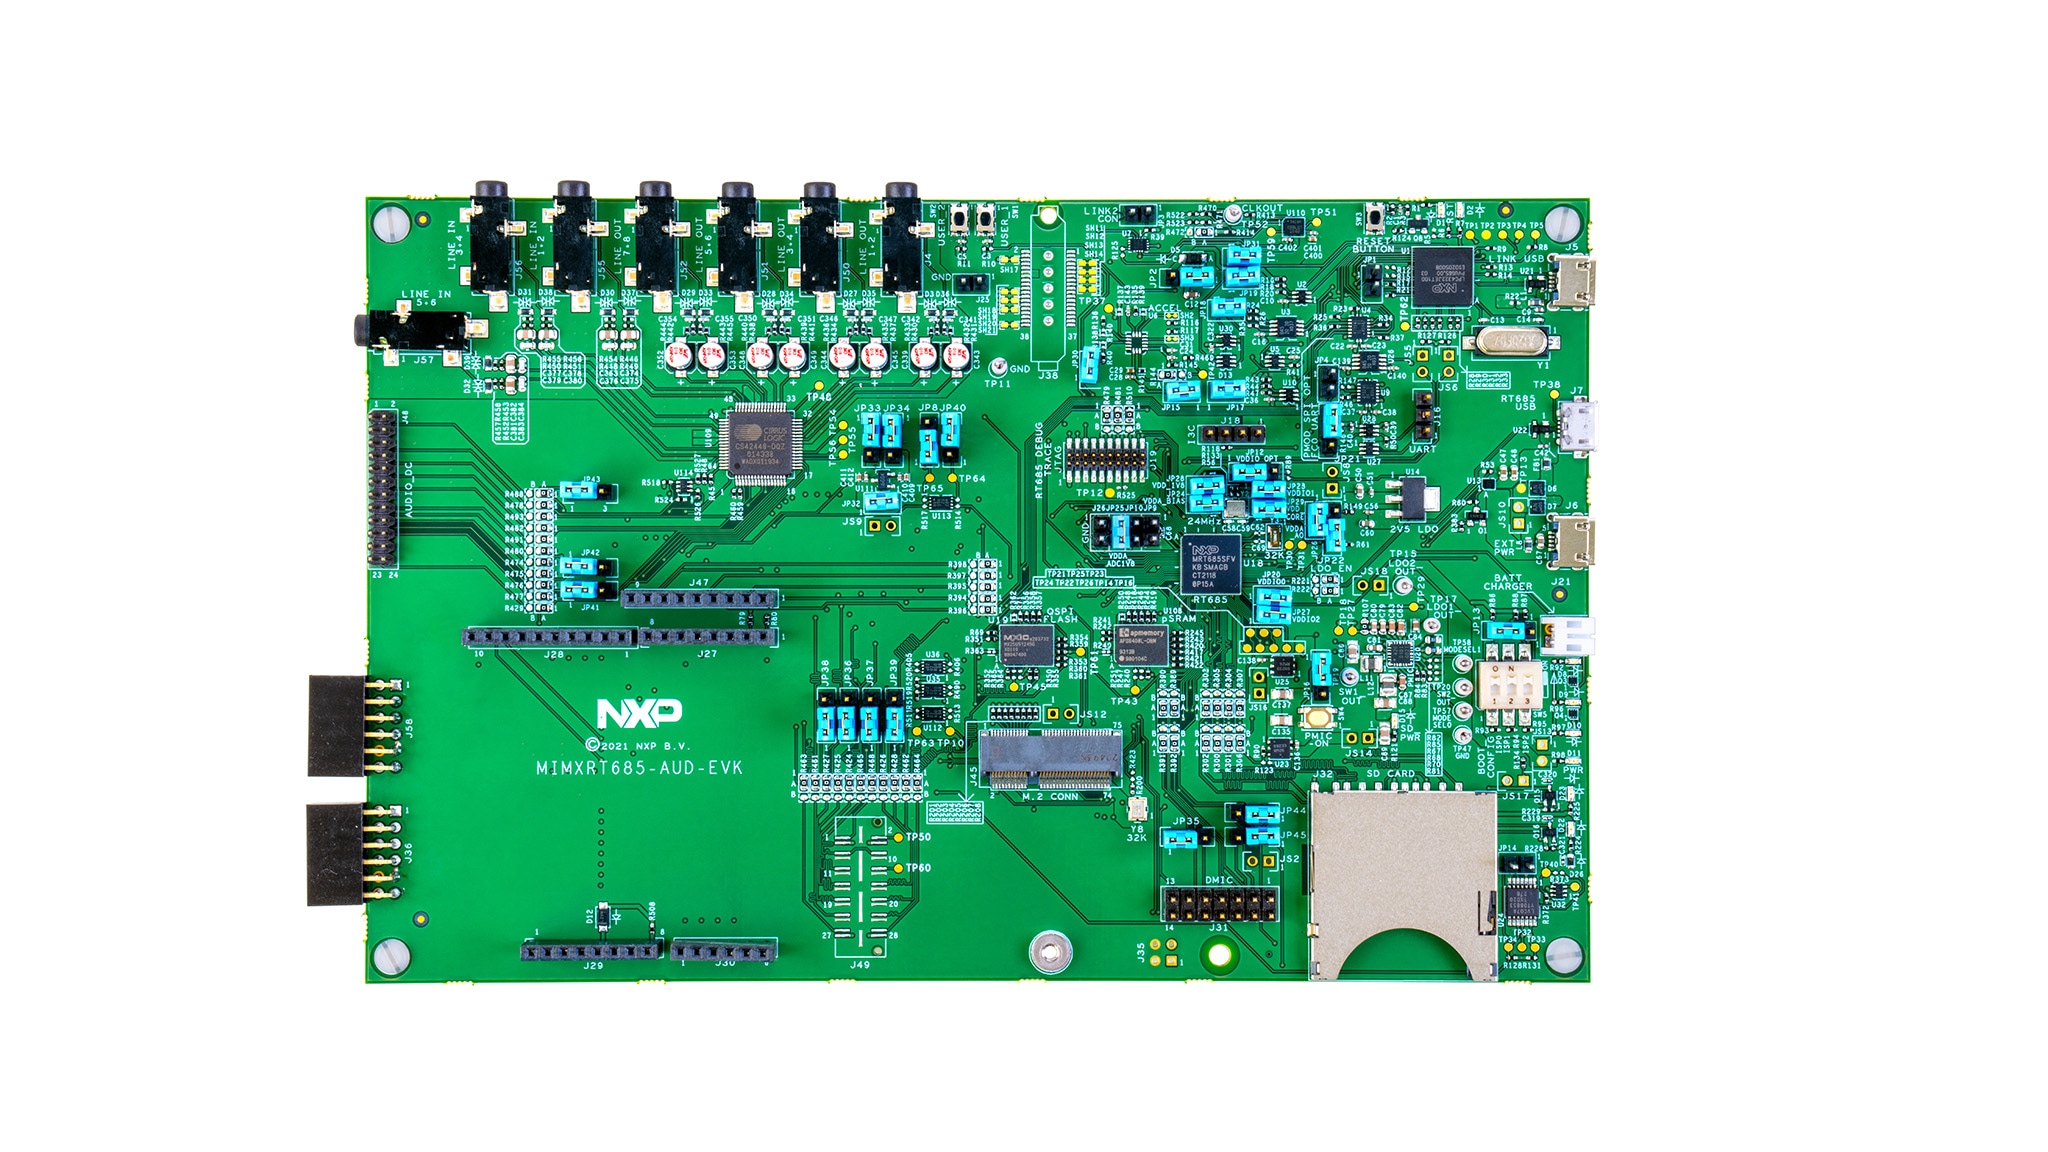
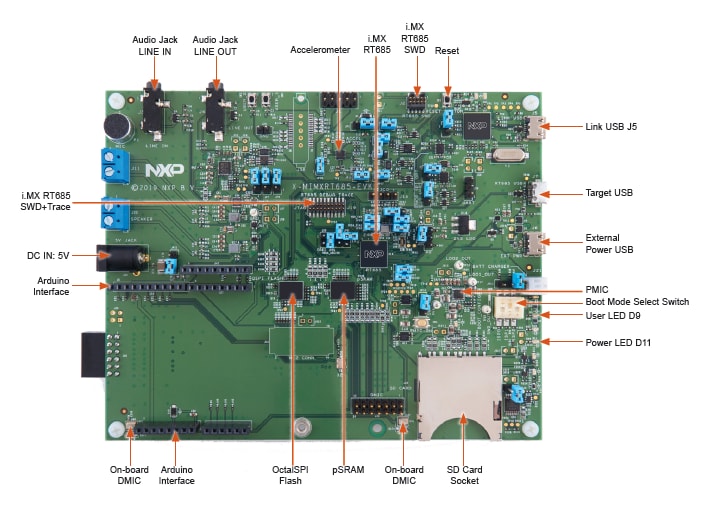
1.2 Get Familiar with the Board
FXOS8700CQ accelerometer is in end-of-life status. Your RT685-AUD-EVK may not have the accelerometer populated.
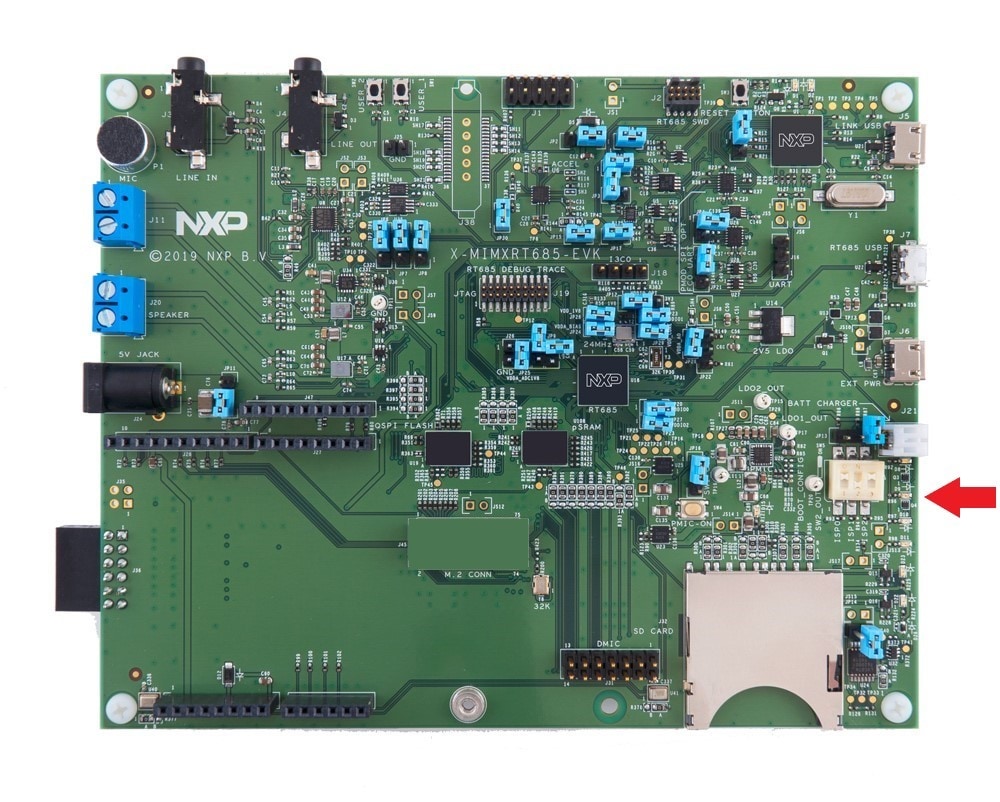
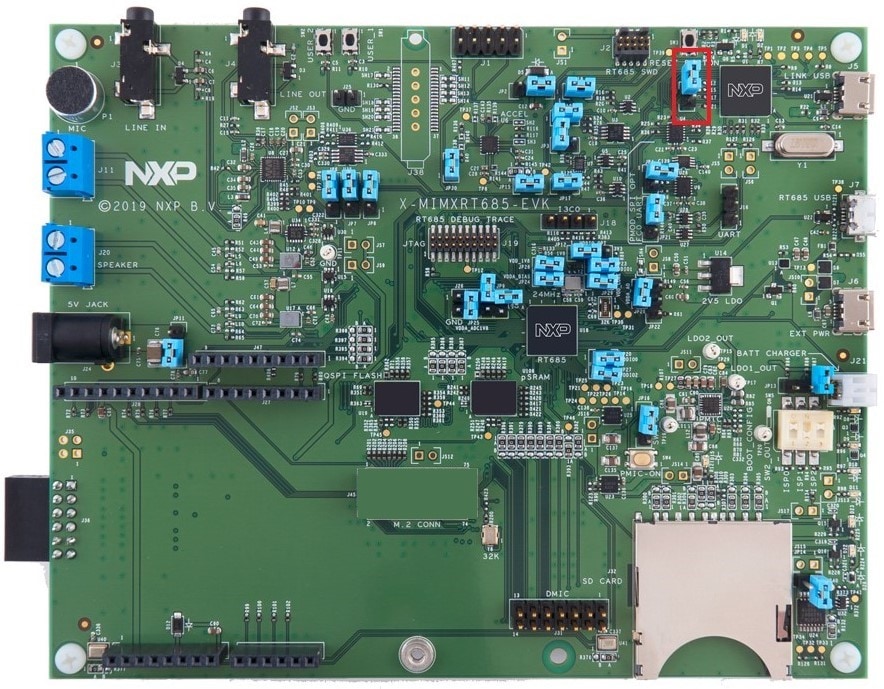
1.3 Attach the USB Cable
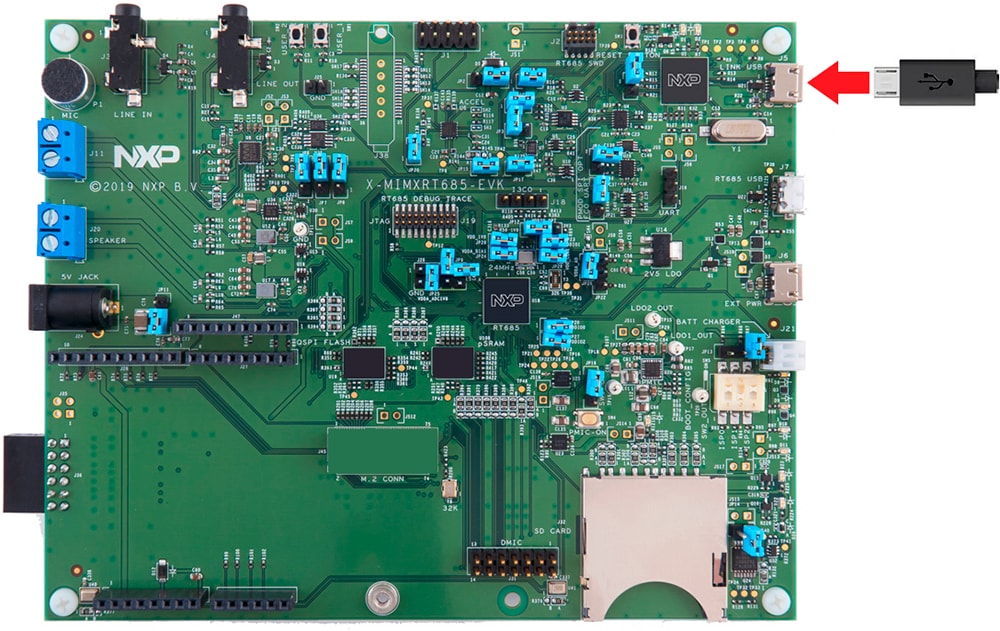
There are three micro USB connectors on the board. Plug the USB cable into the one labeled
"Link USB" (J5), as shown below.

1.4 Run the Out-of-Box Demo
The IMXRT685-AUD-EVK comes loaded with a "LED blinky" demo, explained below and a demo that
exercises the Cortex-M33 and the HiFi 4 DSP, described in the next section. When the board is powered, the red LED D9 should flash on and off.
The second part of this out of the box demo will be shown in the application note.
2. Get Software
2.1 Installing Software for IMXRT685-AUD-EVK
2.2 Jump Start Your Design with the MCUXpresso SDK
The MCUXpresso software development kit (SDK) is complimentary and includes full source code under a permissive open-source license for all hardware abstraction and peripheral driver software.
Click below to download a pre-configured SDK release for the IMXRT685-AUD-EVK. Unzip the SDK into a directory path that does not contain any spaces.

You can also use the online SDK Builder to create a custom SDK package for the IMXRT685-AUD-EVK using the SDK builder.
2.3 Install Your Toolchain
NXP offers a complimentary toolchain called MCUXpresso IDE.

Want to use a different toolchain?
No problem! The MCUXpresso SDK includes support for other tools such as IAR , Keil and command-line GCC .

2.4 MCUXpresso Config Tools
The MCUXpresso Config Tool is an integrated suite of configuration tools that guides users in creating new MCUXpresso SDK projects, and also provides pin and clock tools to generate initialization C code for custom board support. It is already fully integrated as a part of MCUXpressoIDE, but you can also download it as a separate tool if you are using a different.
2.5 LPCScrypt
Drivers for the debugger and virtual COM port also need to be installed. They are part of the LPCScrypt package, which can be downloaded below. The LPC-Link2 circuit firmware will also need to be updated to use the J-Link interface, which is described in the following tutorial: LPCScrypt Tutorial.
2.6 Serial Terminal
Many of the MCUXpresso SDK example applications output data over the MCU UART. Install and configure your preferred terminal software to 115200 baud rate, 8 data bits, no parity and 1 stop bit. To determine the port number of the IMXRT685-AUD-EVK's virtual COM port, open the device manager and look under the "Ports" group.
Not sure how to use a terminal application? Try one of these tutorials:
MCUXpresso IDE Terminal Tutorial
The most recent versions of MCUXpresso IDE count with a terminal emulation application. This tool can be used to display information sent from your NXP development platform's virtual serial port.
- Open the MCUXpresso IDE
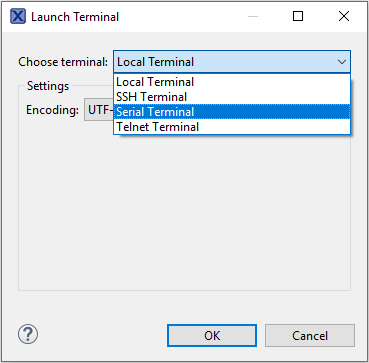
- Launch the MCUXpresso IDE terminal by clicking on the “Open a Terminal” button on the top of the IDE or press “Ctrl + Alt + Shift + T”
- Select Serial Terminal
- Configure the serial port settings (using the LPC-Link2 COM port number) to 115200 baud rate, 8 data bits, no parity and 1 stop bit, then press “OK” button
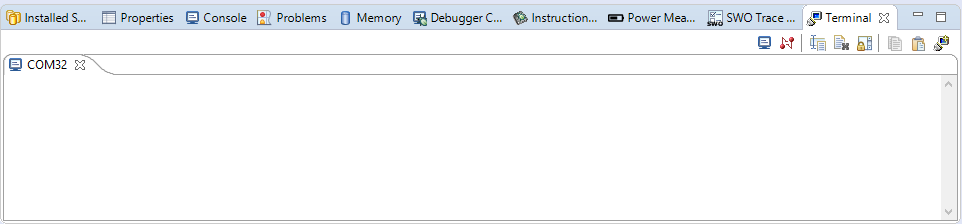
- Verify that the connection is open. If connected, MCUXpresso IDE will look like the figure below at the Terminal view
- You're ready to go


Tera Term Tutorial
Tera Term is a very popular open source terminal emulation application. This program can be used to display information sent from your NXP development platform's virtual serial port.
- Download Tera Term from SourceForge. After the download, run the installer and then return to this webpage to continue
- Launch Tera Term. The first time it launches, it will show you the following dialog. Select the serial option. Assuming your board is plugged in, there should be a COM port automatically populated in the list
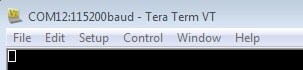
- Configure the serial port settings (using the COM port number identified earlier) to 115200 baud rate, 8 data bits, no parity and 1 stop bit. To do this, go to Setup → Serial Port and change the settings
- Verify that the connection is open. If connected, Tera Term will show something like below in its title bar
- You're ready to go

PuTTY Tutorial
PuTTY is a popular terminal emulation application. This program can be used to display information sent from your NXP development platform's virtual serial port.
- Download PuTTY using the button below. After the download, run the installer and then return to this webpage to continue
- Launch PuTTY by either double clicking on the *.exe file you downloaded or from the Start menu, depending on the type of download you selected
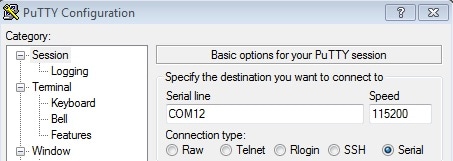
- In the window that launches, select the Serial radio button and enter the COM port number that you determined earlier. Also enter the baud rate, in this case 115200
- Click Open to open the serial connection. Assuming the board is connected and you entered the correct COM port, the terminal window will open. If the configuration is not correct, PuTTY will alert you
- You're ready to go
2.7 J-Link
You will need to download the necessary J-Link drivers in order to debug the HiFi4 DSP. Follow the next tutorial to see how to download and install this software: J-Link Tutorial.

2.8 Install Xtensa Xplorer IDE and Tools
To code and debug the DSP on the IMXRT685-AUD-EVK, you will need to download Cadence Tensilica Xplorer. This is the only available development IDE for the DSP core of MIMXRT600. Follow the next tutorial to download and install this software: Xplorer Tutorial.
3. Build, Run
3.1 Build and Run SDK Demo on the IMXRT685-AUD-EVK
3.2 Explore the MCUXpresso SDK Example Code
The MCUXpresso SDK comes with a long list of example applications code. To see what's available, navigate to the SDK boards folder of your SDK installation and select IMXRT685-AUD-EVK.
<SDK_Install_Directory>/boards/mimxrt685audevkTo learn more about specific example code, open the readme.txt file in an example's directory.
3.3 Building and Debugging MCUXpresso SDK Examples
If one or more of the demo applications or driver examples sounds interesting, you can learn how to build and debug a demo yourself. The Getting Started with SDK guide provides easy, step-by-step instructions on how to configure, build and debug demos for all toolchains supported by the SDK.
Use the guides below to learn how to open, build and debug an example application using the MCUXpresso SDK.
Building and running a DSP demo using MCUXpresso IDE
The RT600 SDK provides a collection of DSP example applications. Each DSP example has two source directories, one for the Arm CM33 and one for the DSP HiFi4.
In order to debug a DSP demo, you will need to follow two processes. The first one is to build and flash the CM33 application to your IMXRT685-AUD-EVK. The second is to build and debug the DSP application using Xtensa Xplorer IDE.
Build and Flash Cortex-M33 Application
The following steps will guide you through the mu_polling application using MCUXpresso IDE for the Cortex-M33 application. The MCUXpresso IDE installation can be found at the section “2. Get Software” of this Getting Started guide.
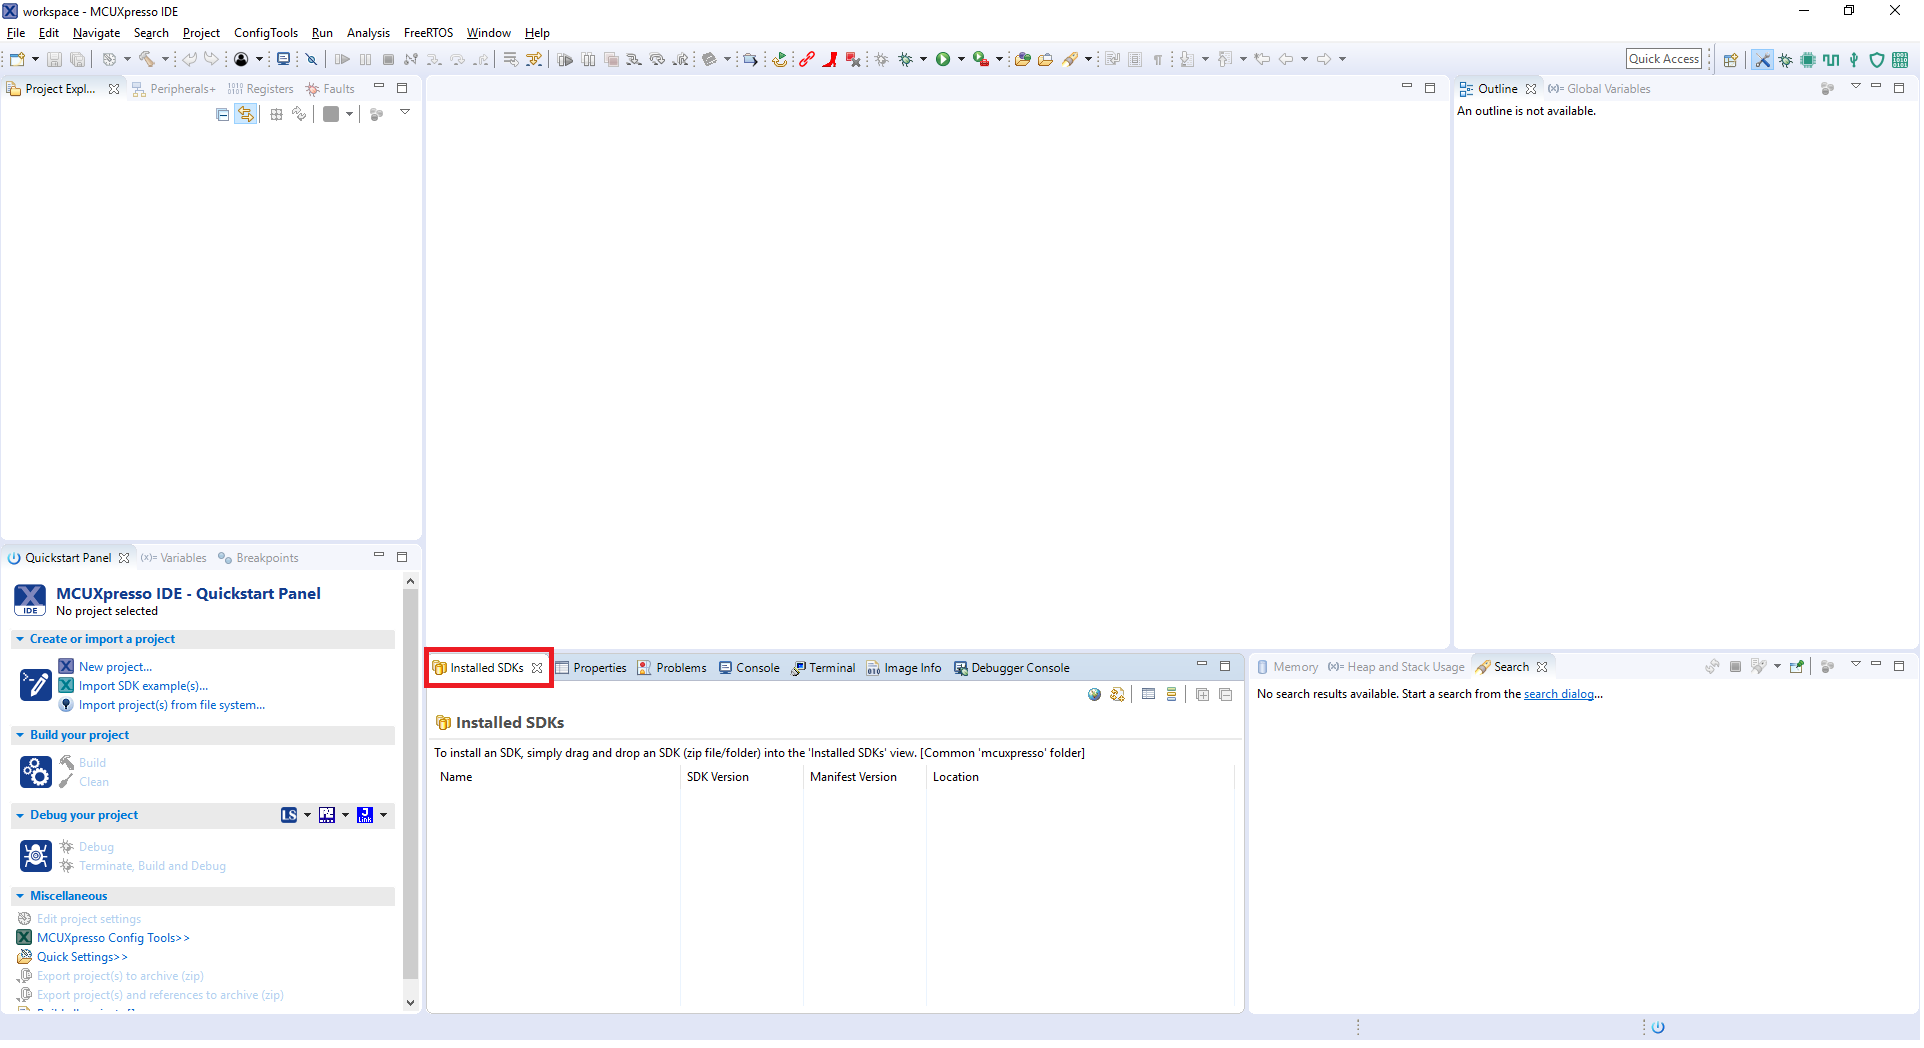
- Open the MCUXpresso IDE
- Switch to the Installed SDKs view within the MCUXpresso IDE window
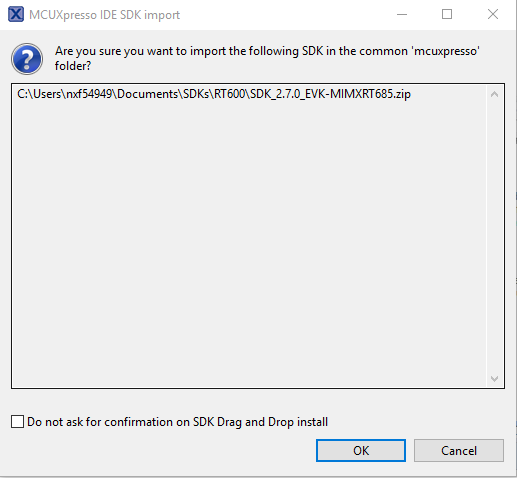
- Drag and drop the IMXRT685-AUD-EVK SDK (zipped) file into the Installed SDKs view
- You will get the following pop-up. Click on OK to continue the import:
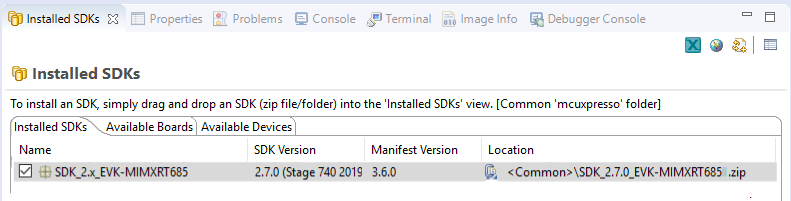
- The installed SDK will appear in the Installed SDKs view as shown below:
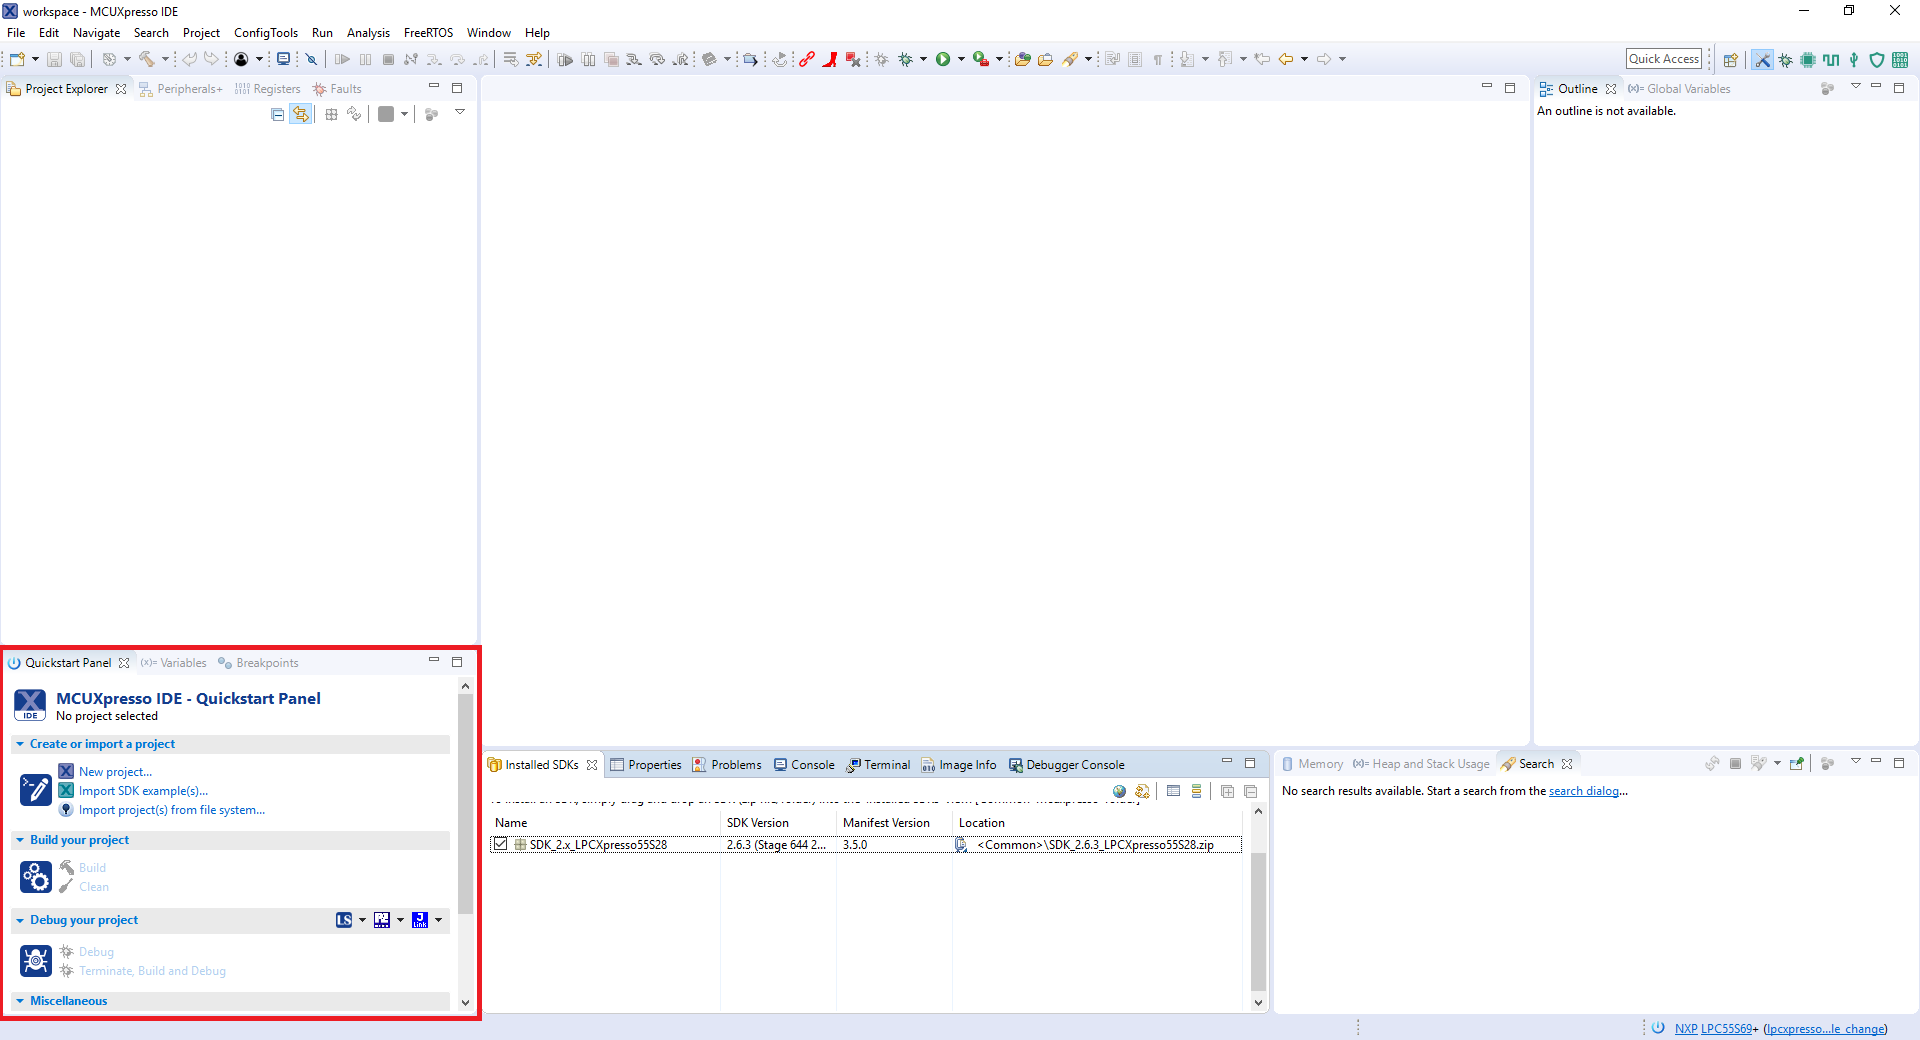
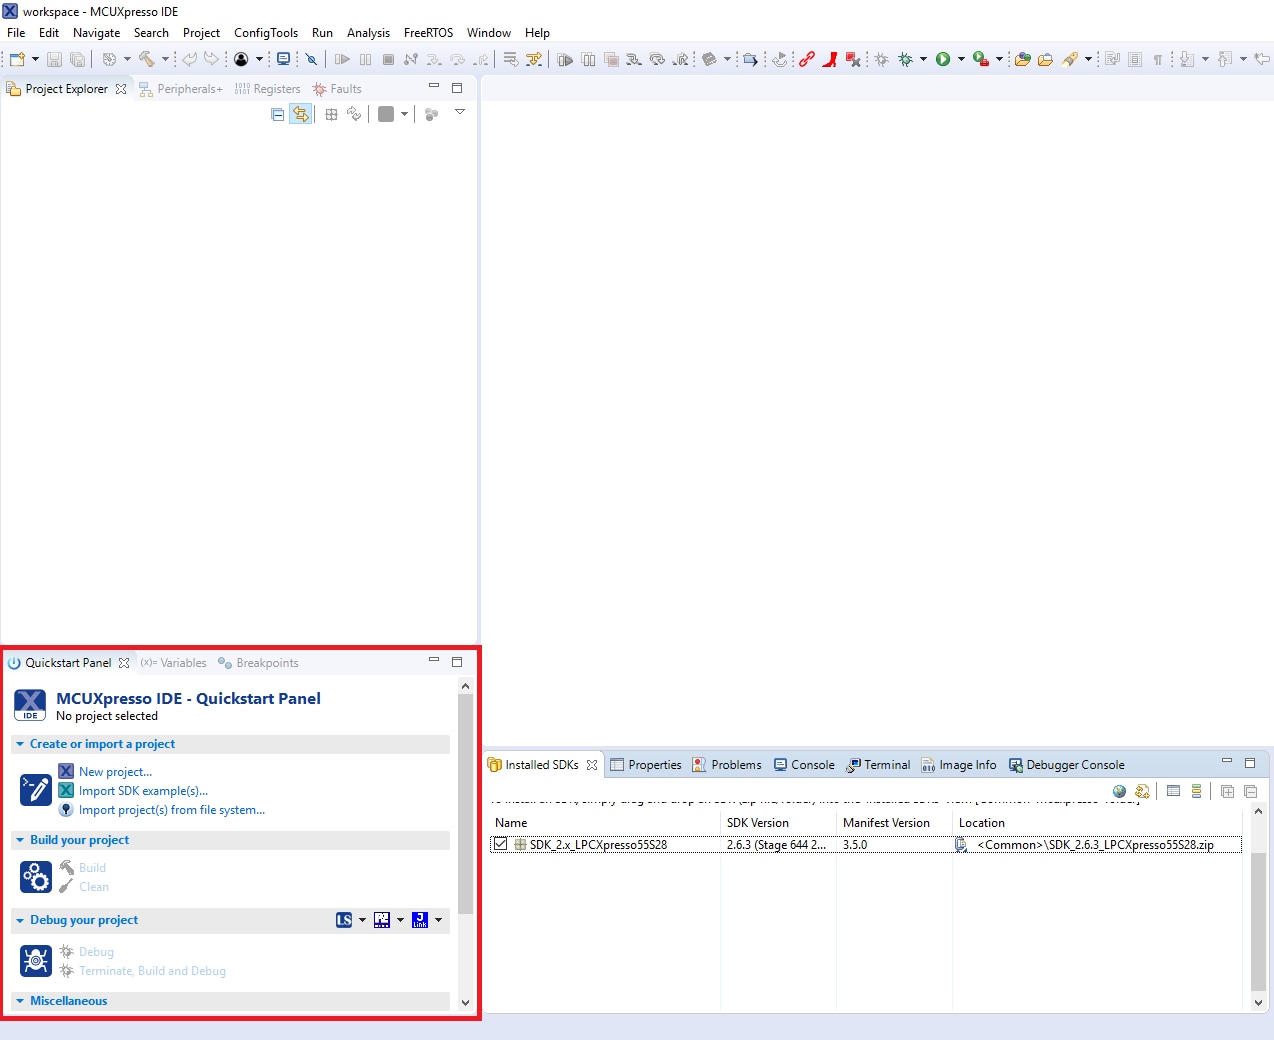
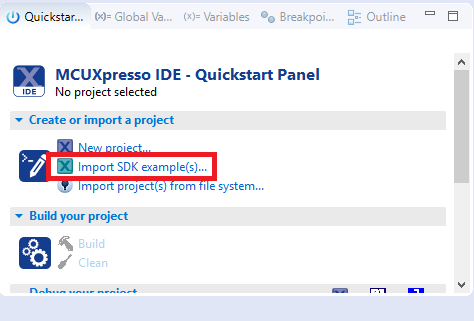
- Find the Quickstart Panel in the lower left-hand corner
- Then click on Import SDK example(s)
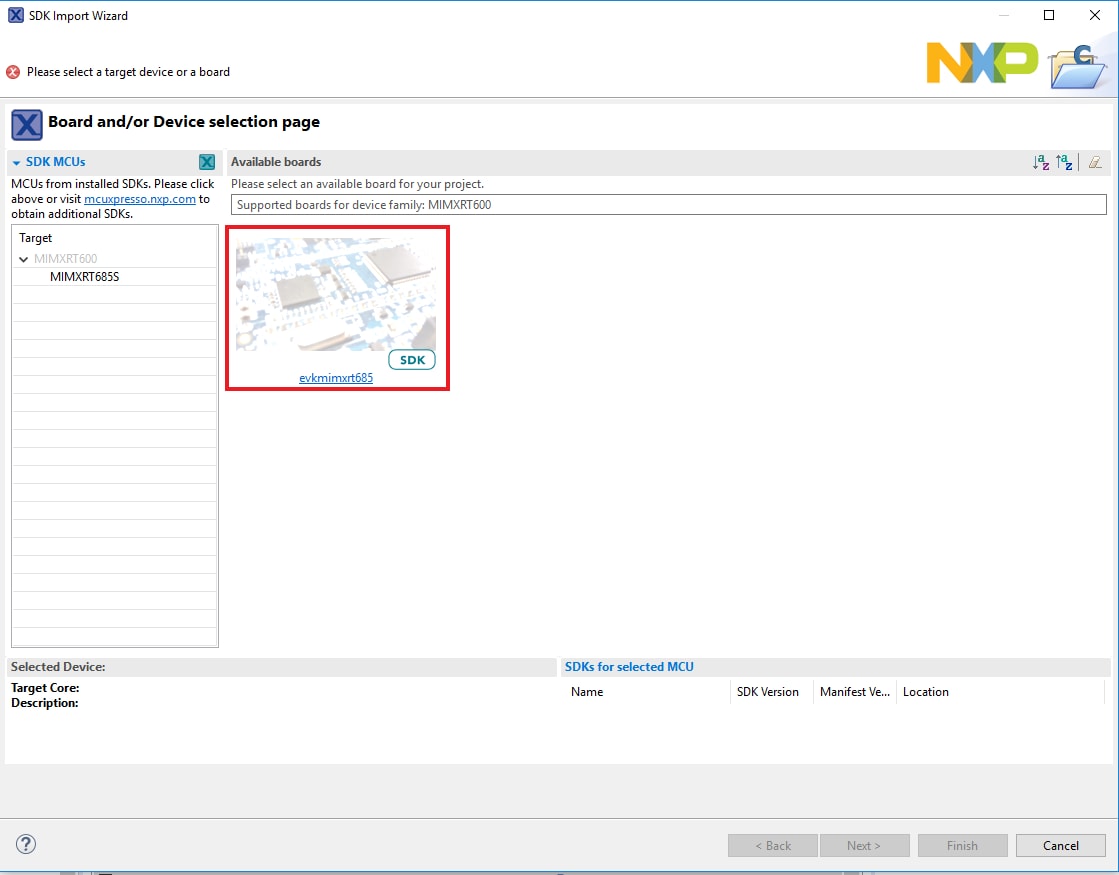
- Click on the mimxrt685audevk board to select that you want to import an example that can run on that board, and then click on Next
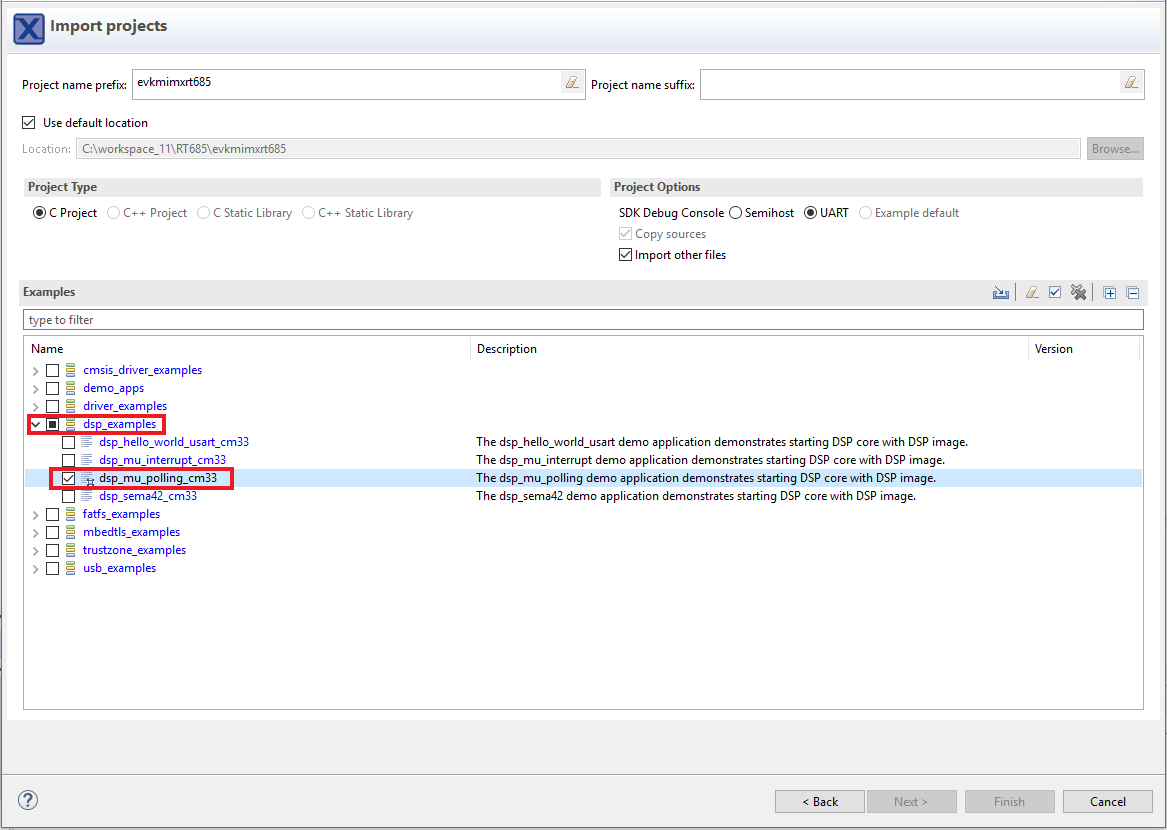
- Use the arrow button to expand the dsp_examples category, and then click the checkbox next to dsp_mu_polling_cm33 to select that project. To use the UART for printing (instead of the default semihosting), select UART as the SDK Debug Console checkbox under the project options. Then, click on Finish
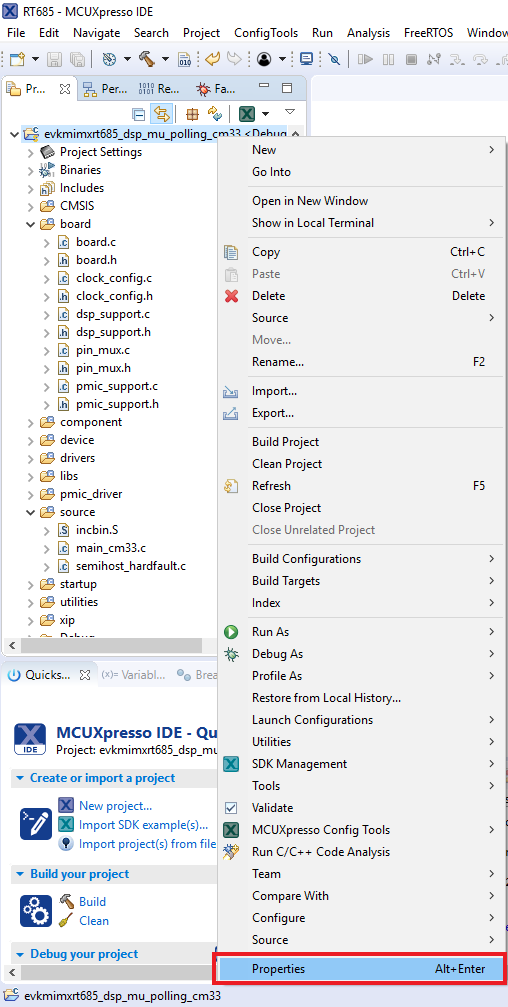
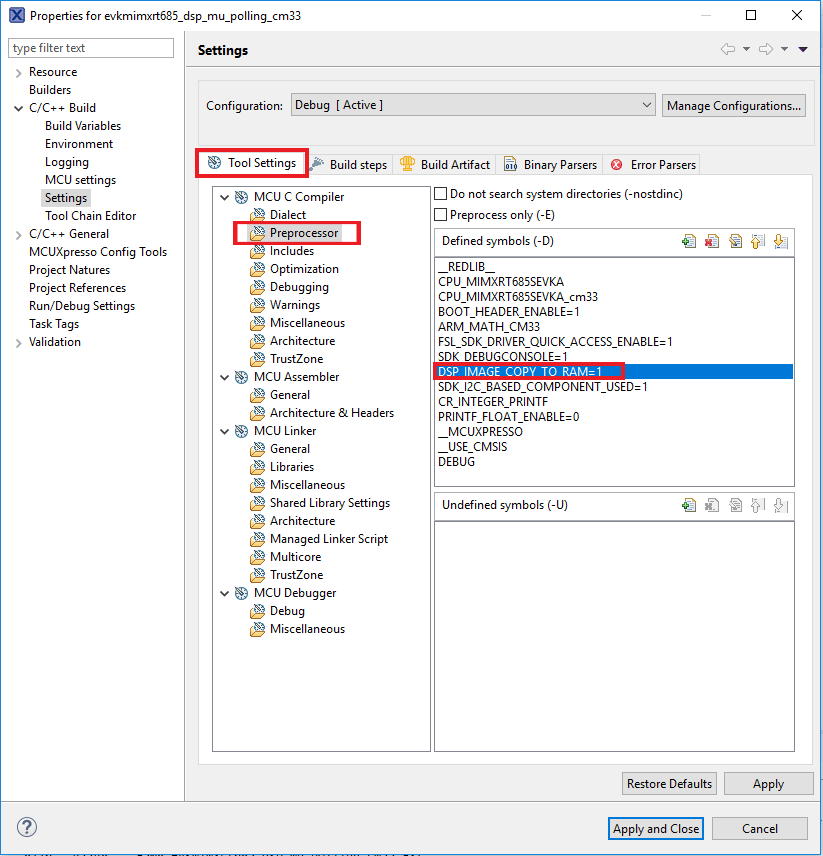
- Verify the
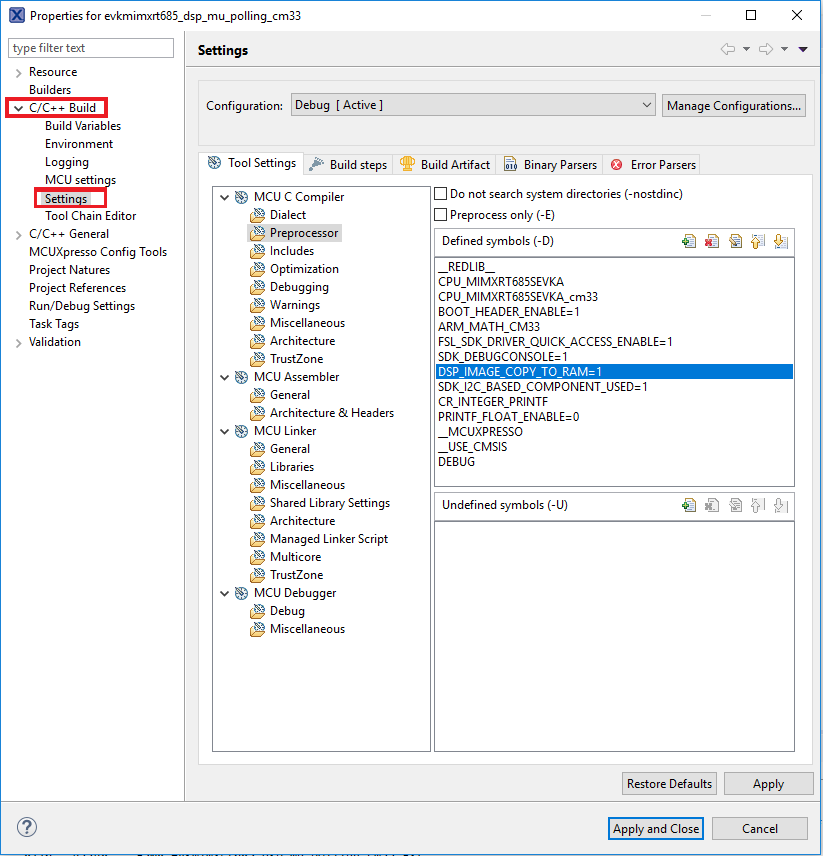
DSP_IMAGE_COPY_TO_RAMmacro value. To do this, go to project properties doing right click on the project - Open C/C++ Build option and select Settings
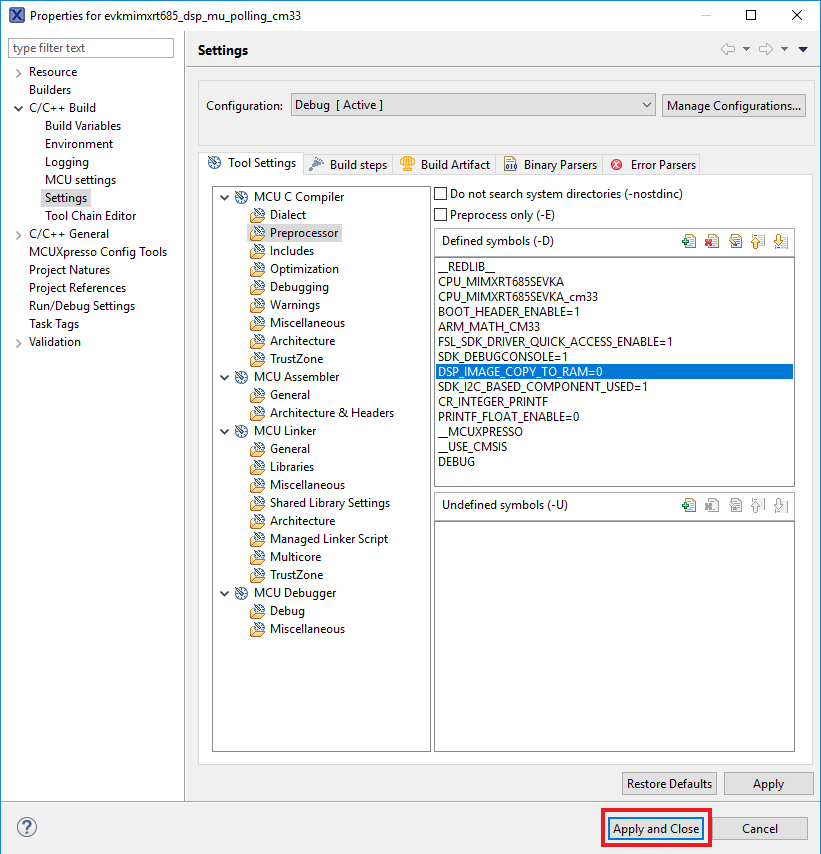
- Once in there, into the Tool Settings, select the Preprocessor folder and change the value of
DSP_COPY_IMAGE_TO_RAMto 0 - Apply and Close
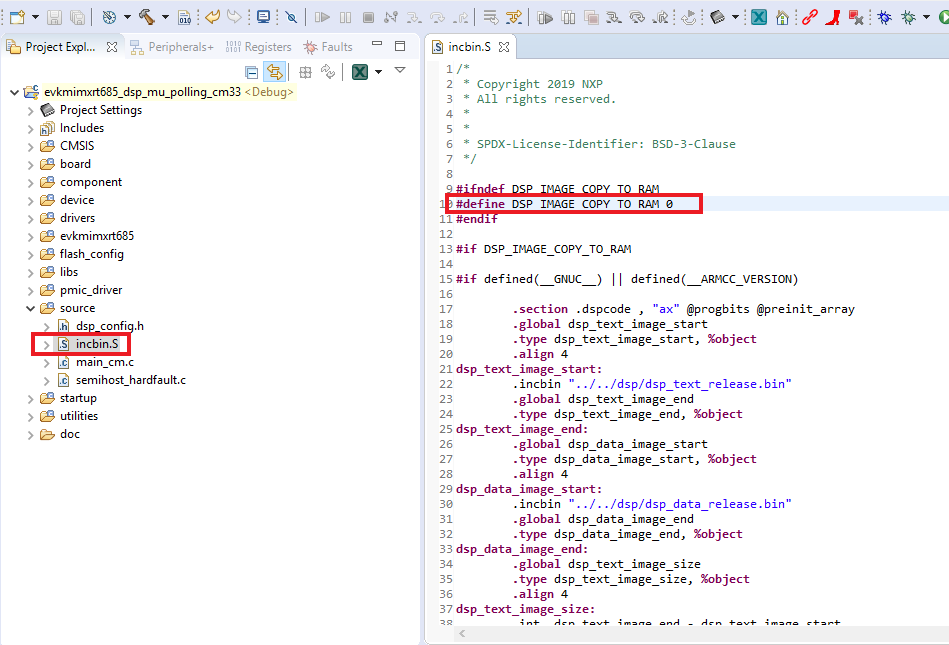
- Open incbin.S file and edit the same macro
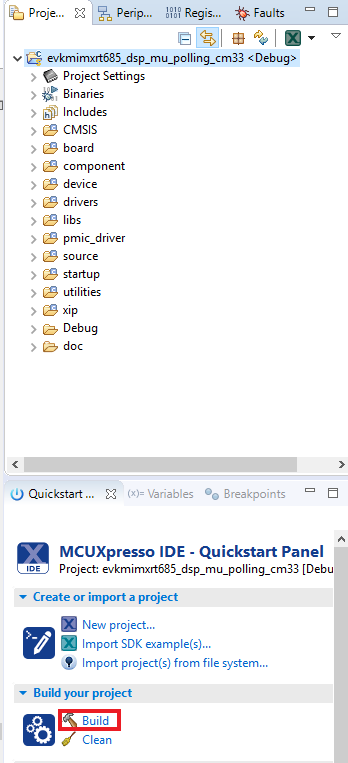
- Select the project and build it
- The project will build without problems
- Connect the board to your computer with the micro USB to
J5'LINK USB' port - Download the application to your IMXRT685-AUD-EVK
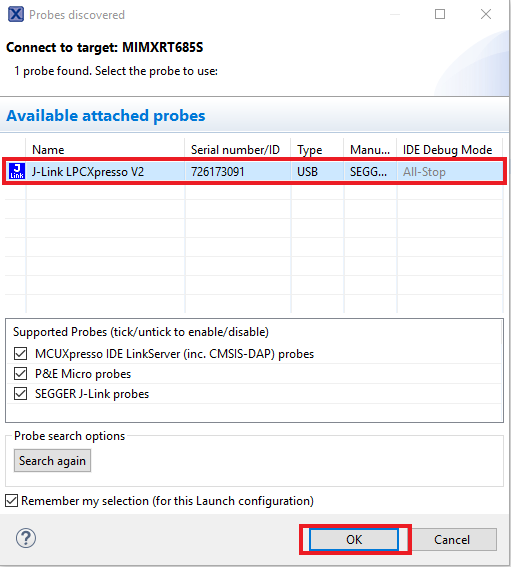
- Select the J-Link debug probe
- Run the application


Build the DSP Application
The following steps will guide you through the mu_polling application using Xtensa Xplorer IDE for the DSP. The Xtensa Xplorer IDE installation can be found at the section “2. Get Software” of this Getting Started guide.
- Open Xtensa Xplorer IDE
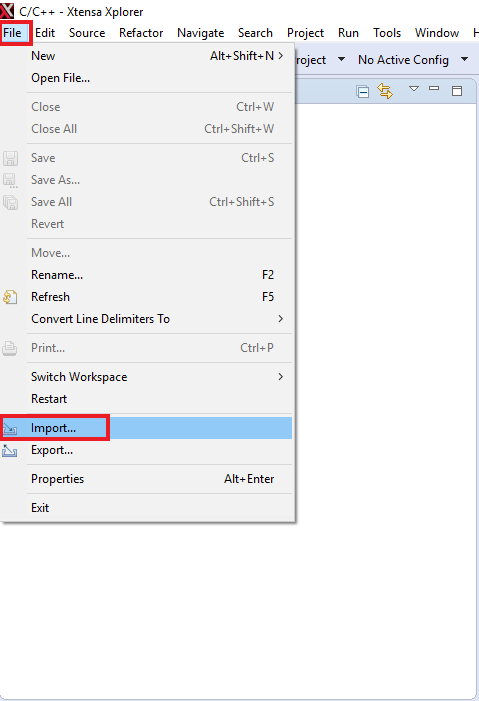
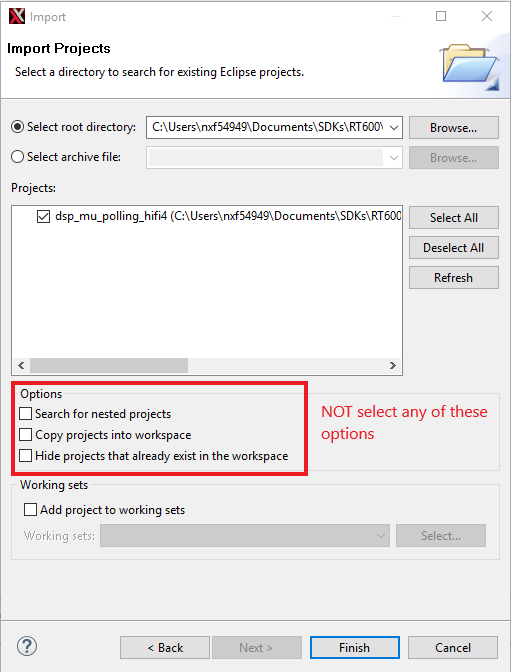
- Import the "mu_polling" demo on your workspace. File → Import
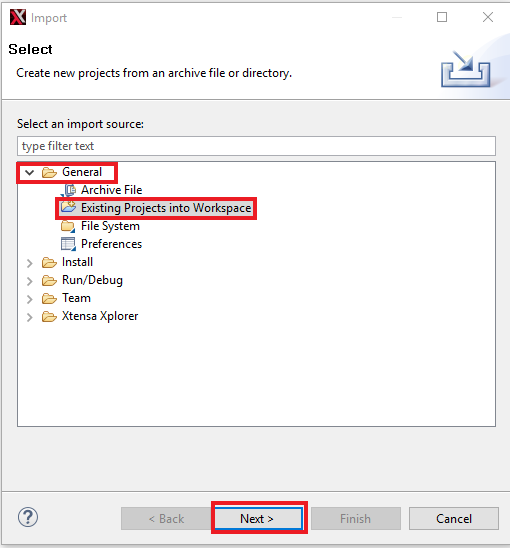
- Select Existing Projects into Workspace
- Use the Browse button and select the mu_polling dsp demo on the SDK. Make sure that the path name to the SDK does not contain any spaces
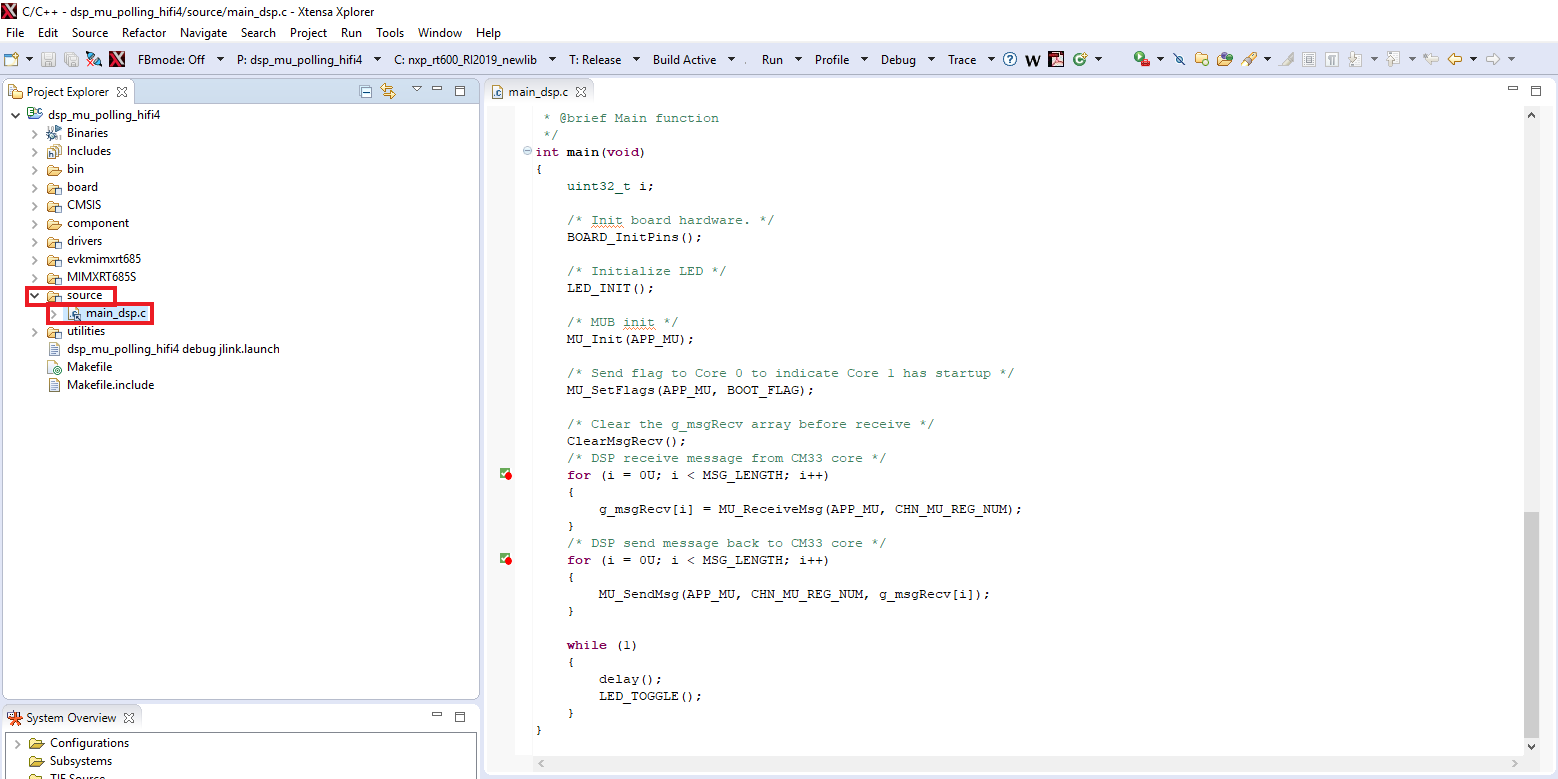
- Once imported, you will see 'dsp_mu_polling_hifi4' in the Project Explorer. This project includes the code for the DSP. You can see the main function at source → main_dsp.c
- To build the DSP application, you must set the following configuration (use the drop-down buttons on the menu bar):
- Build the application by doing click on the "Build Active" button
- The build should complete without errors. If there are errors, verify that the SDK directory path does not contain any spaces
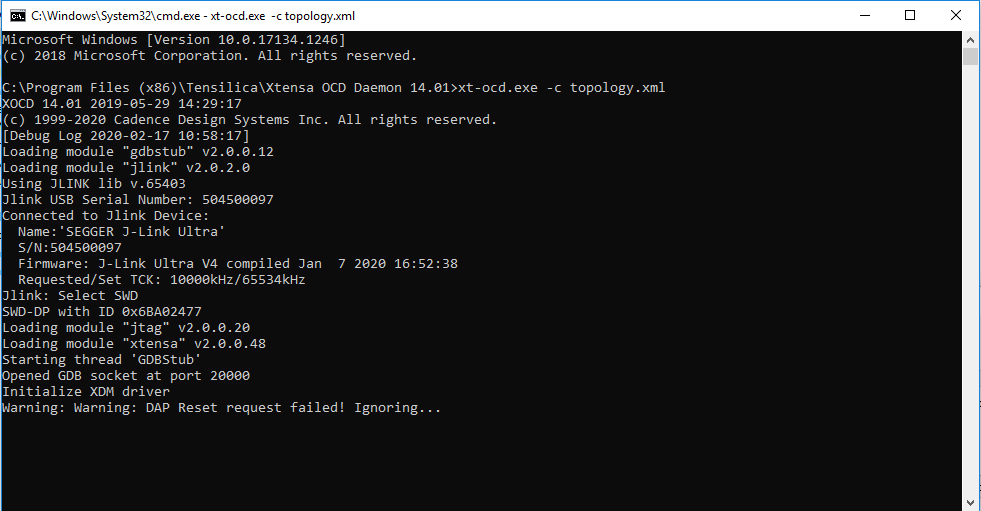
- Open a command prompt on the following location:
- Open the terminal application on the PC (such as PuTTY or Tera Term) and connect to the debug COM port you determined earlier. Configure the terminal with these settings:
- 115200 baud rate
- No parity
- 8 data bits
- 1 stop bit
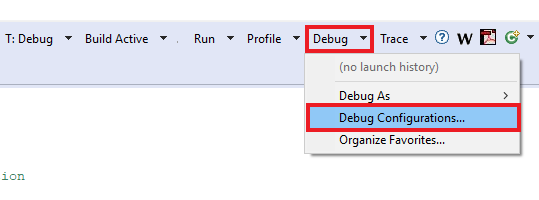
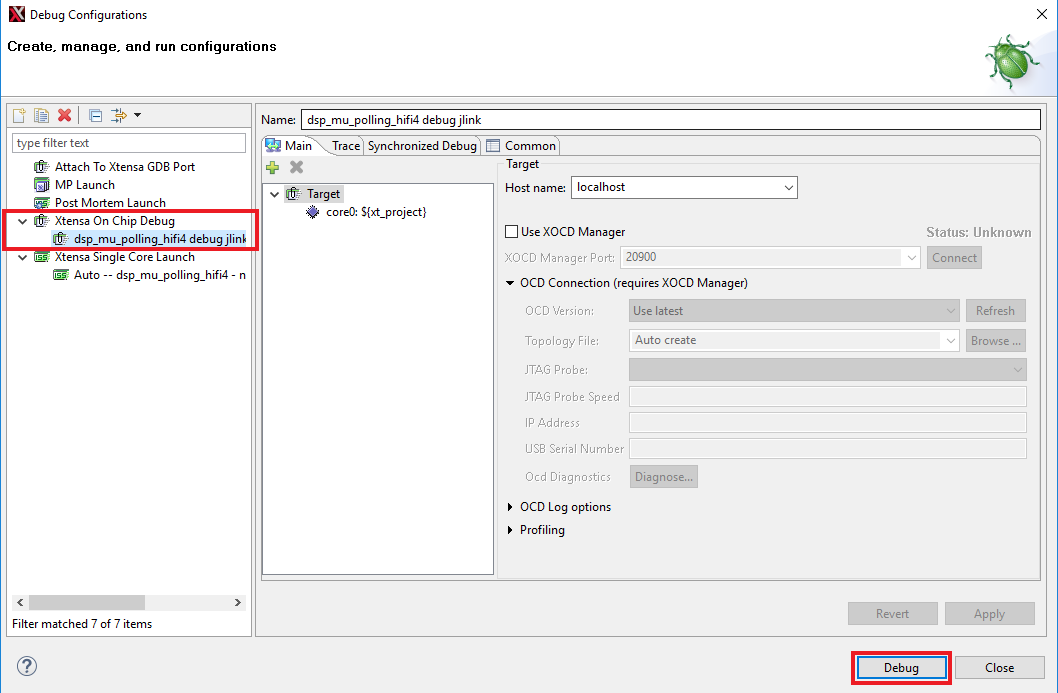
- Go to Xtensa Xplorer IDE and use the Debug action button to open the Debug Configuration
- Please select the dsp_mu_polling Xtensa On Chip Debug and Click on Debug
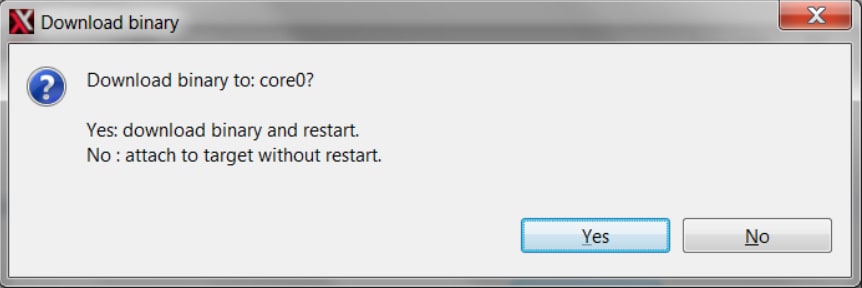
- A new window will be opened asking to download the application to the core 0. Click Yes
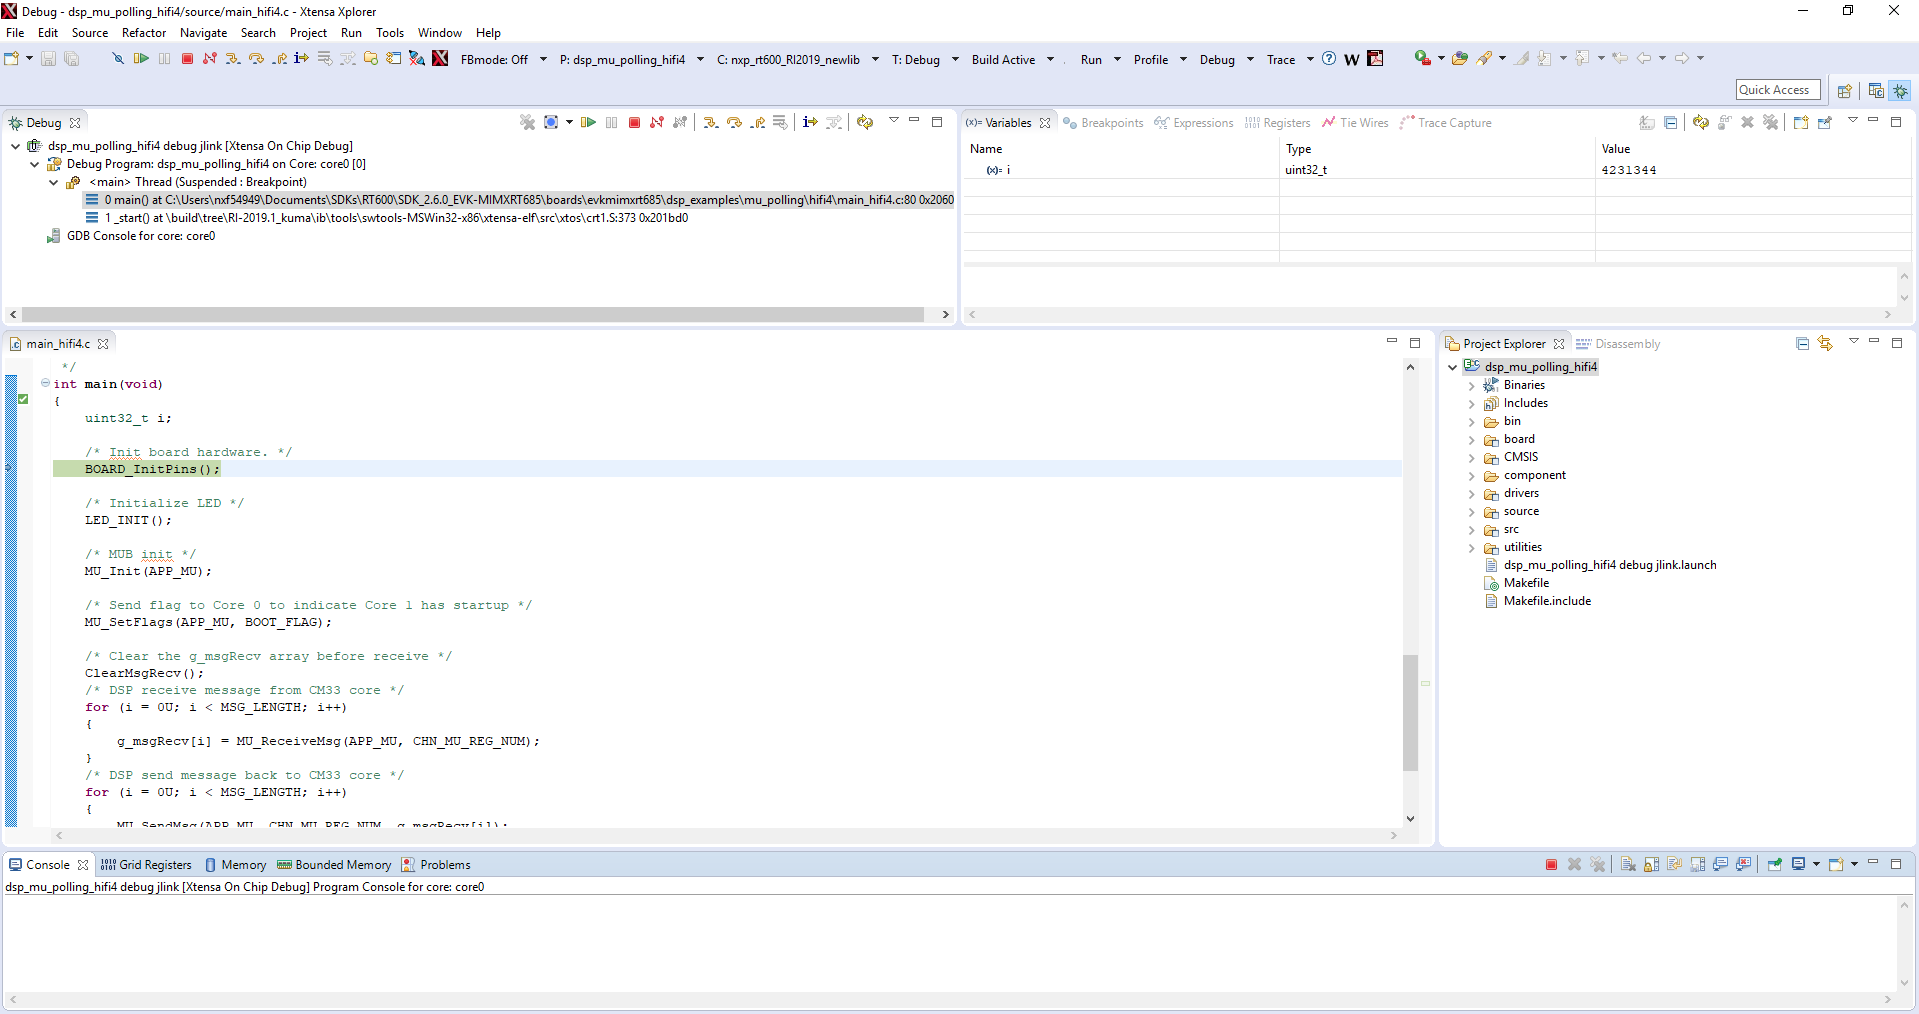
- Xtensa Xplorer will transition to the Debug perspective
- Click on 'Resume' button to start the program
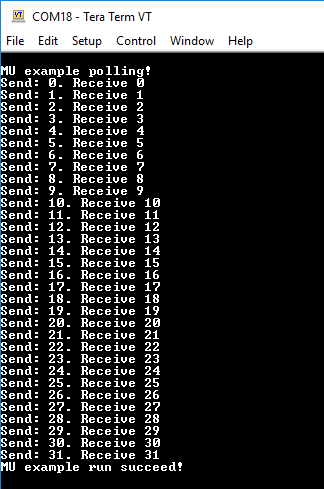
- You should see the LED
D9blinking and the following on the terminal: - Click on 'Terminate' button to stop the debugging session on Xtensa Xplorer IDE
- Stop the debugger on the IDE running the CM33 application
The path is:
<SDK install dir>\boards\mimxrt685audevk\dsp_examples\mu_polling\dsp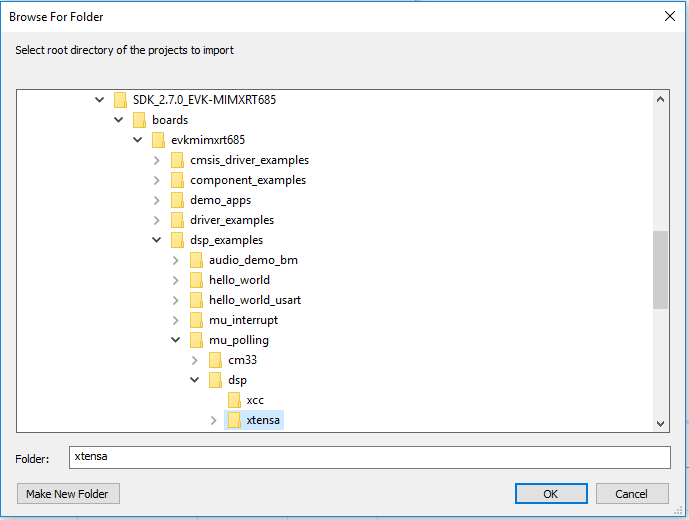


C:\Program Files (x86)\Tensilica\Xtensa OCD Daemon 14.01”Then, execute the following command:
xt-ocd.exe -c topology.xmlYou should see the following:


Running a demo using IAR Embedded Workbench IDE
Build an Example Application
The following steps will guide you through opening the mu_polling application. This application consists of code for both the Cortex M33 core and the DSP core. The instructions for compiling and debugging for the Cortex M33 core are covered in the instructions below.
Instructions for compiling and debugging for the DSP code can be found in Section 2 of the "Building and running a DSP demo using MCUXpresso IDE" tutorial. These steps may change slightly for other example applications as some of these applications may have additional layers of folders in their path.
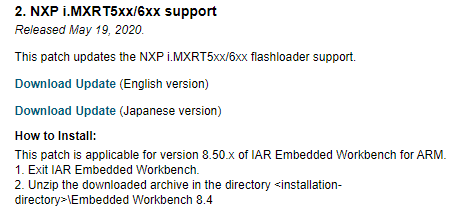
- First, install the IAR patch for IAR EWARM 8.50.1 found on the My Pages site which will add NXP i.MXRT600 flashloader support. The patch can be found by clicking on "Find Updates" after logging into the IAR website
- Next, unzip the previously downloaded SDK package
- If not already done, open the desired example application workspace. Most example application workspace files can be located using the following path:
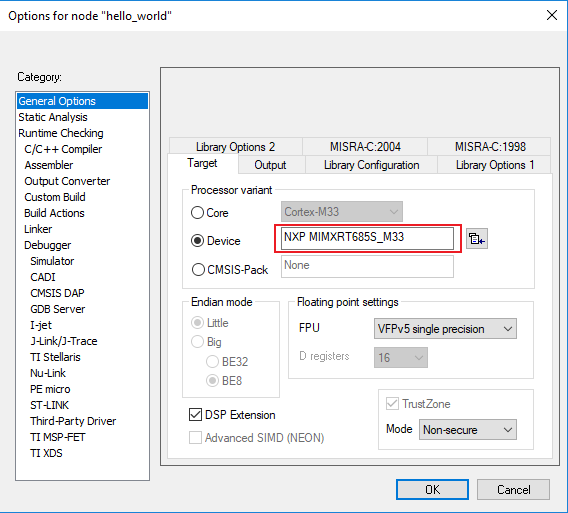
- Select the desired build target from the drop-down. For this example, select the "dsp_mu_polling_cm33 - debug" target
- Change
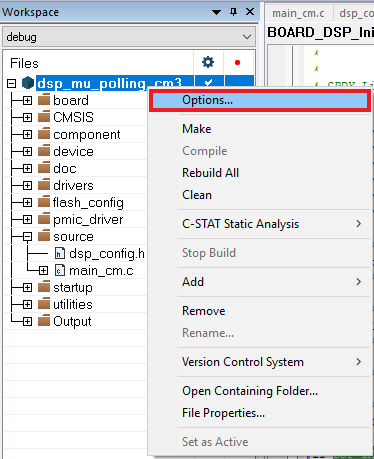
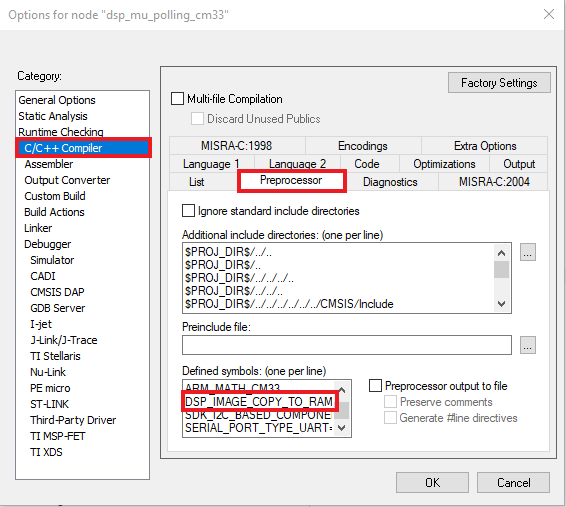
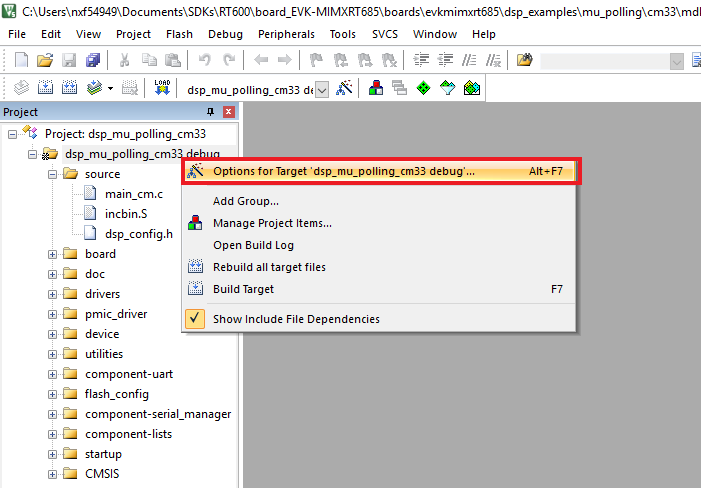
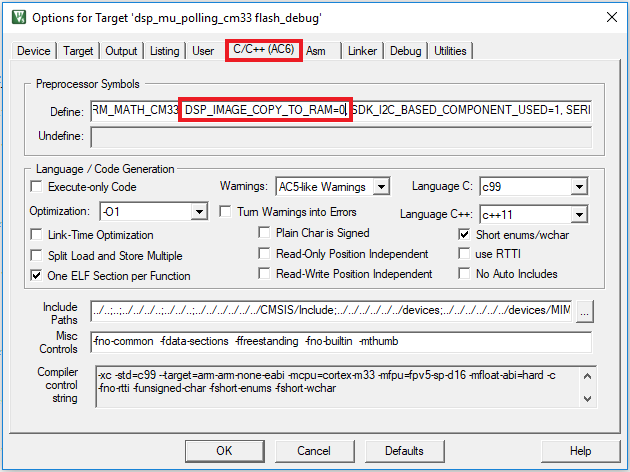
DSP_IMAGE_COPY_TO_RAMmacro value to 0. Open the project properties by doing right click on the project and selecting Options - Click on C/C++ Compiler and select Preprocessor. Change the
DSP_IMAGE_COPY_TO_RAMto 0 - Now, go to Assembler, select Preprocessor option and change the same macro
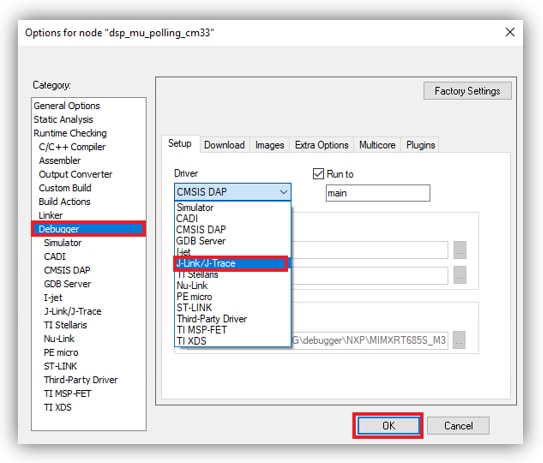
- Now, go to Debugger section and change the debugger driver to J-Link. Press OK button
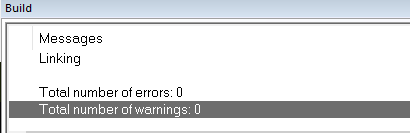
- To build the application, click the "Make" button, highlighted in red below
- The build will complete without errors
<install_dir>/boards/<sdk_board_name>/<example_type>/<application_name>/iarUsing the hello_world demo as an example, the path is:
<install_dir>/boards/mimxrt685audevk/dsp_examples/mu_polling/cm33/iar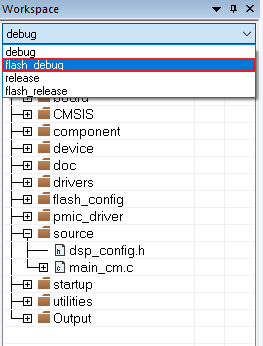


Run an Example Application
The LPC-Link2 circuit on the board should have been updated to use the J-Link interface during "LPCScrypt Tutorial" of the Getting Started website. See that section of the Getting Started website for more details on using LPCScrypt to update the debug circuit firmware on the board to use the J-Link interface if this has not already been done.
- Connect the development platform to your PC via USB cable to
J5"Link USB". Ensure the DFULink jumper (JP1) is removed when powering the board - Click the "Download and Debug" button to download the application to the target
- The application is then downloaded to the target and automatically runs to the main() function
- Run the code by clicking the "Go" button to start the application
- The mu_polling_cm33 application is now running


Build the DSP Application
To build and debug the code for the DSP part of this application, open the "Building and running a DSP demo using MCUXpresso IDE" tutorial and follow the instructions starting at “Build the DSP Application.
Running a demo using Keil® MDK/µVision®
Install CMSIS device pack
After the MDK tools are installed, Cortex® Microcontroller Software Interface Standard (CMSIS) device packs must be installed to fully support the device from a debug perspective. These packs include things such as memory map information, register definitions and flash programming algorithms. Follow these steps to install the appropriate CMSIS pack.
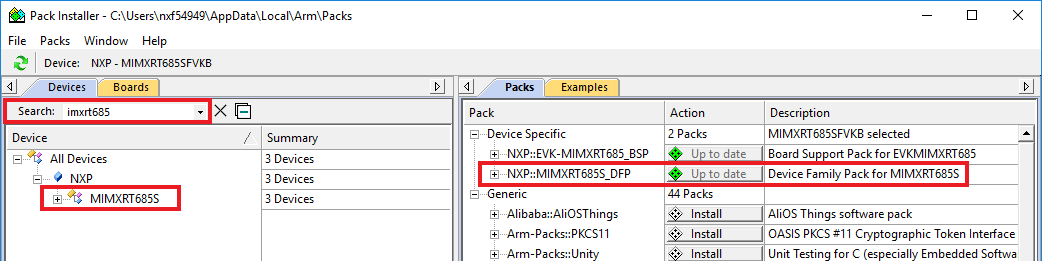
- Open the MDK IDE, which is called µVision. In the IDE, select the "Pack Installer" icon
- In the Pack Installer window, search for “imxrt685” to bring up the LPC55S28 family. Click on the IMXRT685S name, and then in the right-hand side you'll see the NXP::IMXRT685S_DFP pack. Click on the "Install" button next to the pack. This process requires an Internet connection to successfully complete
- After the installation finishes, close the Pack Installer window and return to the µVision IDE

Build the Example Application
The following steps will guide you through opening the mu_polling application. This application consists of code for both the Cortex M33 core and the DSP core. The instructions for compiling and debugging for the Cortex M33 core are covered in the instructions below. Instructions for compiling and debugging for the DSP code can be found in Section 2 of the "Building and running a DSP demo using MCUXpresso IDE" tutorial. These steps may change slightly for other example applications as some of these applications may have additional layers of folders in their path
- If not already done, open the desired demo application workspace in:
- Select debug configuration
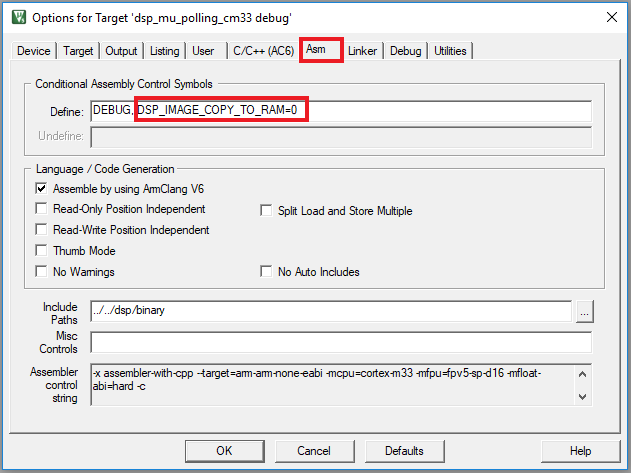
- Do right click on the project and select the project options:
- Select the C/C++ option and change the
DSP_IMAGE_COPY_TO_RAMto 0 - Open the Asm option and change the same macro to 0
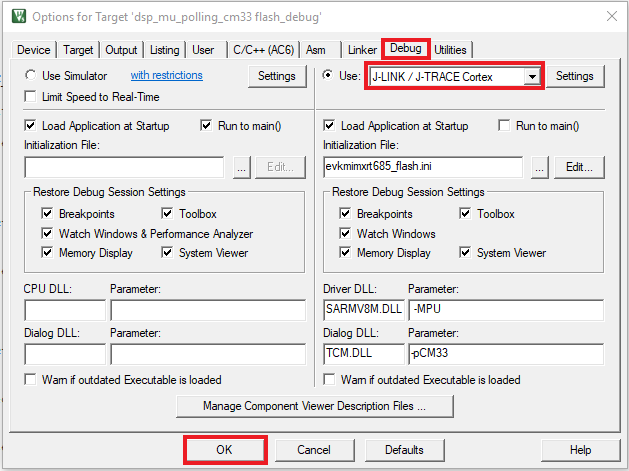
- Now, go to the Debug option and select J-LINK. Click on the OK button
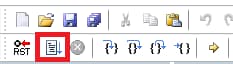
- To build the demo project, select the "Rebuild" button, highlighted in red
- The build will complete without errors
<install_dir>/boards/<sdk_board_name>/<example_type>/<application_name>/mdkThe workspace file is named <application_name>.uvmpw, so for this specific example, the actual path is:
<install_dir>/boards/mimxrt685audevk/dsp_examples/mu_polling/cm33/mdk/dsp_mu_polling_cm33.uvmpw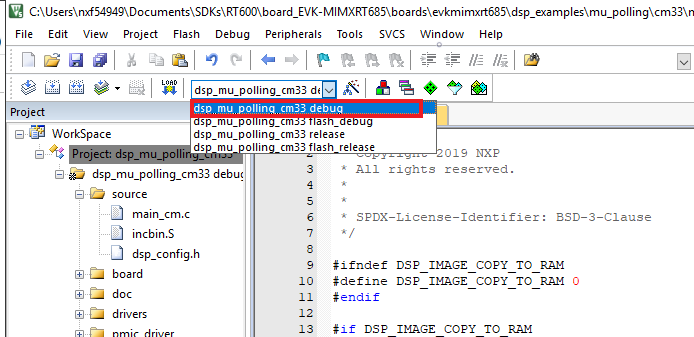

Run an Example Application
The LPC-Link2 circuit on the board should have been updated to use the J-Link interface during Step 2.5 "LPCScrypt Tutorial" of the Getting Started website. See that section of the Getting Started website for more details on using LPCScrypt to update the debug circuit firmware on the board to use the J-Link interface if this has not already been done.
- Connect the development platform to your PC via USB cable to
J5"Link USB". Ensure the DFULink jumper (JP1) is removed when powering the board to boot the debug probe from internal flash - After the application is properly built, click the "Download" button to download the application to the target
- Click on "Start/Stop Debug Session" to open the debug view
- Run the code by clicking the "Run" button to start the application
- The mu_polling_cm33 application is now running


Build the DSP Application
To build and debug the code for the DSP part of this application, open the "Building and running a DSP demo using MCUXpresso IDE" tutorial and follow the instructions starting at “Build the DSP Application".
Use ARM GCC
Set Up Toolchain
This section contains the steps to install the necessary components required to build and run a KSDK demo application with the Arm GCC toolchain, as supported by the MCUXpresso SDK.
There are many ways to use Arm GCC tools, but this example focuses on a Windows environment. Though not discussed here, GCC tools can also be used with both Linux OS and Mac OSX.
Install GCC Arm Embedded Toolchain
Download and run the installer from GNU Arm Embedded Toolchain Downloads . This is the actual toolchain (i.e., compiler, linker, etc.). The GCC toolchain should correspond to the latest supported version, as described in the Kinetis SDK Release Notes.
Install MinGW
The Minimalist GNU for Windows (MinGW) development tools provide a set of tools that are not dependent on third party C-Runtime DLLs (such as Cygwin). The build environment used by the KSDK does not utilize the MinGW build tools, but does leverage the base install of both MinGW and MSYS. MSYS provides a basic shell with a Unix-like interface and tools.
- Download the latest MinGW mingw-get-setup installer from MinGW - Minimalist GNU for Windows Files
- Run the installer. The recommended installation path is C:\MinGW, however, you may install to any location
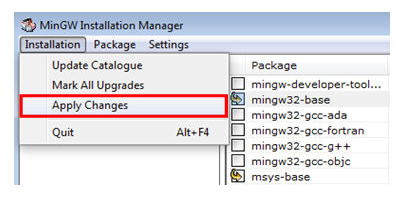
- Ensure that the "mingw32-base" and "msys-base" are selected under Basic Setup
- Click "Apply Changes" in the "Installation" menu and follow the remaining instructions to complete the installation
- Add the appropriate item to the Windows operating system Path environment variable. It can be found under Control Panel → System and Security → System → Advance System Settings in the "Environment Variables" section. The path is:

<mingw_install_dir>\binAssuming the default installation path, C:\MinGW, an example is shown below. If the path is not set correctly, the toolchain does not work

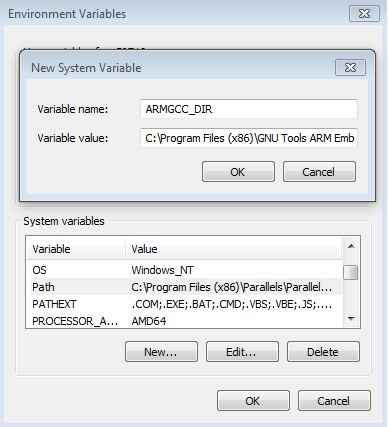
Add a New Environment Variable for ARMGCC_DIR
Create a new system environment variable and name it ARMGCC_DIR. The value of this variable should point to the Arm GCC Embedded tool chain installation path, which, for this example, is:
C:\Program Files (x86)\GNU Tools Arm Embedded\<version>Reference the installation folder of the GNU Arm GCC Embedded tools for the exact path name of your installation.
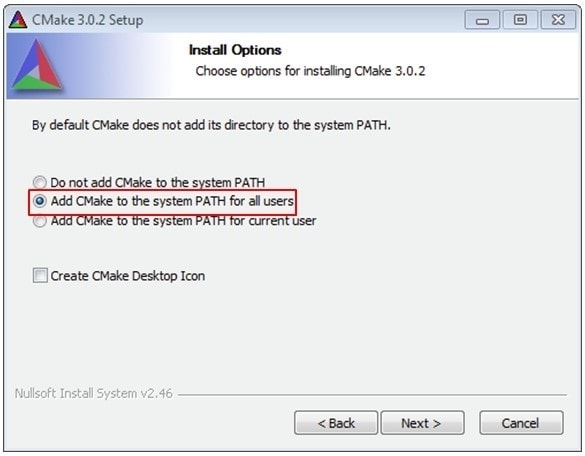
Install CMake
- Download CMake 3.0.x from CMake
- Install CMake, ensuring that the option "Add CMake to system PATH" is selected when installing. It's up to the user to select whether it's installed into the PATH for all users or just the current user. In this example, the assumption is that it's installed for all users
- Follow the remaining instructions of the installer
- You may need to reboot your system for the PATH changes to take effect
Build an Example Application
To build an example application, follow these steps.
- Open the next directory on the file explorer and open the CMakeList.txt file
- Edit the next lines changing the value to 0:
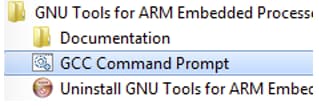
- If not already running, open a GCC Arm Embedded tool chain command window. To launch the window, from the Windows operating system Start menu, go to “Programs → GNU Tools Arm Embedded <version>" and select “GCC Command Prompt”
- Change the directory to the example application project directory, which has a path like this:
- Type “build_debug.bat” on the command line or double click on the "build_debug.bat" file in Windows operating system Explorer to perform the build. The output is shown in this figure:
<SDK Install dir>\boards\mimxrt685audevk\dsp_examples\mu_polling\cm33\armgcc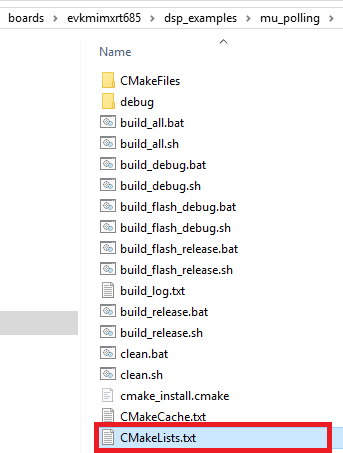
SET(CMAKE_ASM_FLAGS_DEBUG "${CMAKE_ASM_FLAGS_DEBUG} -DDSP_IMAGE_COPY_TO_RAM=0")SET(CMAKE_C_FLAGS_DEBUG "${CMAKE_C_FLAGS_DEBUG} -DDSP_IMAGE_COPY_TO_RAM=0")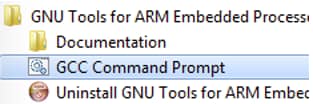
<install_dir>/boards/<board_name>/<example_type>/<application_name>/armgccFor this guide, the exact path is:
<install_dir>/boards/mimxrt685audevk/dsp_examples/mu_polling/cm33/armgcc
Run an Example Application
The GCC tools require a J-Link debug interface. The LPC-Link2 circuit on the board should have been updated to use the J-Link interface during “LPCScrypt Tutorial” of the Getting Started website. See that section of the Getting Started website for more details on using LPCScrypt to update the debug circuit firmware on the board to use the J-Link interface if this has not already been done.
- Connect the development platform to your PC via USB cable to
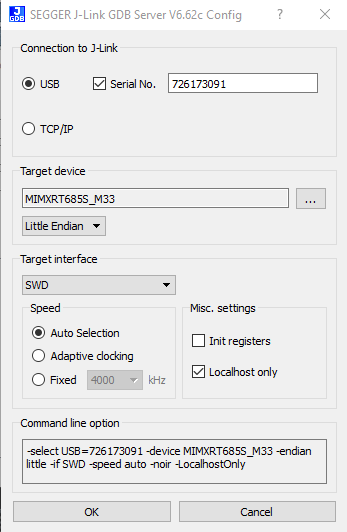
J5“Link USB”. Ensure the DFULink jumper (JP1) is removed when powering the board - Open the J-Link GDB Server application. Assuming the J-Link software is installed, the application can be launched by going to the Windows operating system Start menu and selecting "Programs → SEGGER → J-Link <version> J-Link GDB Server"
- Modify the settings as shown below. The target device selection chosen for this example is the “IMXRT685S_M33” and use the SWD interface
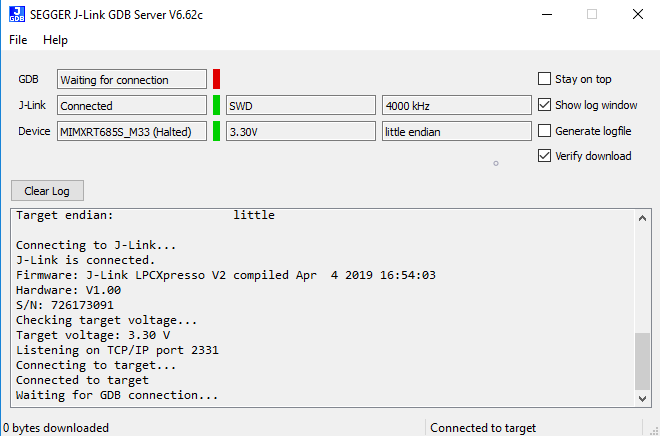
- After it is connected, the screen should resemble this figure:
- If not already running, open a GCC Arm Embedded tool chain command window. To launch the window, from the Windows operating system Start menu, go to "Programs → GNU Tools Arm Embedded <version>" and select "GCC Command Prompt"
- Change to the directory that contains the demo application output. The output can be found in using one of these paths, depending on the build target selected:
- Run the command "arm-none-eabi-gdb.exe <demo_name>.elf". For this example, it is "arm-none-eabi-gdb.exe dsp_mu_polling_cm33.elf"
- Run these commands: "target remote localhost:2331" and "load"
- Execute the "monitor go" command to start the example application
- The mu_polling cm33 application is now running
<install_dir>/boards/<board_name>/<example_type>/<application_name>/armgcc/debug<install_dir>/boards/<board_name>/<example_type>/<application_name>/armgcc/releaseFor this guide, the path is:
<install_dir>/boards/frdmk64f/demo_apps/hello_world/armgcc/debug
Build the DSP Application
To build and debug the DSP application follow the instructions of chapter “Build the DSP Application” at Building and running a DSP demo using MCUXpresso IDE tutorial on this same section.
4. Modify an SDK example
4.1 Create an Application for IMXRT685-AUD-EVK
4.2 Clone an Example Project From MCUXpresso SDK
Option A: Use the MCUXpresso IDE to clone an example project.
Use MCUXpresso IDE
Build an Example Application
The following steps will guide you through the manipulation of the general-purpose outputs. The example sets up a switch button and an LED. The LED blinks if the button SW2 is pressed.
- Find the Quickstart Panel in the lower left-hand corner
- Then click on Import SDK examples(s)
- Click on the mimxrt685audevk board to select that you want to import an example that can run on that board, and then click on Next
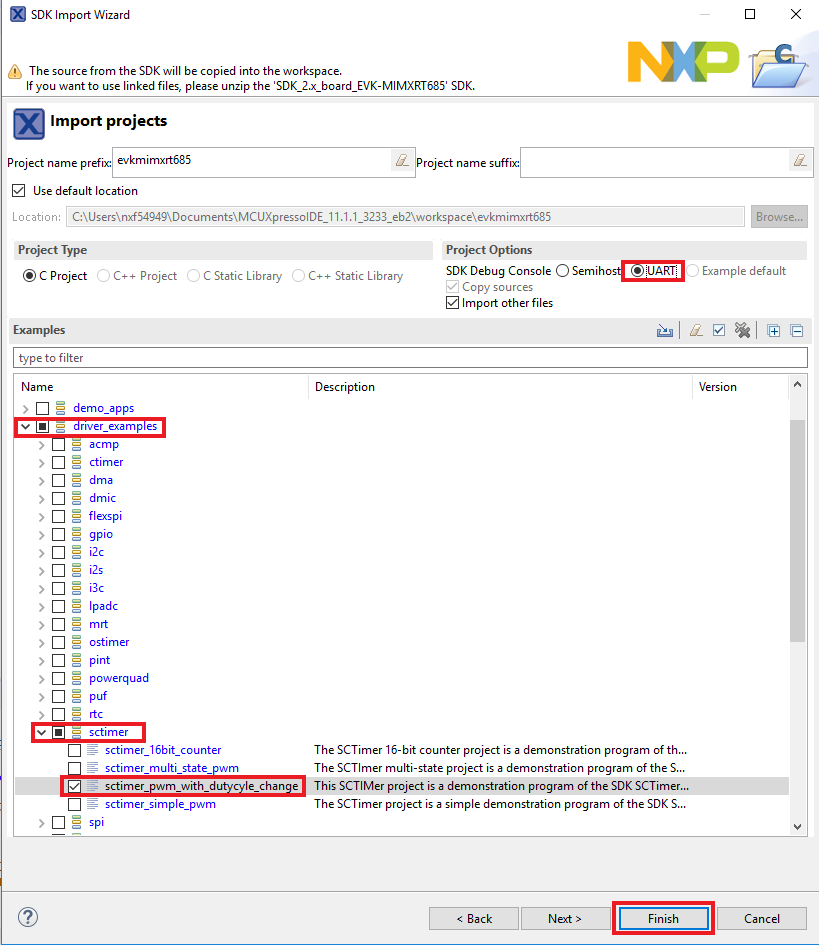
- Use the arrow button to expand the driver_examples category, then expand the sctimer examples, click on the checkbox next to sctimer_pwm_with_dutycycle_change to select it. To use the UART for printing (instead of the default semihosting), select UART as the SDK Debug Console checkbox under the project options. Then, click on Finish
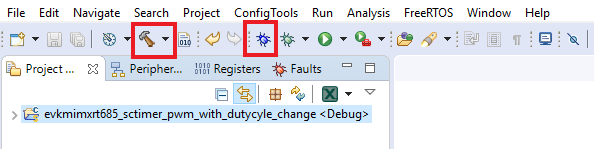
- Click on the “mimxrt685audevk_sctimer_pwm_with_duty_cycle_change” project in the Project Explorer View and build, compile and run the demo as described previously
- You should see the GREEN LED changing the brightness
- Terminate the debug session

Option B: Use the MCUXpresso Config Tools to clone an existing MCUXpresso SDK example for use with third party IDEs.
Use MCUXpresso Config Tools
The following steps will guide you through the manipulation of the general-purpose outputs. The example sets up a switch button and an LED. The LED blinks if the button SW2 is pressed
- Open the MCUXpresso Config Tools
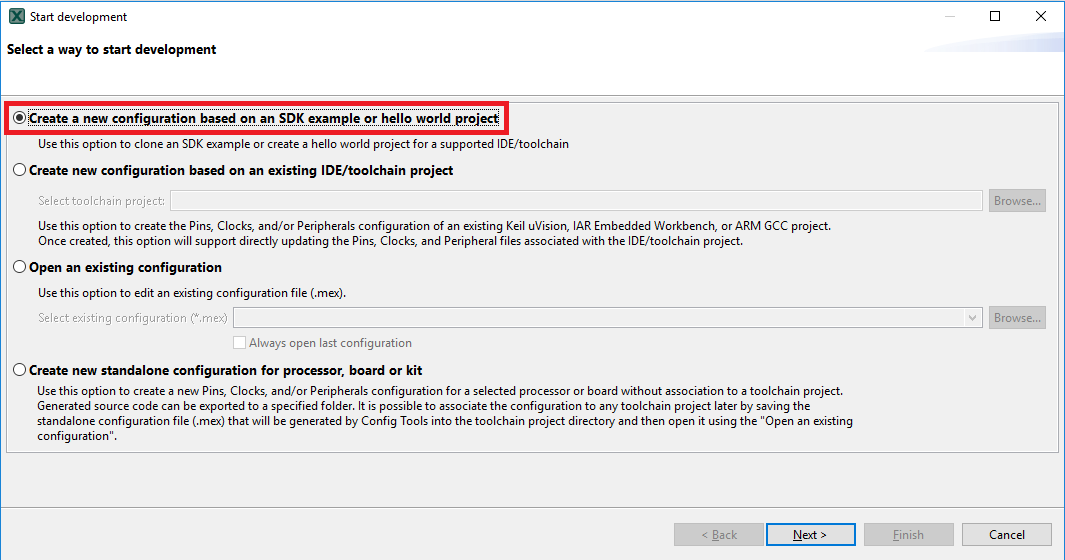
- In the wizard that comes up, select the "Create a new configuration based on an SDK example or hello word project" radio button and click on Next
- On the next screen, select the location of the MCUXpresso SDK that you had unzipped earlier. Then select the IDE that is being used. Note that only IDEs that were selected in the online SDK builder when the SDK was built will be available and click on clone select example
- After, cloning go to the directory you selected and open the project for your IDE. Import, compile and run the project as done in previous sections
- You should see the GREEN LED changing the brightness
- Terminate the debug session
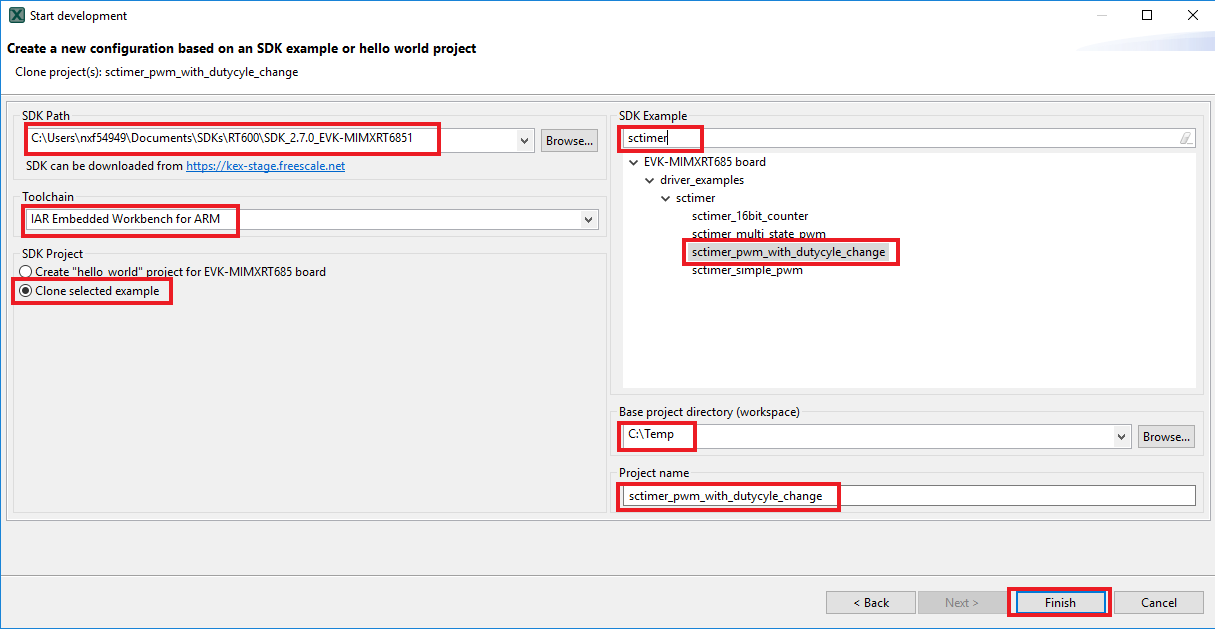
Then, select the project to clone. For this example, we want to use the GPIO LED output project. You can filter this by typing "sctimer" in the filter box and then selecting the “sctimer_pwm_with_dutycycle_change” example project. You can also specify where to clone the project and the name. After that, click on Finish
4.3 Use the Pins Tool
Now, let's use the Pins Tool that is part of the MCUXpresso Config Tools to change the LED that is blinking to a different LED.
Use MCUXpresso IDE Pins Tool
To open Pins Tool in MCUXpresso IDE
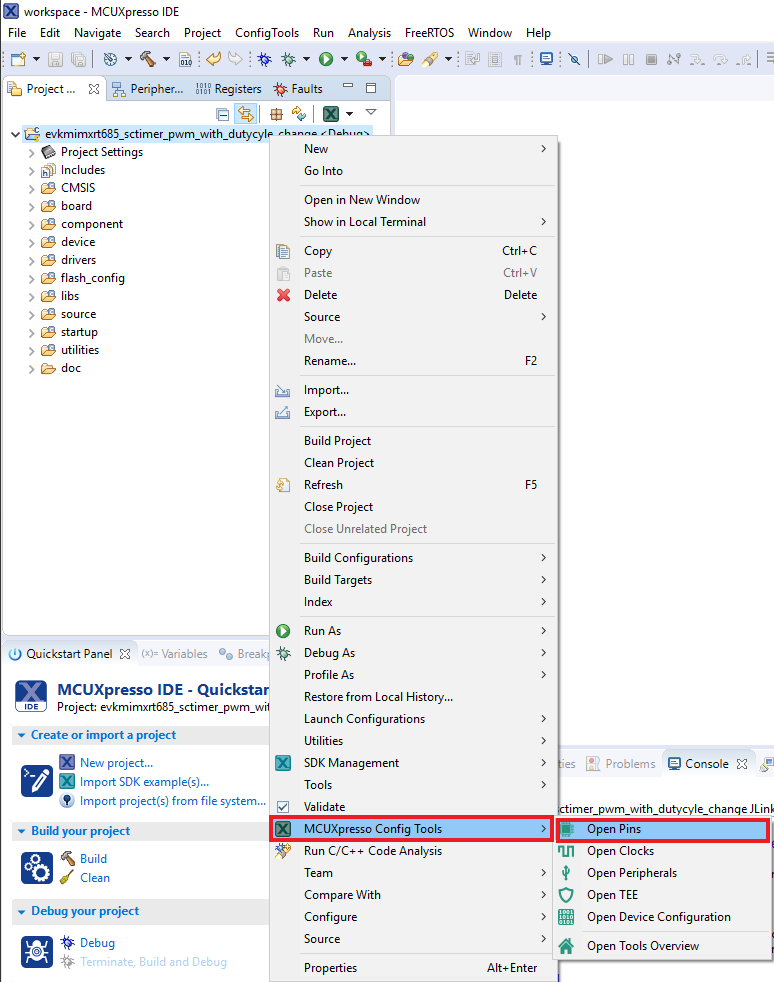
- Open the Pins Tool by right clicking on the “mimxrt685audevk_sctimer_pwm_with_dutycycle_change” project, and selecting “MCUXpresso Config Tools” and then “Open Pins”
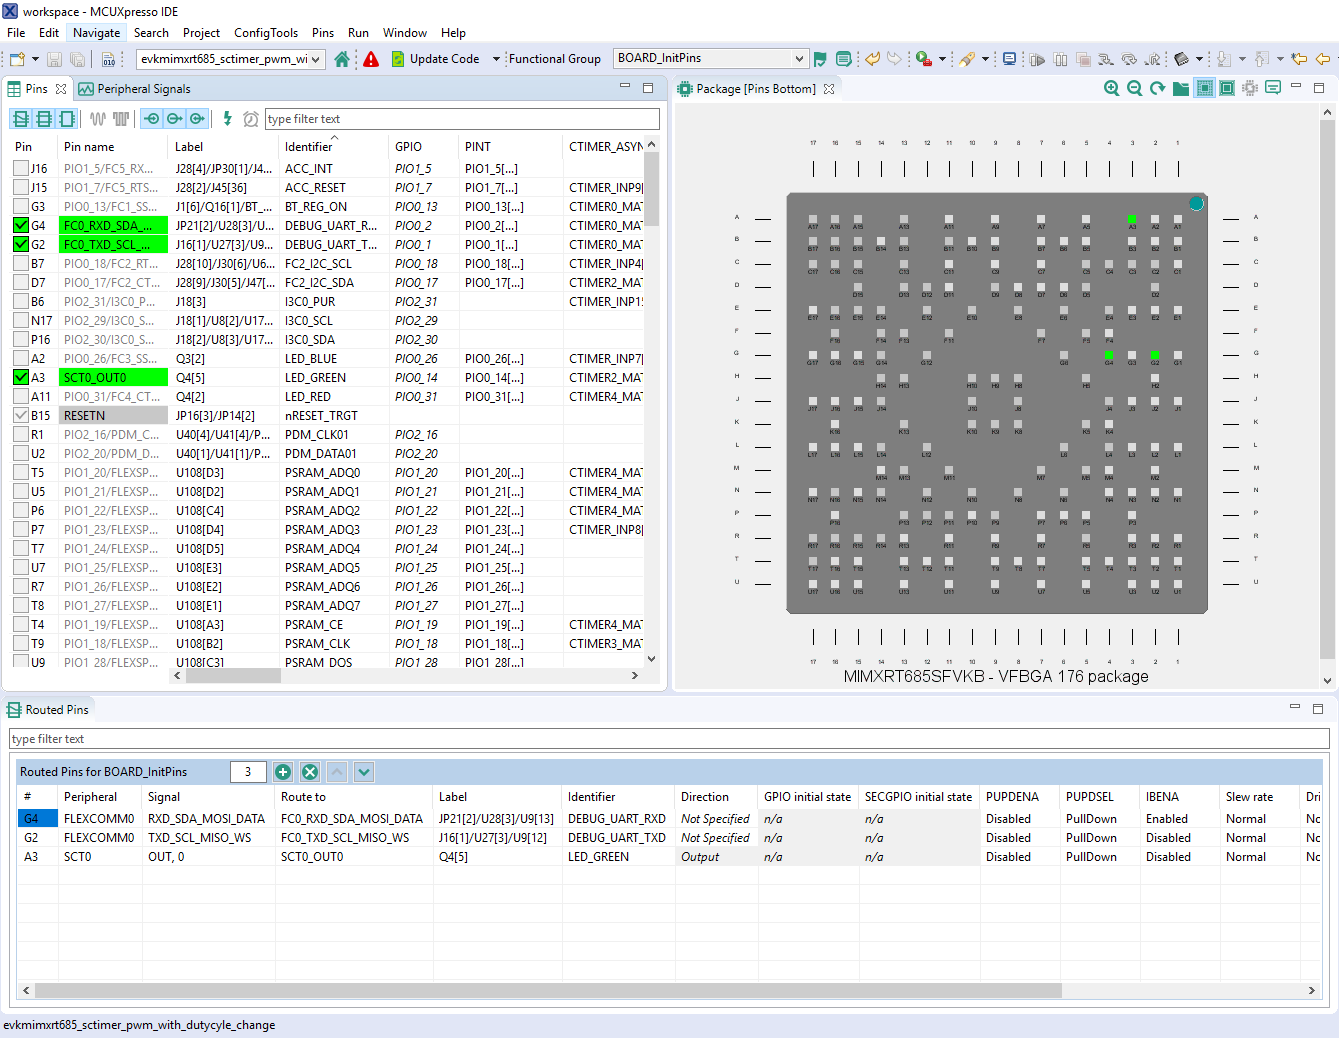
- The Pins Tool should now display the pin configuration for the sct project
To open Pins Tool in MCUXpresso Config Tools
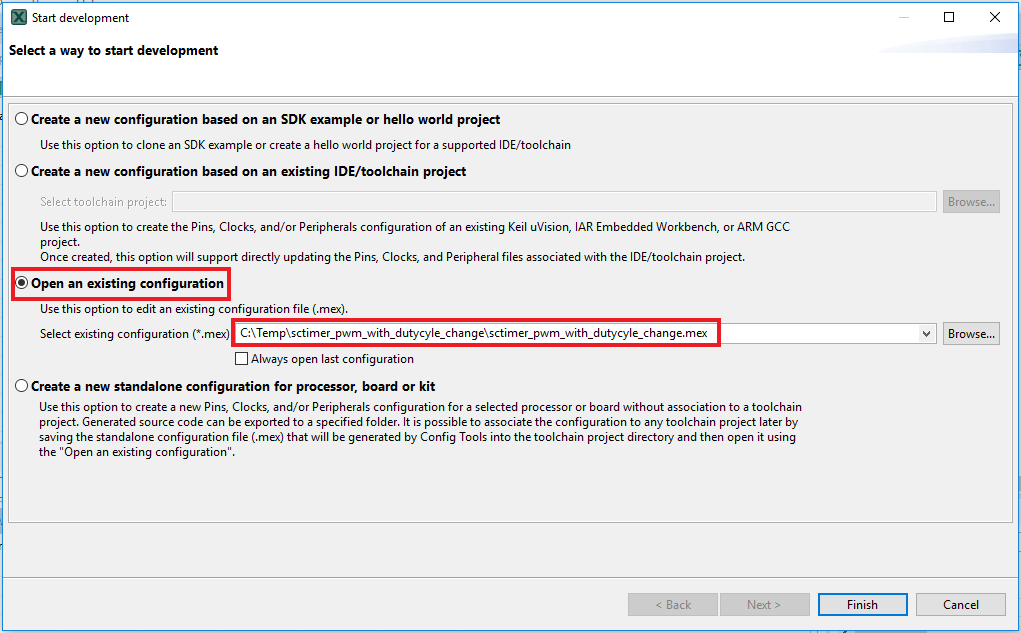
- Open the MCUXpresso Config Tools
- In the wizard that comes up, select the “Open existing configuration” radio button, then select the project that you had clone and click on Next
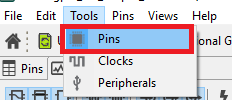
- Open the Pins Tool by selecting Tools → Pins from the toolbar
- The Pins Tool should now display the pin configuration for the sctimer project


Use the Pins Tool to modify the LED routed pin
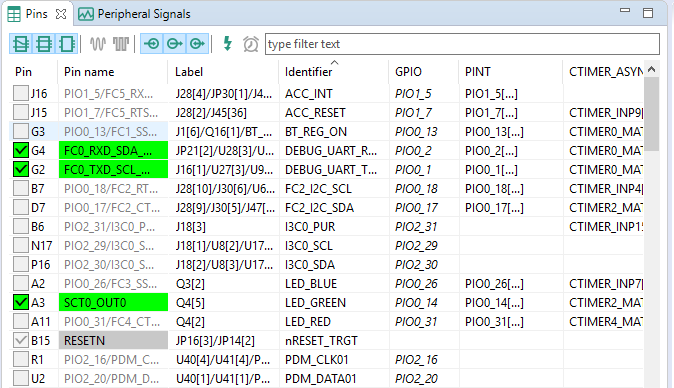
- We'll use MCUXpresso IDE for the rest of the instructions, but the same steps can be done in MCUXpresso Config Tools for third party IDEs. In the Pins view deselect the “Show not routed pins” checkbox to see only the routed pins, you also going to see the pins that are routed by default. Routed pins have a check in a green box next to the pin name. The functions selected for each routed pin are highlighted in green
- In the current configuration,
PIO0_14is routed as aSCT0_OUT0. Let's disable,PIO0_14and change the MUX setting ofPIO0_26to use itsSCT0_OUT6functionality - Disable
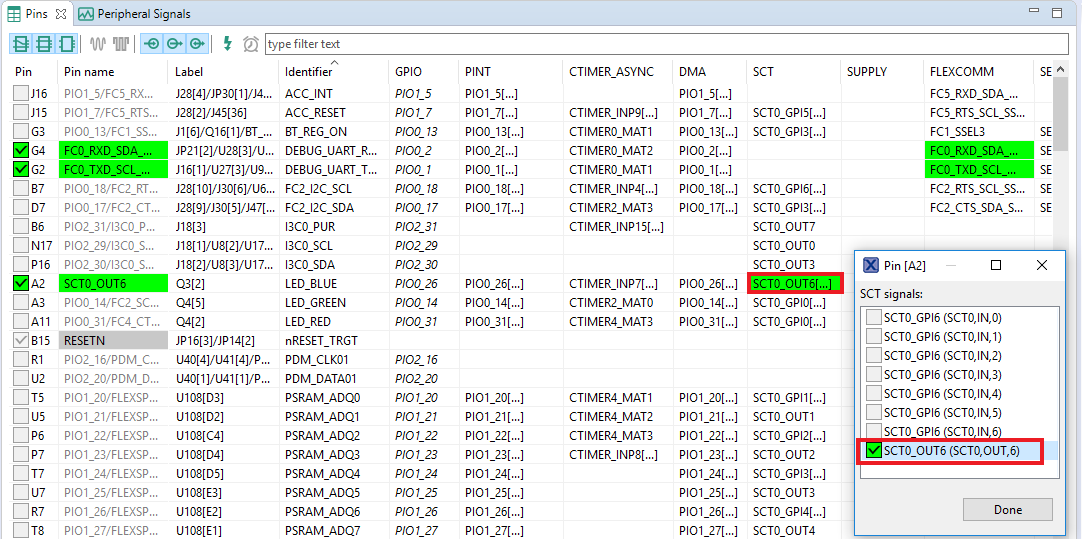
PIO0_14by clicking theSCT0_OUT0field under the SCT column. The pin will then be disabled (it will no longer have a check in box) and therefore disappear from the list - Now, route
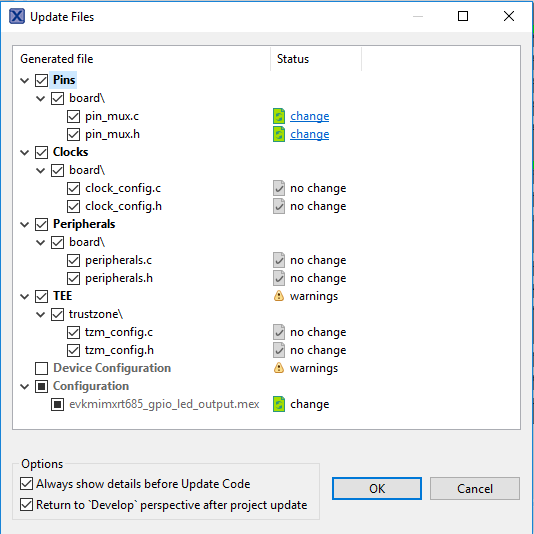
PIO0_26as aSCT_OUT6. First, select the "Show not routed pins" so that all the pins are displayed again. Then, searchPIO0_26in the Pins view. Finally, click the box under the SCT columnPIO0_26. The box will be highlighted in green, and a check will appear next to the pin - Now, it's time to implement these changes into the project by exporting the new updated pin_mux.c and pin_mux.h files that are generated by the Pins Tool. Click on Update Project in the menu bar
- The screen that pops up will show the files that are changing and you can click on “diff” to see the difference between the current file and the new file generated by the Pins Tool. Click on “OK” to overwrite the new files into your project
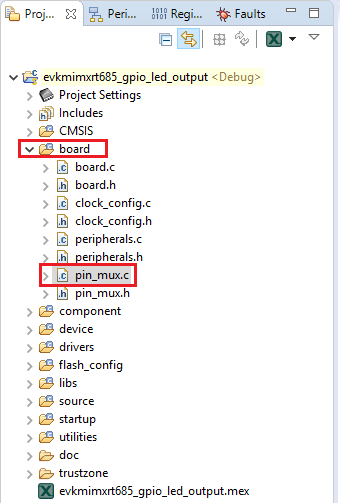
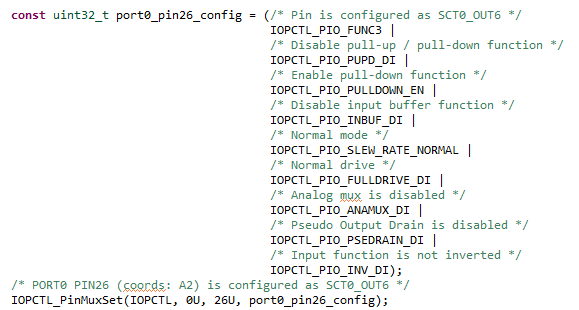
- Now, inside the IDE, open the pin_mux.c file under the board folder
- Note that when we change the sct routed pin in the tool the
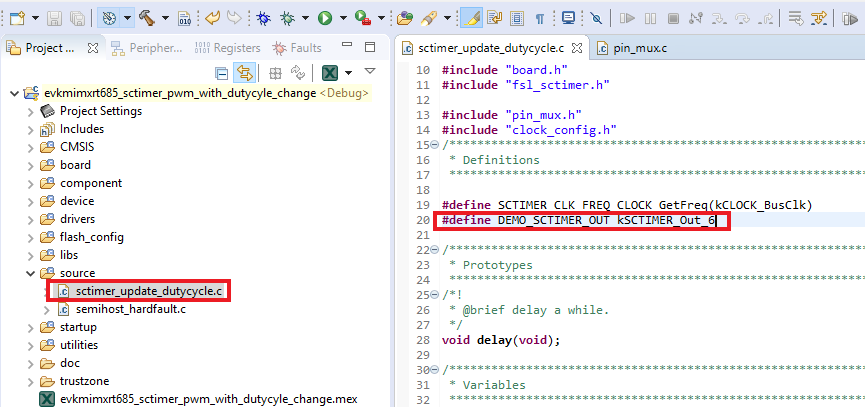
PIO0_14was selected and configured asSCT_OUT(green LED). Now, we have the declaration ofPIO0_26and configured asSCT_OUT(blue LED) - Open the sctimer_update_dutycycle.c file and change the macro
DEMO_SCTIMER_OUTtokSCTIMER_Out_6 - Build and download the project as done in the previous section
- Run the application. You should now see the BLUE LED changing the brightness
- Terminate the debug session


4.4 Use the Clocks Tool
Next, use the Clocks Tool that is part of the MCUXpresso Config Tools to change the clock settings and change the rate that the LED blinks.
Use MCUXpresso IDE Clocks Tool
To open Clocks Tool in MCUXpresso IDE
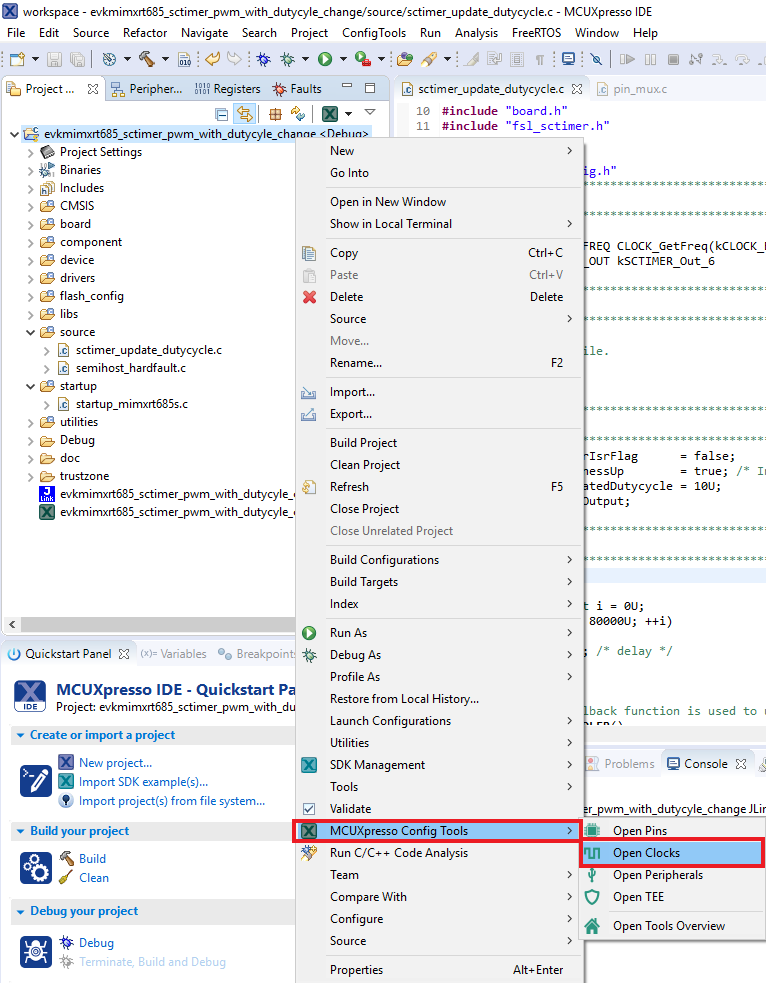
- Open the Clocks Tool by right clicking on the "mimxrt685audevk_sctimer_pwm_with_dutycycle_change" project and selecting "MCUXpresso Config Tools" and then "Open Clocks"
- In the wizard that comes up, select the "Open existing configuration" radio button, then select the project that you had clone and click on Next

To open Clocks Tool in MCUXpresso Config Tools
- Open the MCUXpresso Config Tools
- In the wizard that comes up, select the "Open existing configuration" radio button, then select the project that you had clone and click on Next
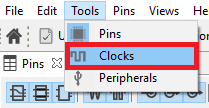
- Open the Clocks Tool by selecting Tools → Clocks from the toolbar
- The Pins Tool should now display the clock configuration for the project
Use the clock tools to modify the system clock
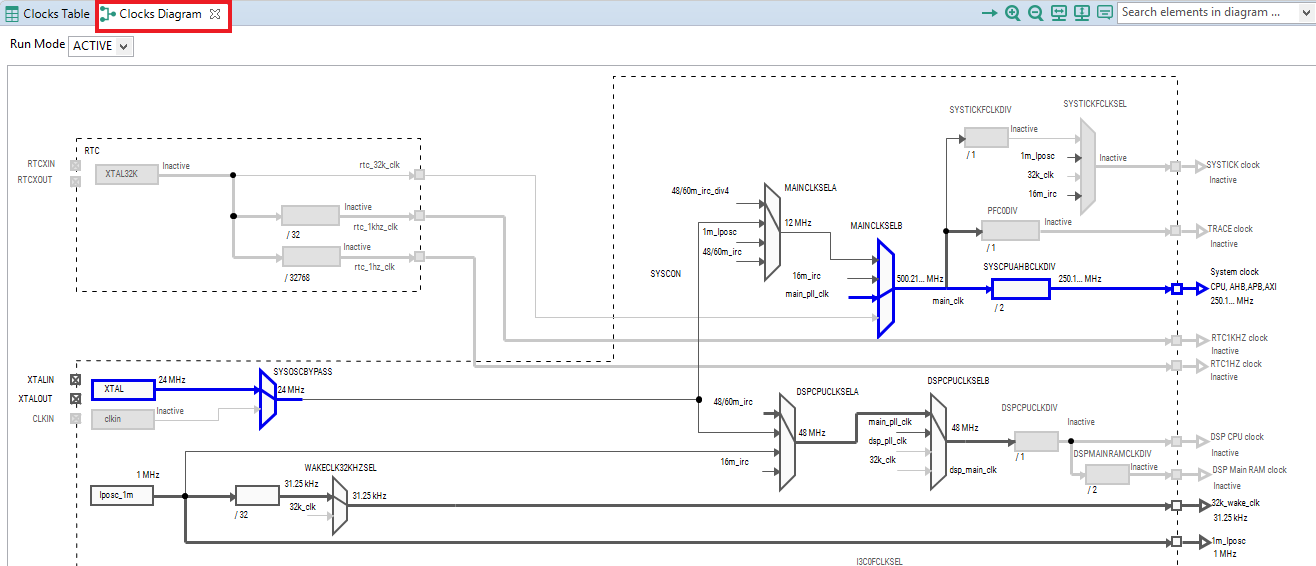
- We'll use MCUXpresso IDE for the rest of the instructions, but the same steps can be done in MCUXpresso Config Tools for third party IDEs. Switch to the Clocks Diagram view by clicking the tab in the upper left corner
- Make sure that you are in the functional group called "BOARD_BootClockRUN"
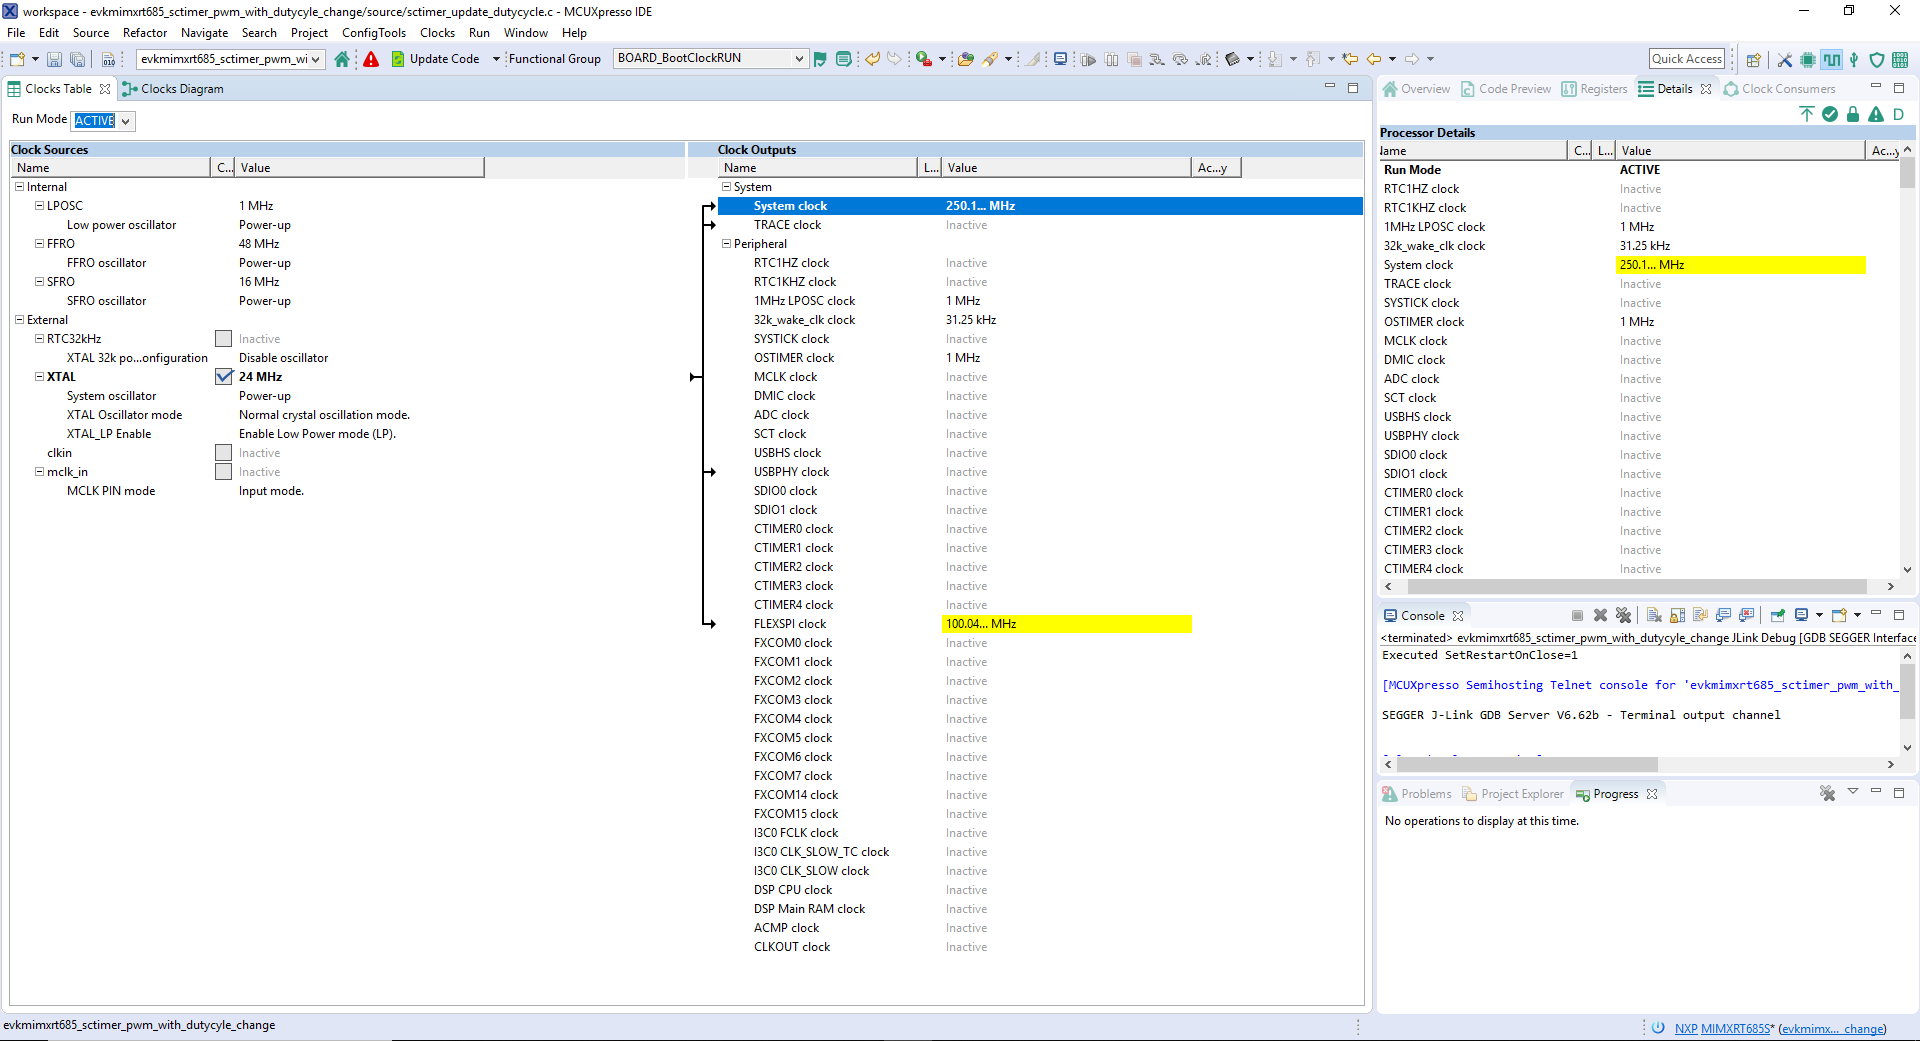
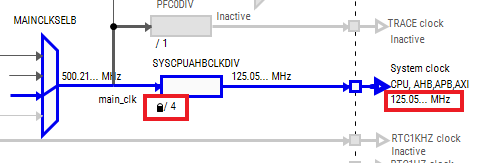
- By default, the IMXRT685 is running at 250MHz. Change the core clock frequency to 125 MHz by clicking in the SYSCPUAHBCLKDIV field and select "/4" option. You'll see all the other clock values automatically change as well to adjust to this slower speed. It will look like this when done:
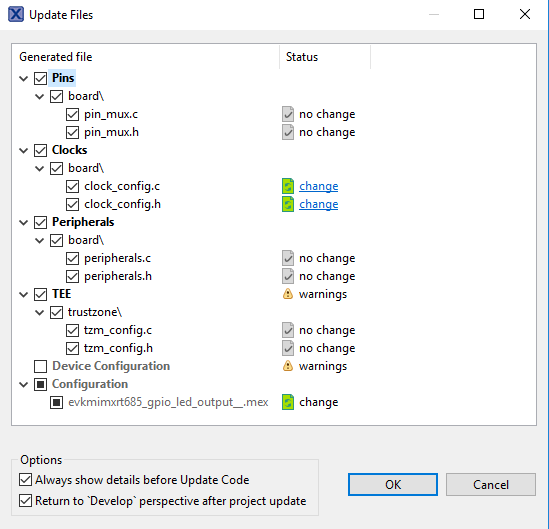
- Now, it's time to implement these changes into the project by exporting the new updated clock_mux.c and clock_mux.h files that are generated by the Pins Tool. Click on Update Project in the menu bar
- The screen that pops up will show the files that are changing and you can click on “diff” to see the difference between the current file and the new file generated by the Clocks Tool. Click on “OK” to overwrite the new files into your project
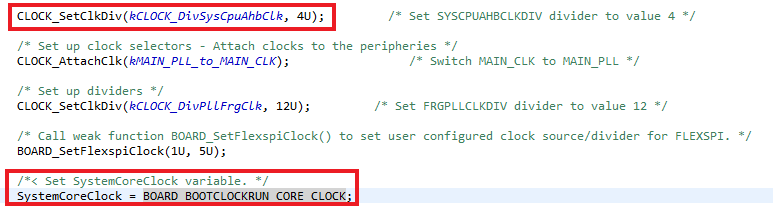
- Build and download the project as done in the previous section. You can confirm the changes at clock_config.c on the following lines:
- Run the application. You should see that the LED changes the brightness slowly
- Terminate the debug session


4.5 Success
With the application modified, you will see the IMXRT685-AUD-EVK blue LED blinking.
Boot Options
The i.MX RT family supports a number of different boot sources and includes the option for memory to be copied to an on-chip or external destination memory, as well as execute in place (XIP) for some interfaces. Learn more about your choices and which one is best for your design.
Boot Options for i.MX RT Crossover MCUs
| Documents and Videos | Description |
|---|---|
| AN12985 RT600 Hybrid Boot | Details on how to place code as bootable into the SRAM or for execution directly from the flash. Includes instructions on programming the flash with both the bootable RAM portion of the code and the run-time code residing in the lower flash. |
| AN12773 How to Enable Master Boot from Serial NOR Flash | This document describes how to program a bootable image into the serial NOR flash device and enable the i.MX RT to boot from this primary flash device. |
MCUXpresso SDK Examples
Several examples, demos and drivers are available within the SDK to help you get started. Some common examples for boot options are listed below.
OTA Bootloader Example
The over-the-air (OTA) bootloader is a secondary bootloader resides in external memory which supports updating and booting the application.
Path:
<SDK_PATH>/boards/mimxrt685audevk/bootloader_examplesTrustZone Examples
Three examples demonstrating TrustZone partitioning and configuration as well as secure GPIO and secure faults.
Path:
<SDK_PATH>/boards/mimxrt685audevk/trustzone_examplesTools and References
SP Secure Provisioning Tool : GUI-based application provided to simplify generation and provisioning of bootable executables on i.MX RT.
External Memory
| Documents and Videos | Description |
|---|---|
| AN13028 Advanced HyperRAM/PSRAM Usage on i.MX RT | This application note describes the advanced usage of HyperRAM/PSRAM when used with FlexSPI on i.MX RT MCU, including FlexSPI prefetch function, HyperRAM/PSRAM refresh interval and HyperRAM devices supported for i.MX RT. |
| AN12773 How to Enable Master Boot from Serial NOR Flash | This document describes how to program a bootable image into the serial NOR flash device device and enable the i.MX RT to boot from this primary flash device. |
| AN12564 Implement Read While Write (RWW) on i.MX RT series | How to implement RWW requirement on i.MXRT series |
| Crossover to Memory Expansion with Adesto ECOXip and NXP’s i.MX RT Crossover Processors | An overview of how performance and usability are addressed for systems depending on external memory. |
MCUXpresso SDK Examples
Several examples, demos and drivers are available within the SDK to help you get started. Some common examples for external memory are listed below.
OTA Bootloader Example
The over-the-air (OTA) bootloader is a secondary bootloader resides in external memory which supports updating and booting the application.
Path:
<SDK_PATH>/boards/mimxrt685audevk/bootloader_examplesFlexSPI Polling Transfer Examples
How to use the FlexSPI driver with external PSRAM or Octal flash for polling.
Path:
<SDK_PATH>/boards/mimxrt685audevk/driver_examples/flexspi/psram/polling_transferPath:
<SDK_PATH>/boards/mimxrt685audevk/driver_examples/flexspi/octal/polling_transferDMA Transfer Example
How to use the FlexSPI driver with external PSRAM or Octal flash for DMA.
Path:
<SDK_PATH>/boards/mimxrt685audevk/driver_examples/flexspi/psram/dma_transferPath:
<SDK_PATH>/boards/mimxrt685audevk/driver_examples/flexspi/octal/edma_transferTools and References
SP Secure Provisioning Tool : GUI-based application provided to simplify generation and provisioning of bootable executables on i.MX RT.
Security and Integrity
The i.MX RT685 is secure-by-design and supported by secure software driving the secure system on a chip (SoC).
| Documents and Videos | Description |
|---|---|
| Realizing Today’s Security Requirements: Achieving End-To-End Security with a Crossover Processor | Learn about common shared security goals that IoT end and edge nodes should meet, as well as the steps, tools and procedures needed to achieve root of trust in end devices. |
| AN12839 RT600 TrustZone | Explains TrustZone technology, how to configure the TrustZone to set secure and non-secure states on RT600 and how to switch between these states and to handle different secure faults. |
| AN12835 RT600 Secure GPIO and Usage | Explains how a secure GPIO must be used and configured in secure mode. |
| AN12834 RT600 HASH Engine | Introduces users to the usage and configuration of the SHA engine on RT600 and demonstrates the performance improvement for speed, memory and power consumption when the SHA engine is used. |
| AN12882 AES Encryption / Decryption Using RT6xx | How to configure the AES engine and write code using the SDK API to encrypt and decrypt data using keys either manually supplied or generated by the PUF IP. Configuration and use of PUF IP is described. |
| AN12445 Asymmetric Cryptographic Accelerator CASPER | The cryptographic accelerator and signaling processing engine and RAM-sharing (CASPER) peripheral provides acceleration to asymmetric cryptographic algorithms as well as to certain signal processing algorithms. |
MCUXpresso SDK Examples
Several examples, demos and drivers are available within the SDK to help you get started. Some common examples for external memory are listed below.
Hashcrypt Example
Demonstration program that uses the KSDK software to encrypt plain text and decrypt it back using AES and SHA algorithm.
Path:
<SDK_PATH>/boards/mimxrt685audevk/driver_examples/hashcryptCASPER Crypto Acceleration Example
How to implement a modular exponentiation algorithm using the CASPER software driver.
Path:
<SDK_PATH>/boards/mimxrt685audevk/driver_examples/casperPUF Driver Example
A demonstration program that uses the KSDK software implement secure key storage using PUF software driver.
Path:
<SDK_PATH>/boards/mimxrt685audevk/driver_examples/pufMbedtls Examples
Program performs cryptographic algorithm benchmarking and testing. Requires optional mbedTLS middleware package.
Path:
<SDK_PATH>/boards/mimxrt685audevk/mbedtls_examples/Tools and References
SP Secure Provisioning Tool : GUI-based application provided to simplify generation and provisioning of bootable executables on i.MX RT.
MbedTLS_lib API : This documentation describes the internal structure of mbed TLS.
Wired Communications
| Documents and Videos | Description |
|---|---|
| Wired Communications Middleware for NXP Microcontrollers | Learn about wired communications libraries and examples provided through MCUXpresso SDK. |
| AN12796 RT600 I3C Simple Master | The I3C is a serial communication interface that carries the advantages of I²C in simplicity, low pin count, easy board design and multi-drop (vs. point to point), but provides the higher data rates, simpler pads and lower power of SPI. |
MCUXpresso SDK Examples
Several examples, demos and drivers are available within the SDK to help you get started. Some common examples related to wired communications are listed below.
CMSIS Driver Examples
How to use I²C, SPI and USART drivers to do board to board transfer with DMA.
Path:
<SDK_PATH>/boards/mimxrt685audevk/cmsis_driver_examplesI2C Examples
How to use the I²C driver for low-power wake-up, interrupt, polling, DMA transfer and device communication.
Path:
<SDK_PATH>/boards/mimxrt685audevk/driver_examples/i2cSPI Examples
How to use the SPI driver for interrupt, polling and DMA transfer.
Path:
<SDK_PATH>/boards/mimxrt685audevk/driver_examples/spiUSART Examples
How to use the USART driver for low-power wake-up, interrupt, polling and 9bit transfer.
Path:
<SDK_PATH>/boards/mimxrt685audevk/driver_examples/usartUSB Examples
A number of USB examples for host and device operation exist within the SDK. (This requires an optional USB host and device stack middleware package).
Path:
<SDK_PATH>/boards/mimxrt685audevk/usb_examplesShell Demo
A simple demonstration on controlling LEDs by commands.
Path:
<SDK_PATH>/boards/mimxrt685audevk/demo_apps/shellLittlevGL Example
A demo application to show LittlevGL widgets. This demo requires the addition of the
Path:
<SDK_PATH>/boards/mimxrt685audevk/littlevgl_examplesemWin GUI Example
Demonstrates graphical widgets of the emWin library.
Path:
<SDK_PATH>/boards/mimxrt685audevk/emwin_examples/Wireless Connectivity
| Documents and Videos | Description |
|---|---|
| Wireless Connectivity at NXP | Our portfolio of low-power, cost-effective wireless solutions address many monitoring and control applications for the Internet of Things—including consumer, smart energy, industrial and healthcare. |
| Cloud Connectivity | Integrated support for cloud services including Amazon Web Services, Microsoft Azure and Google Cloud IoT. |
| Getting Started with NXP Wi-FI® modules using i.MX RT platform | Different modules from third parties that enable NXP Wi-Fi SoCs on i.MX RT EVKs. |
MCUXpresso SDK Examples
Several examples, demos and drivers are available within the SDK to help you get started. Some common examples for wireless connectivity are listed below.
AWS Examples
Amazon FreeRTOS Qualification (AFQ), device configuration, AWS Greengrass discovery, remote control by Android mobile application and shadow lightbulb demos.
Path:
<SDK_PATH>/boards/mimxrt685audevk/aws_examplesWi-Fi Examples
CLI support usage example, iPerf network performance measurement, Wi-Fi test mode example and Wi-Fi configuration utility demos.
Path:
<SDK_PATH>/boards/mimxrt685audevk/wifi_examplesMulticore and Hardware Acceleration
| Documents and Videos | Description |
|---|---|
| AN12789 RT600 Dual-Core Communication and Debugging | The RT600 features an Arm® Cortex® -M33 CPU combined with a Cadence Xtensa HiFi4 advanced Audio Digital Signal Processor CPU. This document discusses means of communication between the two CPUs. |
MCUXpresso SDK Example
Several examples, demos and drivers are available within the SDK to help you get started. A common examples related to power management is listed below.
Semaphore Block Examples
Amazon FreeRTOS Qualification (AFQ), device configuration, AWS Greengrass discovery, remote control by Android mobile application and shadow lightbulb demos.
Path:
<SDK_PATH>/boards/mimxrt685audevk/dsp_examples/sema42CASPER Crypto Acceleration Example
How to implement a modular exponentiation algorithm using the CASPER software driver.
Path:
<SDK_PATH>/boards/mimxrt685audevk/driver_examples/casper/CRC Acceleration Examples
Amazon FreeRTOS Qualification (AFQ), device configuration, AWS Greengrass discovery, remote control by Android mobile application and shadow lightbulb demos.
Path:
<SDK_PATH>/boards/mimxrt685audevk/driver_examples/crcMU Examples
Amazon FreeRTOS Qualification (AFQ), device configuration, AWS Greengrass discovery, remote control by Android mobile application and shadow lightbulb demos.
Path:
<SDK_PATH>/boards/mimxrt685audevk/aws_examplesPower Management
Power management includes device-specific techniques and information on power management and low-power optimization.
| Documents and Videos | Description | Aplication Note Software |
|---|---|---|
| AN12801 Low Power Support in FreeRTOS | How to apply the low power modes (normal sleep, deep sleep, deep power down and full deep power down modes) of i.MX RT6xx to FreeRTOS Tickless power mode. | |
| AN12844 Power Consumption and Measurement of i.MX RT6xx DSP | This document focuses on i.MX RT6xx DSP current consumption under low power mode. It describes the functions that help a user to manage power usage and also includes measurement of current based on MIMXRT6xx EVK board. | - |
| AN13056 Low-Power Modes and Wake-up Time | Introduces the various low-power modes of the RT600 series, entry and wake-up implementations and how to measure current and wake-up time for each mode. | - |
| AN12790 Using the PMIC on RT600 | The IMXRT685-AUD-EVK uses the PCA9420 Power Management IC, which adds flexibility to the RT600 to configure the power supply rails according to the needs of the application. | - |
MCUXpresso SDK Example
Several examples, demos and drivers are available within the SDK to help you get started. A common examples related to power management is listed below.
Power Manager
How to change power modes in the KSDK.
Path:
<SDK_PATH>/boards/mimxrt685audevk/demo_apps/power_manager>Audio
| Documents and Videos | Description |
|---|---|
| Audio Software on NXP Microcontrollers | USB enablement, essential audio processing and partner solutions for developing state-of-the-art, low-power audio product development. |
| AN12762 Audio Player in HiFi4 | How to develop an audio player with NXP i.MX RT600. |
| AN12765 i.MX RT600 DSP Enablement | This document gives examples of how to use certain modules within the Cadence Xtensa HiFi4 Audio DSP processor included within the i.MX RT600. |
| AN12749 I2S (Inter-IC Sound Bus) Transmit and Receive on RT600 HiFi4 | How to use I2S and DMA to record and playback audio, as well as the process of using the codec chip to process audio data on the i.MX RT600 EVK. |
| MCU Tech Minute: USB Audio Reference Design Using DSP Concepts AudioWeaver with i.MX RT865 MCUs | Demonstrate AudioWeaver running on the i.MX RT685 dual-core MCU platform, which allows developers to easily design, develop and deploy embedded audio products rapidly into the market. |
| Bringing Low Power, High Performance Audio and Voice to Market on the i.MX RT600 Crossover MCU | Learn how DSP Concept's Audioweaver tools and libraries can unleash the performance of NXP's i.MX RT600 MCU, allowing audio designers to quickly implement designs from the algorithm level. |
MCUXpresso SDK Examples
Several examples, demos and drivers are available within the SDK to help you get started. Some common examples for audio are listed below.
DMIC Examples
Audio is converted to samples in the DMIC module. These examples demonstrate multiple use cases around the DMIC such as HWVAD (HW voice activity detector), wake from sleep and multiple DMIC channels.
Path:
<SDK_PATH>/boards/mimxrt685audevk/driver_examples/dmicAudio Demo
Demonstrates audio processing using the DSP core.
Path:
<SDK_PATH>/boards/mimxrt685audevk/dsp_examples/audio_demo_bmDSP XAF Demo
Demonstrates audio processing using the DSP core, the Xtensa Audio Framework (SAF) middleware library, and select Xtensa audio codecs.
Path:
<SDK_PATH>/boards/mimxrt685audevk/dsp_examples/xaf_demoI2S Examples
How to use the I2S interface for record and playback.
Path:
<SDK_PATH>/boards/mimxrt685audevk/driver_examples/i2sVoice
| Documents and Videos | Description |
|---|---|
| Voice Processing | A range of voice control and communication software and solutions from NXP, including free voice recognition technology. |
| AN13065 Gender Voice Recognition with TensorFlow Lite Inference | This document describes the steps to train the TensorFlow model on Gender voice audio samples and classification. |
MCUXpresso SDK Examples
Several examples, demos and drivers are available within the SDK to help you get started. Some common example for voice is listed below.
Keyword Spotting Example
Audio samples are evaluated based on Keyword spotting for Microcontrollers. (Requires SDK 2.10 or greater and the optional eIQ® middleware package.)
Path:
<SDK_PATH>/boards/mimxrt685audevk/eiq_examples/tensorflow_lite_micro_kwsTools and References
NXP EdgeReady MCU-Based Solution for Alexa Voice Service: This solution leverages the i.MX RT crossover MCU and enables developers to quickly and easily add Alexa voice assistant capabilities to their products.
Machine Learning
Machine learning (ML) typically encompasses applications where classification, recognition and prediction of man-made abstractions are desired. Examples include image recognition, gesture recognition, anomaly detection, speech-to-text, text-to-speech, ASR, scene recognition and many more. This section will focus specifically on the NXP ML tools applied to image or video streams. The voice and audio sections may also reference the included examples.
| Documents and Videos | Description |
|---|---|
| eIQ ML Software Development Environment | Enables the use of ML algorithms on NXP MCUs, i.MX RT crossover MCUs and i.MX family SoCs. eIQ software includes inference engines, neural network compilers and optimized libraries |
| i.MX Machine Learning User’s Guide | The NXP eIQTM for i.MX toolkit provides a set of libraries and development tools for machine learning applications targeting NXP microcontrollers and application processors. |
| Getting Started with eIQ on i.MX RT | How to download eIQ and run it with MCUXpresso IDE, IAR or Keil MDK. |
| eIQ Fact Sheet | Machine learning software for NXP i.MX and MCUs – libraries, example applications and inference engines. |
| eIQ Glow Lab for i.MX RT | Learn how to use the Glow neural network compiler tool by running a handwritten digit recognition model example. A step-by-step video covering this lab is also available below. |
| eIQ Glow Ahead of Time (AOT) User Guide | Steps to download, start using Glow AOT and create an application that integrates bundles generated using the Glow AOT compiler. |
| Glow Documentation for Building Ahead Of Time (AOT) Applications | A short description about producing AOT compiled executable bundles. |
| eIQ Transfer Learning Lab with i.MX RT | Learn how to perform transfer learning on models and run them on the i.MX RT1060 platform. |
| AN13001 Glow Memory Analysis | How to understand the Glow memory information generated by the Glow compiler and calculate the memory required for a particular model. This compiler can then be used to determine the minimum memory size that is needed to run the model. |
| AN12766 Anomaly Detection with eIQ using K-Means clustering in Tensor Flow Lite | Step by step instruction to enable a machine condition monitoring application using anomaly detection. |
| AN12781 Caffe Model Development on MNIST Dataset with CMSIS-NN Library | Describes the process to train a Caffe model on MNIST dataset for digit classification. The trained Caffe model is converted to a source file that can run on i.MX RT platforms. |
| Advanced Industrial ML Applications are Now Possible with NXP MCUs | Focuses on the software tools that can be used to deploy vision, voice and sensor technology ranging from object recognition to anomaly detection, and how to get started quickly use MCUXpresso SDK ML examples. |
MCUXpresso SDK Examples
Several examples, demos and drivers are available within the SDK to help you get started. Some common examples related to machine learning are listed below.
eIQ Examples
Several examples demonstrating inference for models compiled using the GLOW AOT tool as well as NN processing acceleration or offload using the DSP. This requires SDK 2.10 or greater and the optional eIQ middleware package.
Path:
<SDK_PATH>/boards/mimxrt685audevk/eiq_examplesLPCScrypt Tutorial
LPCScrypt Tutorial
LPCScrypt is a command-line based, fast flash, EEPROM, OTP and security programming tool for LPC microcontrollers. It is the recommended tool to program the latest CMSIS-DAP and J-Link firmware.
- Download the LPCScrypt tool using the button below, choose your platform (Windows, MAC OC X, Linux). After the download, run the installer. During the installation the DFU and VCOM drivers will be automatically installed for all platforms.
- To update the LPC-Link2 debug circuit firmware, unplug the USB cable on
J5and then put on the DFULink jumper. - In the IMXRT685-AUD-EVK,
JP1is the LPCXpresso DFU jumper. ConnectJP1using the jumper. - Reconnect the board to your host computer over the debug link USB connector
J5 - Launch LPCScrypt by double-clicking on the “Boot LPCScrypt” file in the LPCScrypt install:
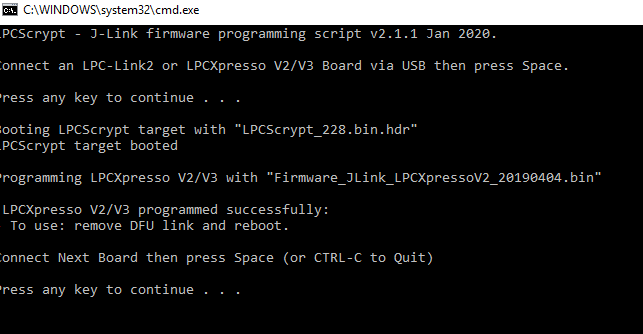
- In that command shell, run the program JLINK script to install the JLink debug firmware:
- Verify once you select on firmware (in this case J-Link), LPCScrypt will show something like below in the console
- Once programming is complete, disconnect the board from the host. Remove the DFULink jumper, then reconnect the board to the host computer. You should see that the probe enumerates on the host's USB system.

C:\ProgramData\Microsoft\Windows\Start Menu\Programs\LPCScrypt


J-Link Tutorial
SEGGER J-Link Tutorial
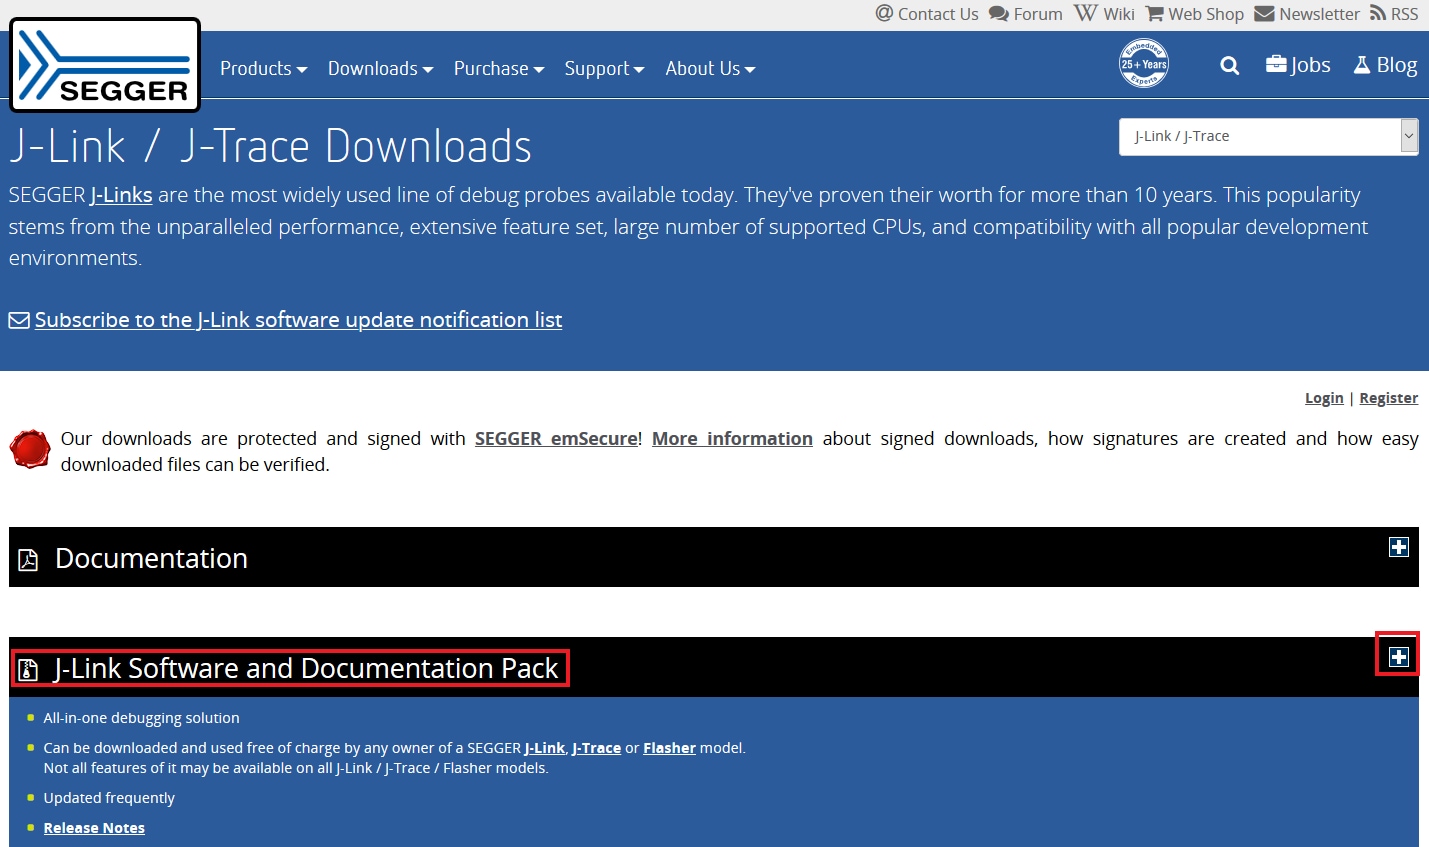
- Download J-Link software. Enter to SEGGER download page: J-Link / J-Trace Downloads
- Expand “J-Link Software and Documentation Pack” section
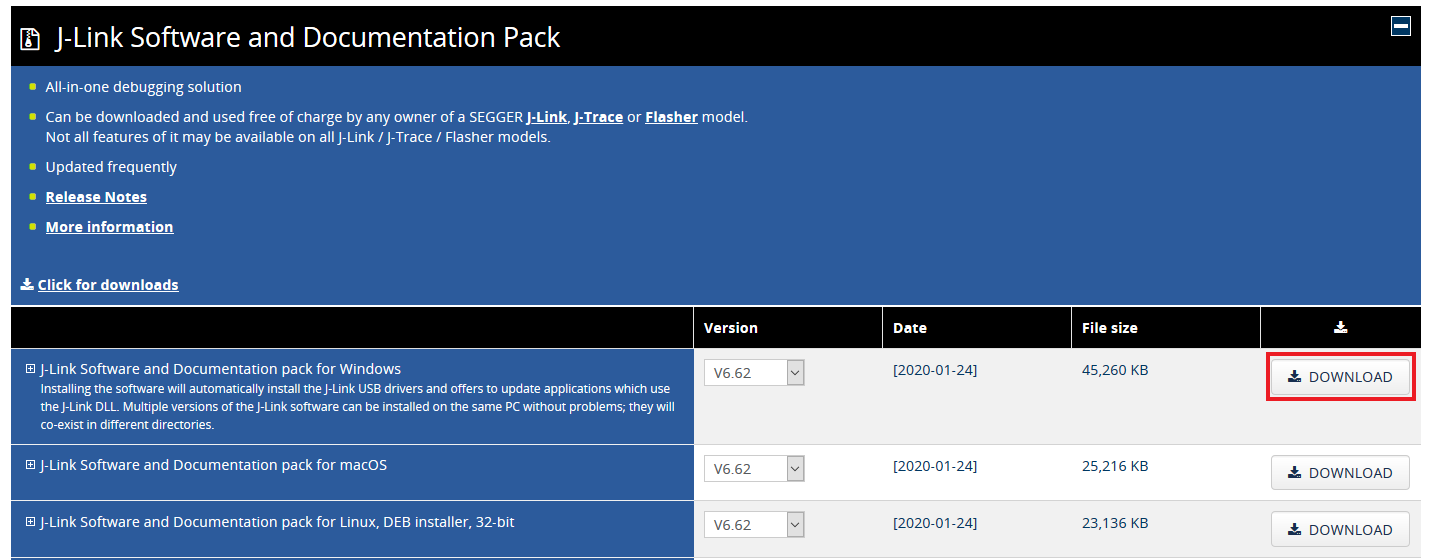
- Select the software that matches your OS and download the newest version
- Accept terms and download the software
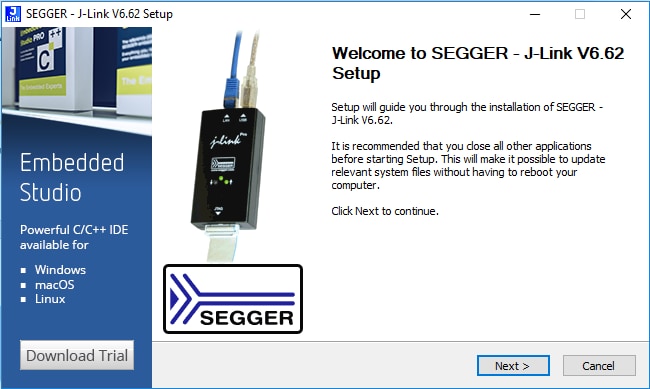
- Execute the *.exe file you just downloaded by doing double-click. Follow the setup instructions until the J-Link installation is complete
- You're ready to go
Xplorer Tutorial
Xtensa Xplorer Tutorial
Cadence® Tensilica® Xplorer is a complete development environment that helps users create application code for high-performance Tensilica® processors. Xplorer is the interface to powerful software development tools such as the XCC compiler, assembler, linker, debugger, code profiler and full set of GUI tools.
Xplorer (including both GUI and command line environment) is the only available development IDE for the DSP core of MIMXRT600.
- Create a profile. This is needed to download the Tensilica Tools. Go to the URL: Tensilica Tools Downloads and login. If this is the first time to access, please register first
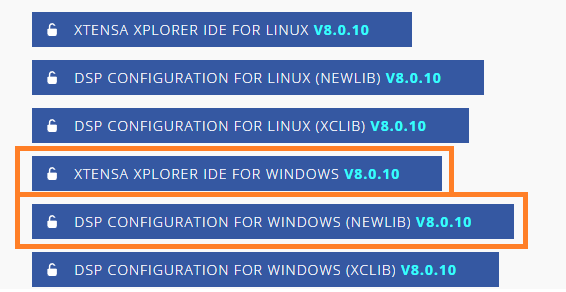
- Install Xtensa Xplorer IDE. Once registered, please login and you will see available materials
- Download and install "Xtensa Xplorer IDE" for your operating system
- Download the "DSP Configuration" for your operating system. Make sure to select the NEWLIB version. This file will be used later
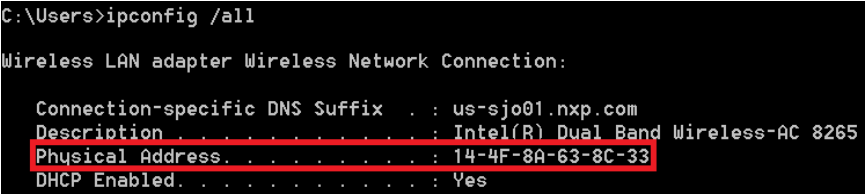
- Download a License Key. To generate the correct license file, you should first identify the appropriate MAC for the computer you plan to run Xtensa tools on. Open a Command Prompt and type:
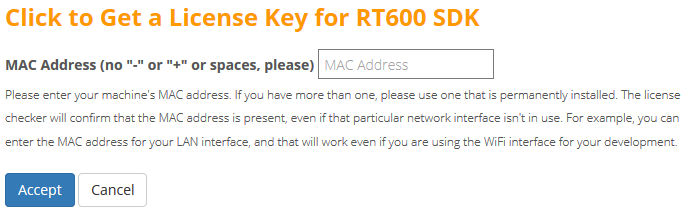
- Reload and return to the Tensilica URL: Tensilica Tools Downloads and click on "Get a License Key for RT600 SDK"
- Type your MAC address without '-' or ':' symbols
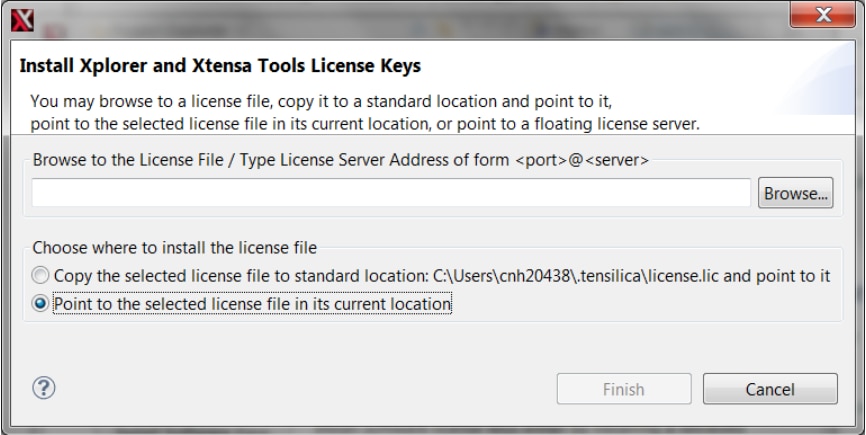
- Install License Key. Once the license has been generated and downloaded, open Xplorer IDE and select on menu Help → Xplorer License Keys → License Options → Install Software Keys. Select the license key file and click 'Finish'
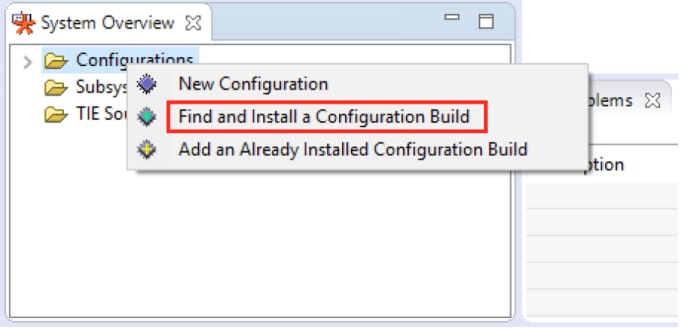
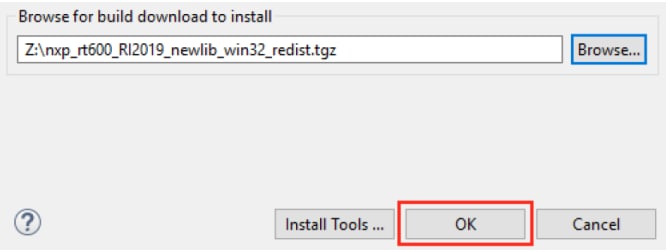
- Install RT600 DSP Build Configuration. The build configuration can be installed into the IDE using the 'System Overview' panel, which is on the lower left corner by default. If this panel is not visible, it can be toggled using the menu item Window → Show View → System Overview
- Install Xtensa On Chip Debugger Deamon. The Xtensa On Chip Debugger Deamon (xt-ocd), is a powerful gdb-based debugging tool. It is not installed by default with the Xplorer IDE. A self-extracting executable installer is included with the IDE. It is at:
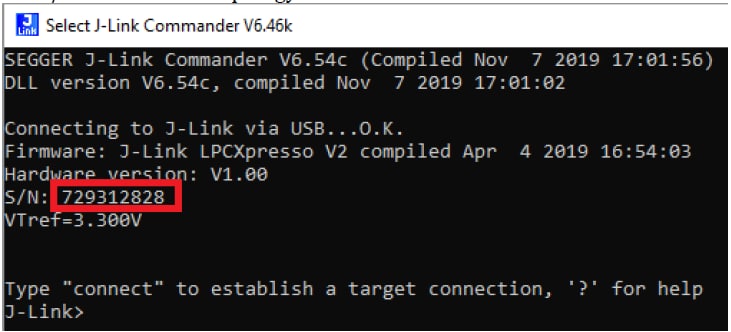
- Identify the Jlink serial number of your LPC-Link2. Run JLINK commander to check the serial number. It is at:
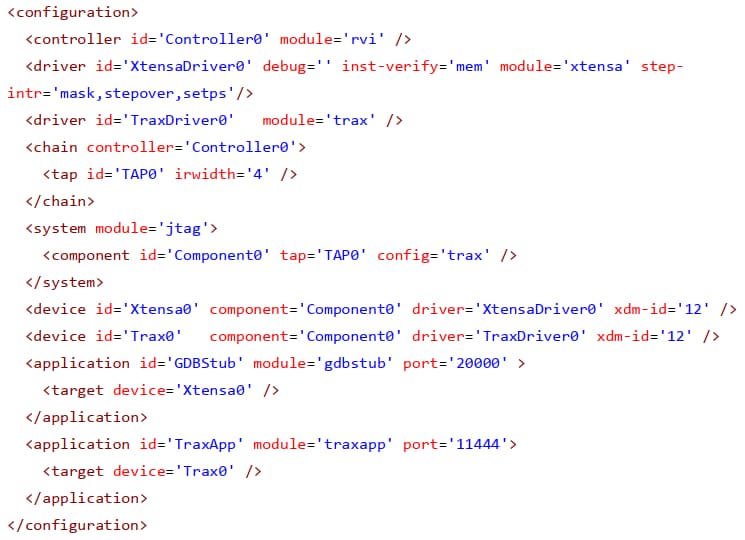
- Edit topology file. xt-ocd is configured with an XML input file named "topology.xml". This file is located in the Xtensa OCD installation directory at:
- You will need to modify this file for your debugger hardware. Using J-link as example, please use this XML file to replace the original file or copy one of the examples below

You will receive an email confirmation with the activation link from "Tensilica tools". Click the activation link to complete the registration
Windows:
Linux:


Search the configuration you downloaded at Step 2
Windows:
C:\usr\xtensa\XtDevTools\downloads\RI2019.1\tools\xt-ocd-14.0.1-windows64-installer.exeLinux:
~/xtensa/XtDevTools/downloads/RI2019.1/tools/xt-ocd-14.0.1-linux64-installerAt this moment, xt-ocd supports J-Link and Arm RVI/DSTREAM probes over Serial Wire Debug (SWD) for RT600. Xt-ocd installs support for J-Link probes but does not install the required J-Link drivers, which must be installed separately. The RT600 requires J-Link software version 6.46 or newer
ln -s <jlink-install-dir>libjlinkarm.so.6 <xocd-install-dir>/modules/libjlinkarm.so.6C:\Program Files (x86)\SEGGER\JLink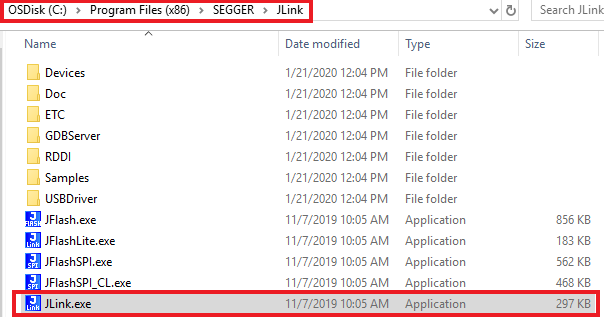
Every EVK/LPC-Link2 will have a different Jlink S/N
C:\Program Files (x86)\Tensilica\Xtensa OCD Daemon 14.01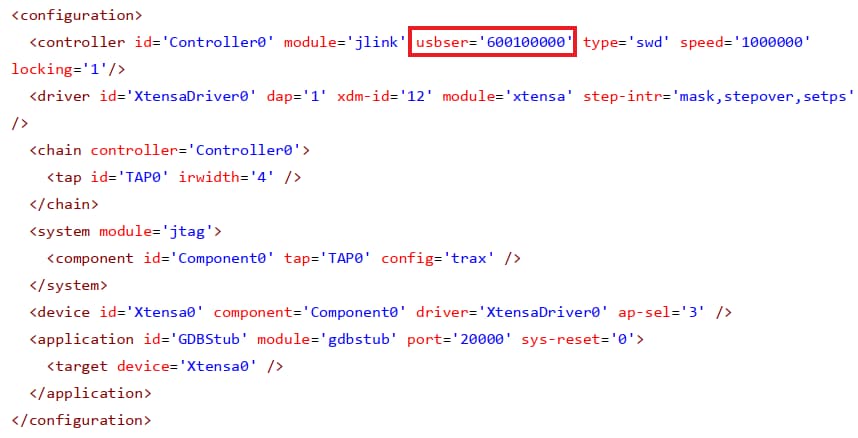
Below is another topology.xml example if using Arm RealView ICE (RVI) and DSTREAM debug probes:
Design Resources
Board Documents
Chip Documents
Additional References
Sensors
Explore the world with a full assortment of NXP sensor solutions. From accelerometers, pressure sensors, touch sensors and many more, NXP has a sensor solution for your project. Find out more at NXP Sensor Solutions.
NFC
Near Field Communication is a simple, intuitive technology that lets you interact securely with the world around you with a simple touch. Learn more about NXP’s NFC solutions at Near Field Communication (NFC).
Wi-Fi®
Getting Started with NXP Wi-Fi Modules Using the i.MX RT Platform - Let's take your Wi-Fi module for a test drive. This guide uses the Wi-Fi modules and i.MX RT platforms.
Support
To learn what to do next, find your issue below. If you still need help, contact NXP Support.
Training
Basic Application Development Using MCUXpresso IDE and MCUXpresso Config Tools - This three-part video series covers the basic interactions between the MCUXpresso IDE and Config Tools when working with either an imported SDK example project or creating a new one.
MCU Tech Minutes- Key Features and Benefits of the i.MX RT series – Short video presentations introduce some of the key features and benefits of the i.MX RT series.
i.MX RT600 Training - Full list of on-demand training, how-to videos and webinars from NXP about this product.
Forums
Connect with other engineers and get expert advice on designing with the i.MX RT1170 on one of our community sites.
Product Forums
Software Forums
On this page
- 1.1
Get Started with IMXRT685-AUD-EVK Development Platform
- 1.2
Get Familiar with the Board
- 1.3
Attach the USB Cable
- 1.4
Run the Out-of-Box Demo
- 2.1
Installing Software for IMXRT685-AUD-EVK
- 2.2
Jump Start Your Design with the MCUXpresso SDK
- 2.3
Install Your Toolchain
- 2.4
MCUXpresso Config Tools
- 2.5
LPCScrypt
- 2.6
Serial Terminal
- 2.7
J-Link
- 2.8
Install Xtensa Xplorer IDE and Tools
- 3.1
Build and Run SDK Demo on the IMXRT685-AUD-EVK
- 3.2
Explore the MCUXpresso SDK Example Code
- 3.3
Building and Debugging MCUXpresso SDK Examples