Getting Started with the MCIMX8QXP-CPU
Contents of this document
-
Out of the Box
-
Build, Run
-
Get Software
-
MCUXpresso SDK
Sign in to save your progress. Don't have an account? Create one.
Purchase your i.MX 8QuadXPlus MEK
1. Out of the Box
The following section describes the steps to boot the i.MX 8QuadXPlus MEK.
1.1 i.MX 8QuadPlus MEK Unboxing
Development kit contains:
- i.MX 8QuadXPlus MEK board for smart devices
- USB cable (micro-B to standard-A)
- Cable -Assembly, USB 2.0 Type-A Male, USB Type-C Male, Shielded, 1m
- 12 V/8.3 A universal power supply
- Quick Start Guide
- 8 GB SD card with bootable operating system demonstration image
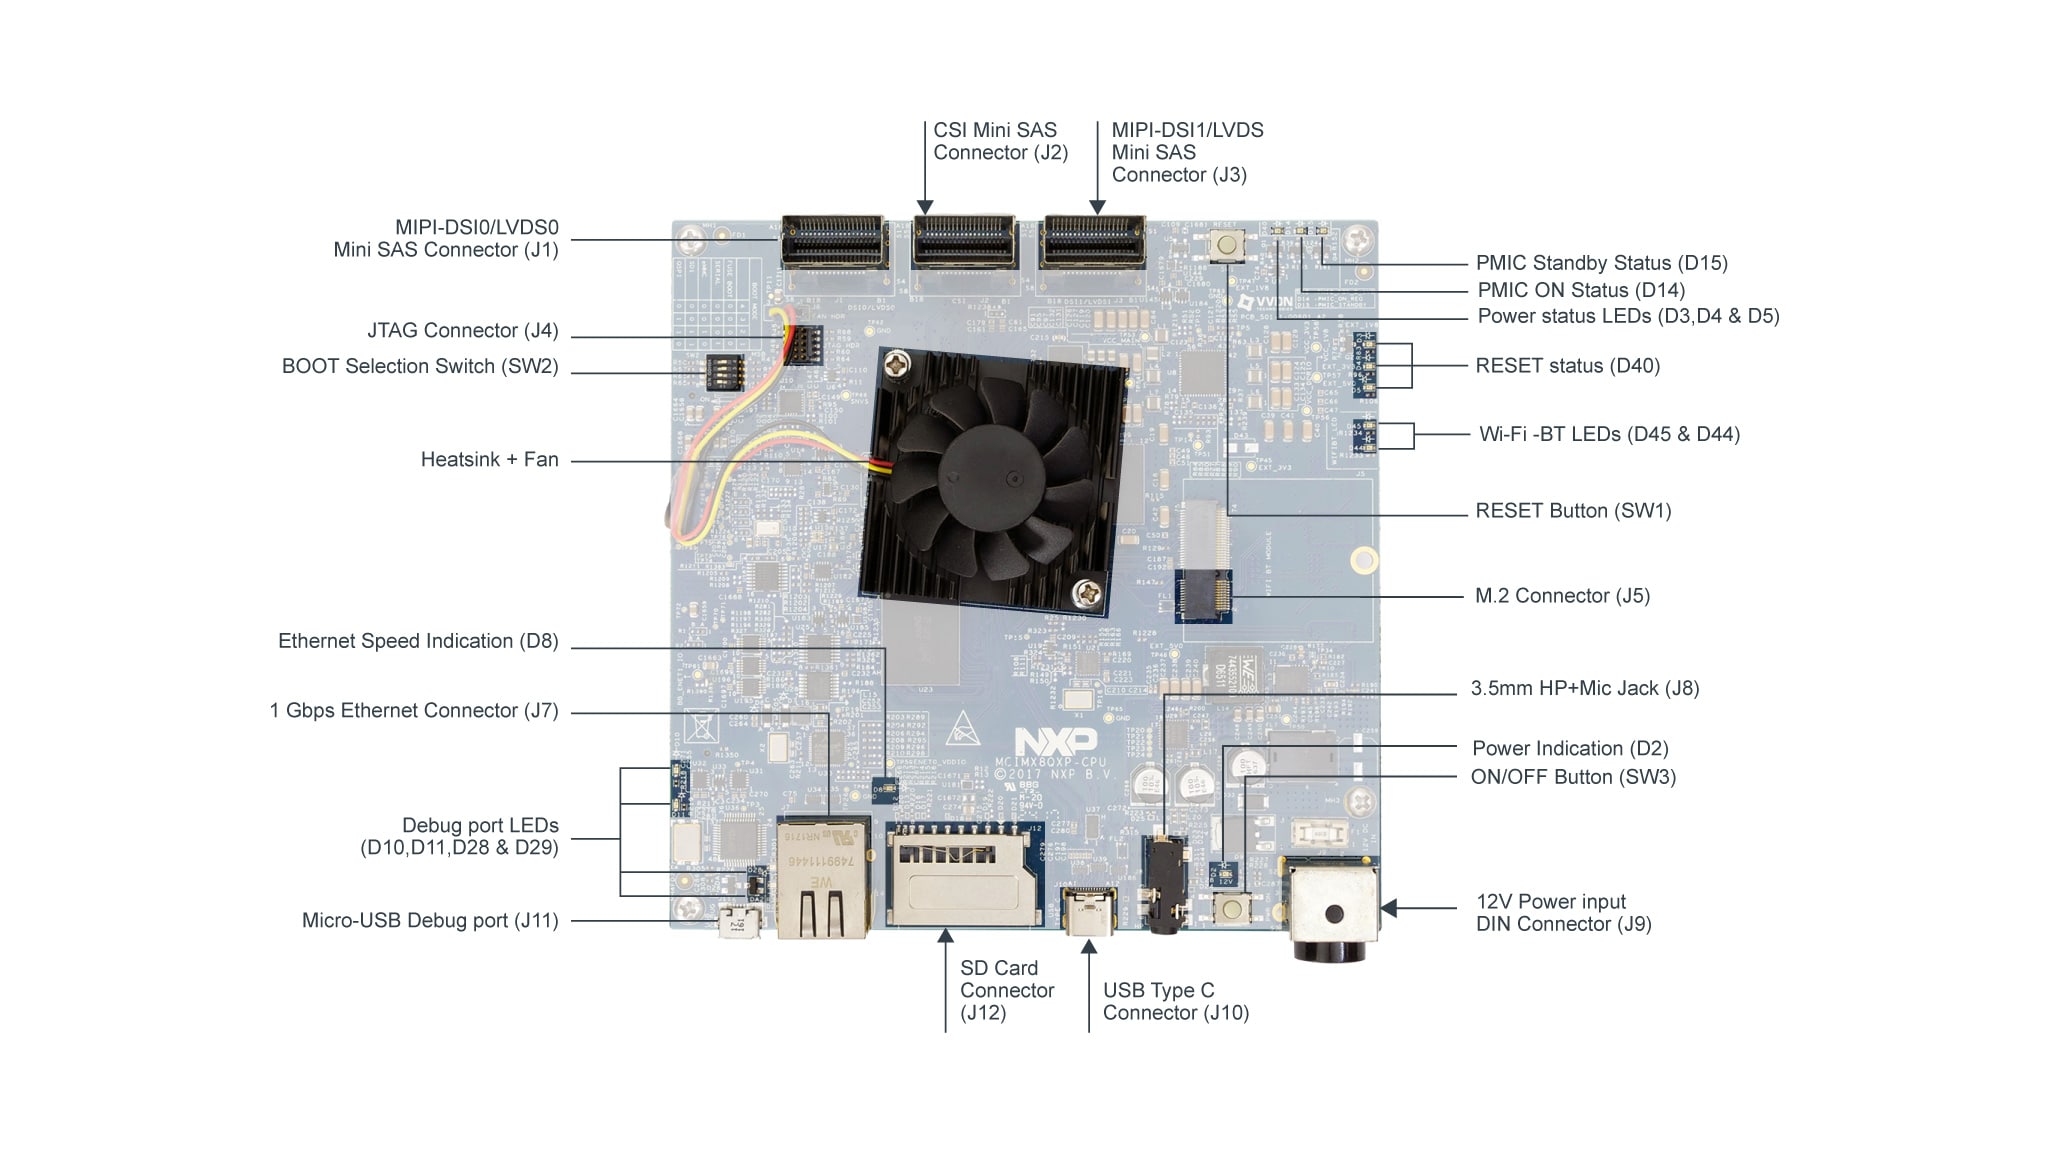
1.3 Insert the SD card (J12)
The kit includes an SD card with a pre-built NXP Linux binary demo image. Without modifying the binary inside the SD card, booting from this SD card provides a default system with certain features for building other applications on top of Linux. The software is described in the following sections.
1.4 Connect USB Debug Cable
Connect the micro-B end of the supplied USB cable into Debug UART port
J11. Connect the other end of the cable to a host computer.
If you are not sure about how to use a terminal application, try one of the following tutorials depending on the operating system of the host machine:
1.5 Connect Power Supply
Connect the power supply cable to the power connector (J9).
The processor starts executing from the on-chip ROM code. With the default boot switch setup, the code reads the fuses to define the media where it is expected to have a bootable image. After it finds a bootable image, the U-Boot execution should begin automatically.
Information is printed in the serial console for the Cortex®-A35. If you do not stop the U-Boot process, it continues to boot the kernel.
2. Build, Run
2.1 Embedded Linux®
This section is applicable ONLY if attempting to load a Linux operating system on the board.
The i.MX Linux Board Support Package (BSP) is a collection of binary files, source code, and support files that are used to boot an Embedded Linux image on a specific i.MX development platform.
Current releases of Linux binary demo files can be found on the i.MX Linux download page. Additional documentation is available in the i.MX Linux documentation bundle under the Linux sections of the i.MX Software and Development Tool.
2.2 Overview
Before the Linux OS kernel can boot on an i.MX board, the Linux kernel is loaded to a boot device (SD card, eMMC and so on) and the boot switches are set to boot that device.
There are various ways to download the Linux BSP image for different boards and boot devices.
For this getting started guide, only a few methods to transfer the Linux BSP image to an SD card are listed. Experienced Linux developers can explore other options.
2.3 Download an NXP Linux BSP Pre-built Image
The latest pre-built images for the i.MX 8QuadXPlus MEK are available on the Linux download page under the most current version on Linux.
The pre-built NXP Linux binary demo image provides a typical system and basic set of features for using and evaluating the processor. Without modifying the system, the users can evaluate hardware interfaces, test SoC features, and run user space applications.
When more flexibility is desired, an SD card can be loaded with individual components (boot loader, kernel, dtb file, and rootfs file) one-by-one or the .sdcard image is loaded and the individual parts are overwritten with the specific components.
Linux
Install UUU on Linux Distro
Download the latest stable files from UUU GitHub page. An extensive tutorial for UUU can be found in UUU GitHub page.
uuulibusb1(via apt-get or any other package manager)
Burn the NXP Linux BSP Image to the Board
By default, this procedure flashes the image to the eMMC flash. Check the UUU GitHub page for reference on how to flash the image to other devices.
Open a terminal application and change directory to the location where uuu and the latest Linux distribution for i.MX 8QuadXPlus MEK are located. Add execution permission to the uuu file and execute it. Uuu waits for the USB device to connect
$ chmod a+x uuu $ sudo ./uuu <kernel_version>_images_<SOC>.zipTurn on the board, uuu starts to copy the images to the board.
When it finishes, turn off the board, and consult Boot switch setup to configure the board to boot from eMMC.
Windows
Install UUU on Windows
Download the latest stable files from UUU GitHub page. An extensive tutorial for UUU can be found in UUU GitHub page.
uuu.exe- Serial USB drivers (depending on your board and Windows installation - check Windows Device Manager)
Burn the NXP Linux BSP Image to the Board
By default, this procedure flashes the image to the eMMC flash. Check the UUU GitHub page for reference on how to flash the image to other devices.
Open the command prompt application and navigate to the directory where the
uuu.exe
file and the Linux release for the i.MX 8QuadXPlus MEK are located.
uuu.exe <kernel_version>_images_<SOC>.zipTurn on the board, uuu starts to copy the images to the board.
When it finishes, turn off the board, and consult Boot switch setup to configure the board to boot from eMMC.
3. Get Software
3.1 Embedded Android™
This section describes the boot process of loading the i.MX 8QuadXPlus MEK board with an Embedded Android system image and introduces how to build the software components that create your own system image. For details on building the Android platform, see Building Android
The current release includes Demo Images, Source code, and Documentation. These can also be found under Android section of the i.MX Software and Development Tool.
3.2 Overview
The storage devices on the development system (MMC/SD or NAND) must be programmed with the U-Boot boot loader. The boot process determines which storage device to access based on the switch settings. When the boot loader is loaded and begins execution, the U-Boot environment space is then read to determine how to proceed with the boot process.
The images can come from pre-built release packages or be created from source code. Regardless of how you obtain them, all Android images contain the following components:
-
U-Boot image:
u-boot.imx -
boot image:
boot.img -
Android system root image:
system.img -
Recovery root image:
recovery.img
For more information about the Android BSP refer to the Android User Guide.
3.3 Download NXP Android BSP Image
The pre-built NXP Android demo image provides a default system with certain features for evaluation. Without modifying the system, users can perform some basic operations, and interact with the system to test hardware interfaces and develop software application in the user space.
The pre-built images from the package are categorized by boot device and put in the directory with the device name. The latest pre-built image files can be found in Android section on the i.MX Software and Development Tool.
3.4 Burn NXP Android BSP Image Using UUU
In addition to the connections from Out of box chapter, connect the J10 to the host machine using the proper USB cable.
Turn off the board. Consult Boot switch setup and configure the board to boot on SDP (Serial Download Protocol) mode.
Depending on the OS used in the host machine, the way to transfer the Android BSP image onto an SD card can vary. Choose an option below for detailed instructions:
Linux
Download UUU on Linux
Download the latest stable files from UUU GitHub page. An extensive tutorial for UUU can be found in GitHub.
- uuu
- libusb1 (via apt-get or any other package manager)
Download the Latest Android Images
Download the Android demo files from NXP.
Extract the downloaded file into a know directory.
Burn the NXP Linux BSP image to the board
By default, this procedure flashes the image to the eMMC flash. Check the UUU GitHub page for reference on how to flash the image to other devices.
Copy the file named uuu from section Download UUU on Linux into the extracted Android demo directory.
$ sudo ./uuu_imx_android_flash.sh -f imx8qxp -a -e -u trustyTurn on the board in serial download mode, uuu starts to copy the images to the board. To put the board in serial download mode follow the instructions on the Boot switch setup section.
When it finishes, turn off the board, and consult Boot switch setup to configure the board to boot from eMMC.
Windows
Download UUU on Windows
Download the latest stable files from UUU GitHub page. An extensive tutorial for UUU can be found in GitHub.
- uuu.exe
- Serial USB drivers (depending on your board and Windows installation - check Windows Device Manager)
Download the Latest Android Images
Download the Android demo files from NXP.
Extract the downloaded file into a know directory.
Burn the NXP Linux BSP Image to the Board
By default, this procedure flashes the image to the eMMC flash. Check the UUU GitHub page for reference on how to flash the image to other devices.
Copy the file named uuu from section Download UUU on Windows into the extracted Android demo directory.
Open Command Prompt and navigate to the extracted Android demo directory
> ./uuu_imx_android_flash.bat -f imx8qxp -a -e -u trustyTurn on the board in serial download mode, uuu starts to copy the images to the board. To put the board in serial download mode follow the instructions on the Boot switch setup section.
When it finishes, turn off the board, and consult Boot switch setup to configure the board to boot from eMMC.
4. MCUXpresso SDK
The MCUXpresso Software Development Kit (MCUXpresso SDK) provides comprehensive software source code to be executed in the i.MX 8QuadXPlus M4 core.
If you do not wish to enable the Cortex®-M4 on i.MX 8QuadXPlus at this moment you can skip this section.
4.1 Overview
The MCUXpresso SDK is designed for the development of embedded applications for Cortex®-M4 standalone or collaborative use with the A cores. Along with the peripheral drivers, the MCUXpresso SDK provides an extensive and rich set of example applications covering everything from basic peripheral use case examples to demo applications. The MCUXpresso SDK also contains RTOS kernels, and device stack, and various other middleware to support rapid development.
Depending on the OS used in the host machine, the way to build and deploy the demos can vary. Choose an option below for detailed instructions:
Linux
Download MCUXpresso SDK on Linux
Current releases of the MCUXpresso SDK and source code can be found at MCUXpresso SDK Builder.
To download the MCUXpresso SDK for i.MX 8QuadXPlus, follow these steps:
- Click on “Select Development Board”.
- Select
MEK-MIMX8QXunder “Select a Device, Board, or Kit” and click on “Build MCUXpresso SDK” on the right.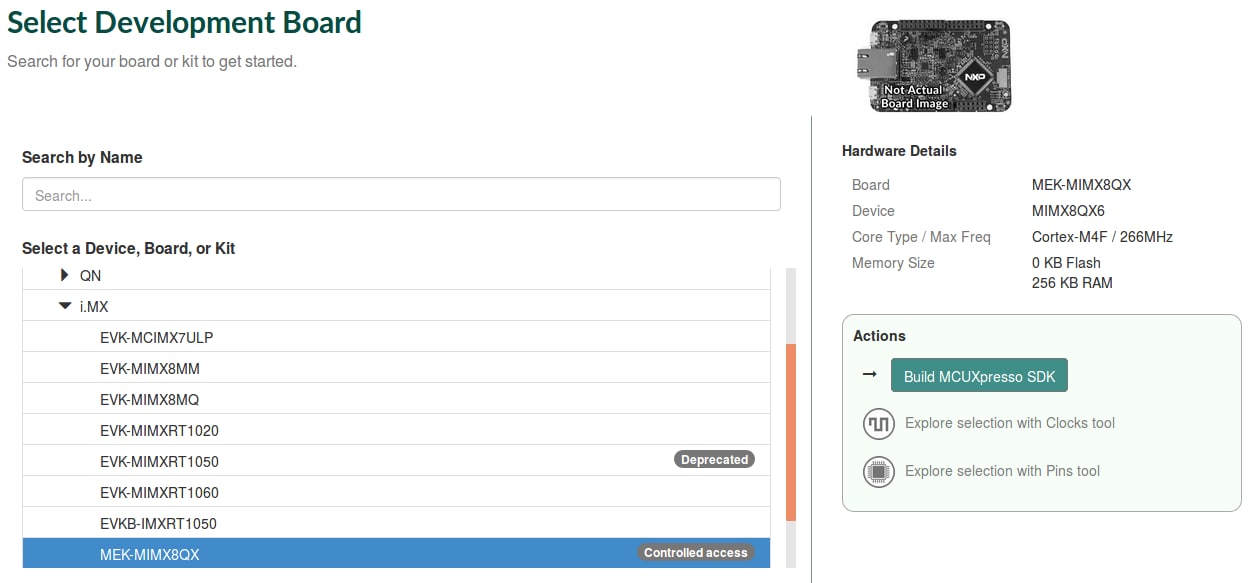
- Select “Host OS” as Linux.
- Select “Toolchain/IDE” as GCC ARM Embedded.
- Click on “Select Optional Middleware“, “Select All“ and hit “Save changes“.
- Click on “Download SDK”.
- Wait for the SDK to build and download the package.
Build MCUXpresso SDK on Windows
Install Toolchain
- Download and run the installer from
launchpad.net/gcc-arm-embedded. This is the actual toolchain. The toolchain includes the compiler, linker, and so on. The GCC toolchain should correspond to the latest supported version, as described in the MCUXpresso SDK Release Notes found in the package already downloaded. -
Export the toolchain location as
ARMGCC_DIR.$ export ARMGCC_DIR=/usr -
Ensure that cmake is installed:
$ sudo apt-get install cmake $ sudo apt-get install gcc-arm-none-eabi
Build MCUXpresso SDK
- Change the directory of the command window to the demo armgcc directory and run the build command:
$ cd <install_dir>/boards/MEK-MIMX8QX/demo_apps<demo_name>/armgcc $ ./build_all.sh -
There are two project configurations (build targets) supported for each MCUXpresso SDK project:
Debug
Compiler optimization is set to low, and debug information is generated for the executable. This target is selected for development and debug.
Release
Compiler optimization is set to high, and debug information is not generated. This target is selected for final application deployment.
- The previous command generates the debug and release binaries (
.bin). These files are in the debug and release folders. - Copy the bootable image
hello_world.binto the boot partition of the SD card.
Run Applications Using U-Boot
This section describes how to run applications using an SD card and pre-built U-Boot image for i.MX processor.
- Following the steps on the Embedded Linux® tab, prepare an SD card with a pre-built U-Boot + Linux image from Linux BSP package for the i.MX 8QuadXPlus processor. If you have already loaded the SD card with a Linux image, you can skip this step.
- Insert the SD card in the host computer (Linux or Windows), and copy the application image (for example hello_world.bin) to the FAT partition of the SD card.
- Safely remove the SD card from the PC.
- Insert the SD card to the target board. Make sure to use the default boot SD slot and double check the [Boot Switch Setup]. The default configuration of the validation board boots from
J12, and on MEK board there is only one SD slot which is used for boot. - Connect the DEBUG UART slot on the board with to the PC through the USB cable. The Windows OS installs the USB driver automatically, and the Ubuntu OS will find the serial devices as well. See [Serial Communication Console setup] section in Out of box for more instructions on serial communication applications.
- Open a second terminal emulator on the i.MX 8QuadXPlus MEK board's second enumerated serial port. This is the Cortex®-M4's serial console. Set the speed to 115200 bit/s, data bits 8, no parity, and power on the board.
- Power up the board and stop the boot process by pressing any key before the U-Boot countdown reaches zero. At the U-Boot prompt on the first terminal emulator, type the following commands to U-Boot.
=>fatload mmc 1:1 0x88000000 hello_world.bin => dcache flush => bootaux 0x88000000
Windows
Download MCUXpresso SDK on Windows
Current releases of the MCUXpresso SDK and source code can be found at MCUXpresso SDK Builder.
To download the MCUXpresso SDK for i.MX 8QuadXPlus, follow these steps:
- Click on “Select Development Board”.
- Select
MEK-MIMX8QXunder “Select a Device, Board, or Kit” and click on “Build MCUXpresso SDK” on the right.
- Select “Host OS” as Windows.
- Select “Toolchain/IDE” as
GCC ARM Embedded. - Click on “Select Optional Middleware“, “Select All“ and hit “Save changes“.
- Click on “Download SDK”.
- Wait for the SDK to build and download the package.
Build MCUXpresso SDK on Windows
Install toolchain
Download and run the installer from launchpad.net/gcc-arm-embedded. This is the actual toolchain. The toolchain includes the compiler, linker, and so on. The GCC toolchain should correspond to the latest supported version, as described in the MCUXpresso SDK Release Notes found in the package already downloaded.
Install MinGW
The Minimalist GNU for Windows (MinGW) development tools provide a set of tools not dependent on third-party C-Runtime DLLs (such as Cygwin). The build environment used by the MCUXpresso SDK does not utilize the MinGW build tools, but does leverage the base install of both MinGW and MSYS. MSYS provides a basic shell with a Unix-like interface and tools.
- Download the latest MinGW mingw-get-setup installer from: MinGW - Minimalist GNU for Windows Files
- Run the installer. The recommended installation path is C:\MinGW, however, you may install to any location.
- Ensure that the
mingw32-baseandmsys-baseare selected under Basic Setup.
- Click
Apply Changesin the Installation menu and follow the remaining instructions to complete the installation.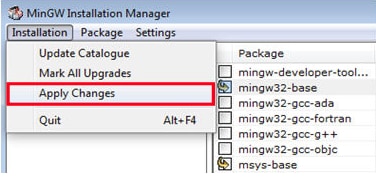
-
Add the appropriate item to the Windows operating system PATH environment variable. It can be found under Control Panel → System and Security → System → Advanced System Settings in the Environment Variables… section. The path is: <mingw_install_dir>\bin
IMPORTANT
Assuming the default installation path,
C:\MinGW, an example is shown below. If the path is not set correctly, the toolchain does not work.If you have
C:\MinGW\msys\x.x\binin thePATHvariable (as required by KSDK 1.0.0), remove it to ensure that the new GCC build system works correctly. -
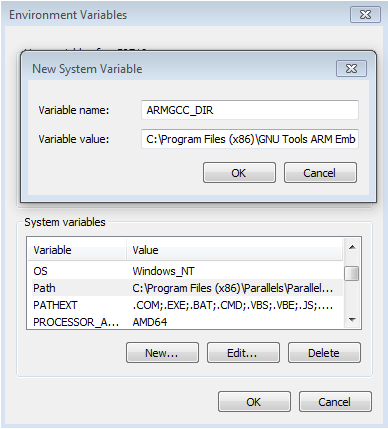
Create a system environment variable and name it
ARMGCC_DIR. The value of this variable should point to the Arm® GCC Embedded tool chain installation path, which, for this example, is:C:\Program Files (x86)\GNU Tools Arm Embedded\4.8 2014q3Reference the installation folder of the GNU Arm® GCC Embedded tools for the exact pathname of the installation.
Install CMake
- Download CMake 3.0.x from CMake Downloads
-
Before installing CMake, ensure that the option Add CMake to system PATH is selected. It is up to the user to select whether it is installed into the PATH for all users or just the current user. In this example, the assumption is that it is installed for all users.
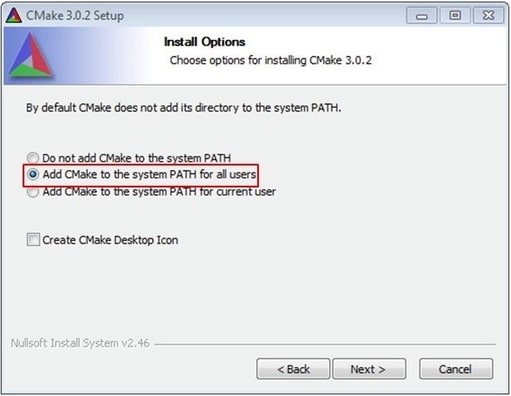
Figure 16. Install CMake
-
Follow the remaining instructions of the installer.
Build MCUXpresso SDK
-
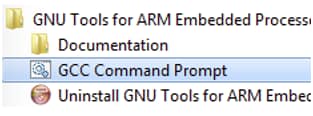
Open a GCC Arm® Embedded tool chain command window. To launch the window, from the Windows operating system Start menu, go to Programs → GNU Tools Arm Embedded <version> and select GCC Command Prompt.
-
Change the directory of the command window to the demo armgcc directory and run the build command:
                > cd <install_dir>\boards\ MEK-MIMX8QX\demo_apps<demo_name>\armgcc


                > build_all.bat
Or double-click on the
build_all.batfile in Explorer to perform the build. The expected output is shown in this figure:
-
There are two project configurations (build targets) supported for each MCUXpresso SDK project:
Debug
Compiler optimization is set to low, and debug information is generated for the executable. This target is selected for development and debug.
Release
Compiler optimization is set to high, and debug information is not generated. This target is selected for final application deployment.
- The previous command generates the debug and release binaries (
.bin). These files are in the debug and release folders. - Copy the bootable image
hello_world.binto the boot partition of the SD card.
Run applications using U-Boot
This section describes how to run applications using an SD card and pre-built U-Boot image for i.MX processor.
- Following the steps on the Embedded Linux® tab, prepare an SD card with a pre-built U-Boot + Linux image from Linux BSP package for the i.MX 8QuadXPlus processor. If you have already loaded the SD card with a Linux image, you can skip this step.
- Insert the SD card in the host computer (Linux or Windows), and copy the application image (for example hello_world.bin) to the FAT partition of the SD card.
- Safely remove the SD card from the PC.
- Insert the SD card to the target board. Make sure to use the default boot SD slot and double check the [Boot Switch Setup]. The default configuration of the validation board boots from J12, and on MEK board there is only one SD slot which is used for boot.
- Connect the DEBUG UART slot on the board with to the PC through the USB cable. The Windows OS installs the USB driver automatically, and the Ubuntu OS will find the serial devices as well. See [Serial Communication Console setup] section in Out of box for more instructions on serial communication applications.
- Open a second terminal emulator on the i.MX 8QuadXPlus MEK board’s second enumerated serial port. This is the Cortex®-M4’s serial console. Set the speed to 115200 bit/s, data bits 8, no parity, and power on the board.
-
Power up the board and stop the boot process by pressing any key before the U-Boot countdown reaches zero. At the U-Boot prompt on the first terminal emulator, type the following commands to U-Boot.
=>fatload mmc 1:1 0x88000000 hello_world.bin
=>dcache flush
=>bootaux 0x88000000
External Memory
External Memory
| Documents and Videos | Description |
|---|---|
| i.MX 8/8X Family DDR Tools Release |
The purpose of the i.MX 8/8X DDR Tools is to enable users to generate and test a custom DRAM initialization based on their device configuration (density, number of chip selects, etc.) and board layout (data bus bit swizzling, etc.). |
Security and Integrity
| Documents and Videos | Description |
|---|---|
| AN12714 i.MX Encrypted Storage Using CAAM Secure Keys |
Provides the steps to run a transparent storage encryption at block level using DM-Crypt taking advantage of the secure key feature provided by i.MXs Cryptographic Accelerator and Assurance Module (CAAM) |
| AN12838 Strengthening Public Key Cryptography using CAAM Secure Key |
Describes the public key cryptography scheme based on the Black Key feature provided by the i.MX application processors. |
| AN12554 Demo Application to Generate Red/Black Blobs Using CAAM and Encrypt/Decrypt Data |
Instructions and steps on how to set up and run a demo application to generate both red and black key blobs and use them to encrypt and decrypt data. |
| AN12906 HSM and SHE on i.MX 8QXP and i.MX 8DXL |
Hardware Secure Module (HSM) and Secure Hardware Extension (SHE) are two security services for NXP products, that supports in various types of automotive applications. This document provides an initial knowledge of the architecture of these services and helps to develop an application using the HSM and SHE APIs. |
| Trusted Execution Environment: Getting Started with OP-TEE on i.MX Processors |
An overview of TEE, example use cases and how to leverage i.MX hardware security features from OP-TEE. |
| Secure the Edge: Manufacturing Protection: Provision Sensitive Material in an Unsecure Environment |
This webinar will provide an introduction to the Manufacturing protection feature and discuss how it can be used to ensure that sensitive material is delivered and installed securely. |
| AN12312 Secure Boot on i.MX 8 and i.MX 8X Families using AHAB |
The i.MX family of applications processors provides this capability with the Advanced High Assurance Boot (AHAB) component on the on-chip ROM and the Security Controller (SECO) Firmware. The AHAB in ROM is responsible for authenticating the SECO firmware (NXP signed), which will supply the services for authenticating the images signed by the user to the System Controller ROM. |
| AN12812 Using Code-Signing Tool with Hardware Security Module |
This document provides the information necessary for the user to effectively use Code-Signing Tool (CST) with a Hardware Security Module (HSM) backend. |
CAAM Module Example
The i.MX 8QuadXPlus MEK board includes the Cryptographic Acceleration and Assurance Module (CAAM) module that can be used through CryptoDev in order to accelerate by hardware the encryption and decryption process. It is recommended to use this module when working with large amounts of data or in any application where performance is important. This example shows the advantages of using CAAM as an encryption offload engine.
Checking the speed performance
OpenSSL is an open source project that defines the security protocols SSL (Secure Sockets Layer) and TLS (Transport Layer Security). It has a software library that can be used in applications that require a secure information transmission in order to prevent eavesdropping.
OpenSSL includes a speed command that tests the encryption performance for a desired encryption algorithm. For this example, the algorithm used is the
aes-128-cbc that implements the Advanced Encryption Standard (AES) encryption algorithm, with a Cipher Block Chaining (CBC) mode of operation and 128 bits block.
The OpenSSL speed test can be seen using the following command:
# openssl speed -evp aes-128-cbc
Doing aes-128-cbc for 3s on 16 size blocks: 19785933 aes-128-cbc's in 3.00s
Doing aes-128-cbc for 3s on 64 size blocks: 10656521 aes-128-cbc's in 3.00s
Doing aes-128-cbc for 3s on 256 size blocks: 3706151 aes-128-cbc's in 3.00s
Doing aes-128-cbc for 3s on 1024 size blocks: 1036434 aes-128-cbc's in 3.00s
Doing aes-128-cbc for 3s on 8192 size blocks: 134183 aes-128-cbc's in 3.00s
OpenSSL 1.0.2n 7 Dec 2017
built on: reproducible build, date unspecified
options:bn(64,32) rc4(ptr,char) des(idx,cisc,16,long) aes(partial) idea(int)
blowfish(ptr)
compiler: arm-poky-linux-gnueabi-gcc -march=armv7ve -mfpu=neon -mfloat-abi=hard
-mcpu=cortex-a7
-DL_ENDIAN -DTERMIO -O2 -pipe -g -feliminate-unused-debug-types -Wall -Wa,--noexecstack
-DHAVE_CRYPTODEV
-DUSE_CRYPTODEV_DIGESTS The 'numbers' are in 1000s of bytes per second processed. type
16 bytes 64 bytes 256 bytes 1024 bytes 8192 bytes aes-128-cbc 105524.98k 227339.11k
316258.22k 353769.47k 366409.05k
Load the cryptodev module and run the openssl command again. This time you should be able to see that the timing values show the accelerated values. As the block sizes increases, the elapsed time decreases:
# modprobe cryptodev
cryptodev: driver 1.9 loaded.
# openssl speed -evp aes-128-cbc -engine cryptodev engine "cryptodev" set.
Doing aes-128-cbc for 3s on 16 size blocks:
103333 aes-128-cbc's in 0.07s Doing aes-128-cbc for 3s on 64 size blocks: 102441
aes-128-cbc's in 0.09s
Doing aes-128-cbc for 3s on 256 size blocks: 84088 aes-128-cbc's in 0.08s
Doing aes-128-cbc for 3s on 1024 size blocks: 72447 aes-128-cbc's in 0.04s
Doing aes-128-cbc for 3s on 8192 size blocks: 25304 aes-128-cbc's in 0.03s OpenSSL
1.0.2n 7 Dec 2017 built on: reproducible build, date unspecified options:bn(64,64)
rc4(ptr,char) des(idx,cisc,16,int) aes(partial) idea(int) blowfish(ptr) compiler:
aarch64-poky-linux-gcc -DL_ENDIAN -DTERMIO -O2 -pipe -g -feliminate-unused-debug-type
The 'numbers' are in 1000s of bytes per second processed. type 16 bytes 64 bytes 256
bytes 1024 bytes 8192 bytes aes-128-cbc 23618.97k 72846.93k 269081.60k 1854643.20k
6909678.93k
The encryption algorithms supported by the CryptoDev can be listed by the following command:
# openssl engine cryptodev -c
(cryptodev) BSD cryptodev engine
[RSA, DSA, DH, DES-CBC, DES-EDE3-CBC, AES-128-CBC, AES-192-CBC, AES-256-CBC,
hmacWithMD5, hmacWithSH A1, RIPEMD160, MD5, SHA1]Wired Communications
| Documents and Videos | Description |
|---|---|
| AN12409 i.MX6/7/8 series USB Certification Guide |
The purpose of this document is to describe how to perform USB Certification Test on the i.MX6/7/8 series family of applications processor including procedure descriptions, tools and criteria for USB Compliance Test. |
| AN12444 PCIe Certification Guide for i.MX 8 Series |
A fast and easy way to describe the compliance test procedures, tools, and criteria for PCI Express 3.0, 2.0, and 1.1/1.0a designs on i.MX 8 series products for both silicon validation, as per the PCIe® BASE specification and add-in cards motherboard systems, as per the PCIe CEM specification. |
| AN13164 i.MX8MP PCIe Bandwidth Analysis |
This document presents various usage scenarios for PCIe on the i.MX 8M Plus to provide a more clear understanding of the cases where near Gen3 x1 line rate bandwidth (8 Gbits/s) can be achieved after protocol overhead. NOTE: While this app note references the i.MX 8MP, the test environment setup is the same for the i.MX 8QXP, however, the amount of bandwidth does not apply. |
| AN13210 How to Use FlexCAN in Linux |
i.MX 8MP EVK - i.MX8MP presents two FlexCAN FD interfaces which can be programmed from Realtime domain or Linux domain. This document presents various usage scenarios for FlexCAN on the i.MX 8M Plus to provide a clearer understanding of how FlexCAN to be used in Linux. NOTE: While this app note references the i.MX 8MP, the method of using FlexCAN in Linux is the same for the i.MX 8QXP. |
Connectivity
To connect to the Internet on Linux with i.MX 8QuadXPlus MEK follow the steps below:
-
- Connect an Ethernet cable to the board
RJ-45connector. - Boot up the board and wait for the Linux prompt.
-
At the Linux prompt, enter the following command.
# ifconfig eth0 -
Ping any site to corroborate functionality.
# ping 8.8.8.8
PING 8.8.8.8 (8.8.8.8) 56(84) bytes of data.
64 bytes from 8.8.8.8: icmp_seq=1 ttl=119 time=4.81 ms
64 bytes from 8.8.8.8: icmp_seq=2 ttl=119 time=4.87 ms
64 bytes from 8.8.8.8: icmp_seq=3 ttl=119 time=4.94 ms
64 bytes from 8.8.8.8: icmp_seq=4 ttl=119 time=4.61 ms
- Connect an Ethernet cable to the board
Wireless Connectivity
Wireless Connectivity
| Documents and Videos | Description |
|---|---|
| Cloud Connectivity |
Integrated support for cloud services including Amazon Web Services, Microsoft Azure and Google Cloud IoT. |
| Getting Started with NXP-based WiFi modules on i.MX 8M Quad EVK Running Linux OS |
This manual covers the bring-up of i.MX 8M Quad EVK, configurations for the BSP image, hardware connection with NXP-based wireless modules, and how to bring up the Wi-Fi and Bluetooth interfaces. |
| Feature Configuration Guide for NXP-based Wireless Modules on i.MX 8M Quad EVK |
This document specifies the Wi-Fi/Bluetooth features and configurations on i.MX 8M Quad EVK with Azurewave AW-CM358MA (88W8987) and Azurewave AW-CM276MA (88W8997) wireless modules. It covers the initialization and configuration of the Wi-Fi and Bluetooth interfaces. |
Multicore and Hardware Acceleration
Multicore and Hardware Acceleration
| Documents and Videos | Description |
|---|---|
| AN13285 i.MX 8X Using L1 Cache for Cortex-M4 Core |
Introduces the basic technology of the cache system including the L1 cache, memory types, attributes, and Memory Protection Unit for the Cortex-M4 core embedded into the i.MX 8X series processors. It guides you on how to use the cache to develop applications running correctly and with high performance |
Power Management
The PF8100-8200 are the NXP Power Management ICs optimized for i.MX 8 and i.MX8X families.
| Documents and Videos | Description |
|---|---|
| AN12338 i.MX 8QuadXPlus Power Consumption Measurement |
Illustrates the current drain measurements of the i.MX 8QuadXPlus application processors taken on the NXP Multisensory Evaluation Kit (MEK) platform through several use cases. |
Low Power Mode Suspension Example
With Linux running on the i.MX board, you can evaluate special features that i.MX SoCs provide. This example shows how to suspend to low-power modes and resuming to normal operation.
-
Enter the command below in order to enable serial TTY as a wake up source for the board:
# echo enabled > /sys/class/tty/ttymxc0/power/wakeup -
Enter the command below to enter Suspend-To-RAM mode:
# echo mem > /sys/power/state [ 18.832439] PM: Syncing filesystems ... done. [ 18.939268] Freezing user space processes ... (elapsed 0.001 seconds) done. [ 18.947957] Freezing remaining freezable tasks ... (elapsed 0.001 seconds) done. [ 18.956810] Suspending console(s) (use no_console_suspend to debug) -
Press the
SW3switch to wake-up the board. The following messages should appear on terminal:[ 138.859067] PM: suspend of devices complete after 40.103 msecs [ 138.859071] PM: suspend devices took 0.040 seconds [ 138.861306] PM: late suspend of devices complete after 2.229 msecs [ 138.864518] PM: noirq suspend of devices complete after 3.207 msecs [ 138.864521] Disabling non-boot CPUs ... [ 138.892702] CPU1: shutdown [ 138.892705] psci: CPU1 killed. [ 138.940761] CPU2: shutdown [ 138.940764] psci: CPU2 killed. [ 138.992702] CPU3: shutdown [ 138.992704] psci: CPU3 killed. [ 139.005413] Enabling non-boot CPUs ... [ 139.017625] Detected VIPT I-cache on CPU1 [ 139.017647] GICv3: CPU1: found redistributor 1 region 0:0x00000000388a0000 [ 139.017689] CPU1: Booted secondary processor [410fd034] [ 139.018002] cache: parent cpu1 should not be sleeping [ 139.018221] CPU1 is up [ 139.033610] Detected VIPT I-cache on CPU2 [ 139.033624] GICv3: CPU2: found redistributor 2 region 0:0x00000000388c0000 [ 139.033654] CPU2: Booted secondary processor [410fd034] [ 139.033930] cache: parent cpu2 should not be sleeping [ 139.034129] CPU2 is up [ 139.049722] Detected VIPT I-cache on CPU3 [ 139.049737] GICv3: CPU3: found redistributor 3 region 0:0x00000000388e0000 [ 139.049767] CPU3: Booted secondary processor [410fd034] [ 139.050049] cache: parent cpu3 should not be sleeping [ 139.050257] CPU3 is up [ 139.106888] PM: noirq resume of devices complete after 56.624 msecs [ 139.108600] PM: early resume of devices complete after 1.408 msecs [ 139.115589] Suspended for 0.435 seconds [ 139.116781] PM: resume of devices complete after 8.175 msecs [ 139.262945] Restarting tasks ... done. [ 139.277327] hantro receive hot notification event: 0
Audio
| Documents and Videos | Description |
|---|---|
| DSP Concepts offering for i.MX 8 Processors |
Learn about audio platform offerings from DSP Concepts for the i.MX 8M family. |
Simple Audio Example
This simple example shows the link between audiotestsrc and alsasink.
First, check the sound card info using [aplay -|]. Note which sound card number is assigned to WM8960. Modify the gstreamer command below as needed to align with the WM8960 sound card number. For example, if the WM8960 is sound card 2, then change the end of the gstreamer command to be hw:2.”
Connect your earphone to the Audio Jack on the i.MX 8QuadXPlus MEK board.
If your earphone includes a microphone feature (TRRS with four contacts), do push the microphone jack to the end. Leave one contact ring outside
# gst-launch-1.0 audiotestsrc ! alsasink device=hw:2
Setting pipeline to PAUSED ...
Pipeline is PREROLLING ...
Redistribute latency...
Pipeline is PREROLLED ...
Setting pipeline to PLAYING ... New clock: GstAudioSinkClock
You should be able to listen a tone on the earphone.
When you are done with the tone, finish the command line by pressing:[Ctrl+C]
Decoder Video Audio Example
This example explains how to decode just the audio from a video file. Copy a video file to your /home/root/on your SD card rootfs partition, boot the board from the SD card and run the command below:
The default output device is cs42888,you can set output device to wm8960 with below steps first:
Start pulseAudio daemon
# pulseaudio --startGet wm8960 sink number
# pacmd list-sinks
From the log, wm8960 is in index 2
Set default sink to wm8960
# pacmd set-default-sink 2
Then you can run the command below to play a video file:
# gplay-1.0 big_buck_bunny_1080p_stereo.avi
FSL_GPLAY2_01.00_LINUX build on Mar 12 2018 11:48:19
Set VideoSink kmssink
Set TextSink fakesink
====== AIUR: 4.3.4 build on Mar 12 2018 11:47:35. ======
Core: AVI_PARSER_03.05.29 build on Aug 31 2017 09:15:57
file: /usr/lib/imx-mm/parser/lib_avi_parser_arm_elinux.so.3.1
Track 00 [video]: Disabled
Codec: 4, SubCodec: 1
------------------------
------------------------
Track 01 [audio_0] Enabled
Duration: 0:09:56.424000000
Language: und
Mime:audio/mpeg, mpegversion=(int)1, channels=(int)2, rate=(int)48000,bitrate=(int)0
------------------------
====== BEEP: 4.3.4 build on Mar 12 2018 11:47:45. ======
Core: MP3 decoder Wrapper build on Jan 11 2018 10:20:25
file: /usr/lib/imx-mm/audio-codec/wrap/lib_mp3d_wrap_arm_elinux.so.3
CODEC: BLN_MAD-MMCODECS_MP3D_Arm_02.13.01_ArmV8 build on Jan 11 2018 10:05:45. [Stop (No
Repeated)][Vol=1.0][00:00:00/00:09:56]=========== fsl_player_play()==================
FSL_GPLAY2_01.00_LINUX build on Mar 12 2018 11:48:19
[h]display the operation Help
[p]Play
[s]Stop
[e]Seek
[a]Pause when playing, play when paused
[v]Volume
[m]Switch to mute or not
[>]Play next file
[ [r]Switch to repeated mode or not
[u]Select the video track
[d]Select the audio track
[b]Select the subtitle track
[f]Set full screen
[z]resize the width and height
[t]Rotate
[c]Setting play rate
[i]Display the metadata
[x]eXit
State changed: buffering
State changed: playing
[Playing (No Repeated)][Vol=1.0][00:07:12/00:09:56]EOS Found
getNextItem No next item!
No more media file, exit gplay!
State changed: stopped
Exit display thread
FSL_PLAYER_UI_MSG_EXIT
fsl_player_deinitDisplay and Graphics
Display and Graphics
| Documents and Videos | Description |
|---|---|
| i.MX Graphics User’s Guide |
Provides information on graphic APIs and driver support for developers writing graphics applications or video drivers. |
| i.MX 8 Gstreamer User Guide |
Learn more about how to use GStreamer version 1.0 on the i.MX 8M Nano EVK. Includes examples for decode, encode, camera, video composition and video scaling and rotation. |
| Implementing Graphics in Real-time Industrial HMI Systems with NXP MCUs and Embedded Wizard |
NXP has partnered with TARA Systems to offer Embedded Wizard as an Enabling Software Technology. |
| AN12189 Quick Start Guide for MX8-DSI-OLED1 for i.MX 8X Evaluation Kit |
This document provides a brief overview on how to get started with the MX8-DSI-OLED1 accessory card, a MIPI-DSI interface OLED display kit with touch screen support, and the i.MX 8QXP EVK. |
| AN12188 Quick Start Guide for IMX-MIPI-HDMI for i.MX 8X Evaluation |
This document provides a brief overview on how to get started with the i.MX 8QXP EVK and the IMX-MIPI-HDMI accessory card, which is used for converting the MIPI-DSI signal to an HDMI signal. |
| i.MX 8QXP-MEK Display Selection Guide |
Describes the i.MX 8QXP MEK mini-SAS connectors features on Linux and Android use cases, covering the supported daughter cards, the process to change Device Tree (DTS) files or Boot images, and enable these different display options on the board. |
Camera Interfaces
Camera Interfaces
| Documents and Videos | Description |
|---|---|
| i.MX 8 Camera Use Cases |
Learn more about the i.MX 8 MIPI CSI use case, Advanced Gstreamer camera use cases, available cameras and daughter cards supported by the i.MX 8M Nano EVKB, compatible Device Tree (DTS) files, and how to enable different camera options. |
| i.MX 8 Gstreamer User Guide |
Learn more about how to use GStreamer version 1.0 on the i.MX 8M Nano EVK. Includes examples for decode, encode, camera, video composition and video scaling and rotation. |
| AN12187 Quick Start Guide for MINISASTOCSI for i.MX 8M Evaluation Kit |
This document provides a brief overview on how to get started with the i.MX 8M EVK and the MINISASTOCSI accessory card, a MIPI-CSI interface camera kit based on OmniVision chipset OV5640. |
Functional Safety
Functional Safety
| Documents and Videos | Description |
|---|---|
| i.MX 8/8X Functional Safety Concepts |
The i.MX 8/8X is designed as a Safety Element out of Context (SEooC) MPU and can be used in dedicated manners for safety-critical applications such as automotive digital instrument clusters, where critical information and alerts need to be assessed and analyzed at all times. |
| Functional Safety Industrial and Automotive Concepts of the i.MX 8/8X Families of Applications Processors |
The i.MX 8 and i.MX 8X processor families have the safety mechanisms in place to help with your SIL 2/3 and ASIL A/B needs from a platform level. Explore the quality-managed (QM) safety-related hardware components for your specific use case. |
Machine Learning
Machine learning (ML) typically encompasses applications where classification, recognition, and prediction of man-made abstractions are desired. Examples include image recognition, gesture recognition, anomaly detection, speech-to-text, text-to-speech, ASR, scene recognition, and many more. This section will focus specifically on the NXP ML tools applied to image or video streams. The voice and audio sections may also reference the included examples.
| Documents and Videos | Description |
|---|---|
| eIQ® ML Software Development Environment |
Enables the use of ML algorithms on NXP MCUs, i.MX RT crossover MCUs, and i.MX family SoCs. eIQ software includes inference engines, neural network compilers and optimized libraries. |
| i.MX Machine Learning User’s Guide |
The NXP eIQ UM for i.MX toolkit provides a set of libraries and development tools for machine learning applications targeting NXP microcontrollers and application processors. |
| NXP eIQ Machine Learning Software Development Environment for i.MX Applications Processors |
This users manual provides guidance for the supported ML software for the i.MX family and includes an eIQ introduction, Yocto installation guide, and step-by step guide for running all supported DNN and non-DNN examples. |
| eIQ FAQ |
This document covers some of the most commonly asked questions we've gotten about eIQ and embedded machine learning. |
| AN13001 Glow Memory Analysis |
How to understand the Glow memory information generated by the Glow compiler and calculate the memory required for a particular model. This compiler can then be used to determine the minimum memory size that is needed to run the model. |
| AN12766 Anomaly Detection with eIQ using K-Means clustering in Tensor Flow Lite |
Step by step instruction to enable a machine condition monitoring application using anomaly detection. |
| Getting Started with eIQ Software for i.MX Applications Processors |
A series of step-by-step tutorials using our eIQ ML software development environment from unboxing a board, to deploying, to modeling, to inferencing at the edge. |
Tools and References
eIQ Inference with Arm NN library - eIQ Arm NN (Neural network) is an inference engine for CPUs, GPUs, and other compute engines supporting Caffe, TensorFlow, TensorFlow Lite, and ONNX models
eIQ Inference with TensorFlow Lite library - TensorFlow Lite, a low latency, smaller footprint inference engine, uses the Eigen library and techniques such as pre-fused activations and quantized kernels.
eIQ Toolkit for End-to-End Model Development and Deployment - eIQ Workflow Tool supports data curation, model training, quantization and pruning, validation, target profiling and model deployment.
Device Management and Secure OTA
Device Management and Secure OTA
| Documents and Videos | Description |
|---|---|
| AN12900 Secure Over-the-Air Prototype for Linux Using CAAM and Mender or SW Update |
Provides a prototype implementation for Secure OTA for Linux images, specifically for the i.MX 8M/MM |
| AN12921 Google Cast Authentication Aspects Implementation on i.MX |
This app note provides details about security properties required for Google Voice Assistant (GVA) and Cast for Audio (C4A) on the security aspects and their implementations on NXP’s GVA/C4A reference platform |
Minicom Tutorial
Serial Communication Console Setup
On the command prompt of the Linux host machine, run the following command to determine the port number:
$ ls /dev/ttyUSB*The smaller number is for Arm® Cortex®-A35 core and the bigger number is for Arm® Cortex®-M4 core.
Minicom
Use the following commands to install and run the serial communication program (minicom as an example):
- Install Minicom using Ubuntu package manager.
$ sudo apt-get install minicom - Launch Minicom using a console window using the port number determined earlier.
$ sudo minicom /dev/ttyUSB* -s - Configure Minicom as show in Figure 3
- The next step is to Connect the HDMI cable.
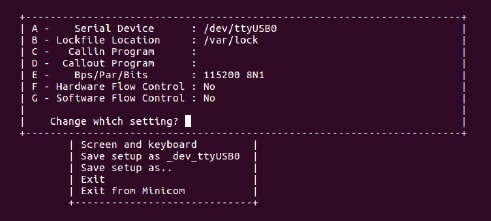
Tera Term Tutorial
Serial Communication Console Setup
The FTDI USB-serial chip on i.MX 8QuadXPlus enumerates two serial ports. Assume that the ports are COM9 and COM10. The smaller numbered port COM9 is for the serial console communication from Arm® Cortex®-A35 core and the larger numbered port COM10 is for Arm® Cortex ®-M4 core. The serial-to-USB drivers are available atFTD Chip Drivers
Tera Term
Is an open source terminal emulation application. This program displays the information sent from the NXP development platform’s virtual serial port.
- Download Tera Term. After the download, run the installer and then return to this webpage to continue.
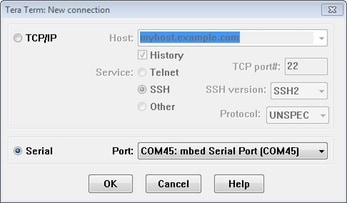
- Launch TeraTerm. The first time it launches, it shows the following dialog. Select the serial option. Assuming your board is plugged in, there should be a COM port automatically populated in the list.
- Configure the serial port settings (using the
COMport number identified earlier) to115200baud rate,8data bits, no parity and1stop bit. To do this, go to Setup → Serial Port and change the settings. - Verify that the connection is open. If connected, Tera Term shows something like below in its title bar.
- The next step is to Connect the HDMI cable.

PuTTY Tutorial
Serial Communication Console Setup
The FTDI USB-serial chip on i.MX 8QuadXPlus enumerates two serial ports. Assume that the ports are COM9 and COM10. The smaller numbered port ( COM9) is for the serial console communication from Arm® Cortex®-A7 and the larger numbered port (COM10) is for Arm Cortex-M4. The serial-to-USB drivers are available at
FTD Chip Drivers
PuTTY is a popular terminal-emulation application. This program displays the information sent from the NXP development platform’s virtual serial port.
- Download PuTTY After the download, run the installer and then return to this webpage to continue.
- Launch PuTTY by either double clicking on the executable file you downloaded or from the Start menu, depending on the type of download you selected.
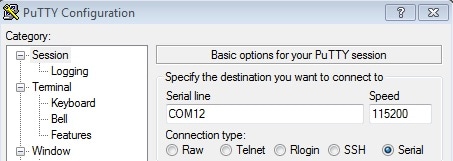
- Configure In the window that launches. Select the Serial radio buttonand enter the
COMport number that you determined earlier. Also enter the baud rate, in this case115200. - Click Open to open the serial connection. Assuming the board is connected and you entered the correct
COMport, the terminal window opens. If the configuration is not correct, PuTTY alerts you. - The next step is to Connect the HDMI cable.
Design Resources
Board Information
Chip Documents
- i.MX 8DualX Automotive and Infotainment Applications Processors Data Sheet
- i.MX i.MX 8QuadXPlus and 8DualXPlus Automotive and Infotainment Applications Processors Data Sheet
- i.MX 8DualXPlus/8QuadXPlus Applications Processor Reference Manual
- i.MX 8QuadMax/i.MX 8QuadXPlus Hardware Developer’s Guide
- Mask Set Errata for Mask 0N99Z-C0 Silicon
- Mask Set Errata for Mask 0N95W-B0 Silicon
- BSDL/IBIS file
Support
Troubleshooting
Demo not Working?
Did your board come in a box that looks like this?:

No problem! Your board simply came in the old packaging and has a different out-of-box demo loaded into the flash memory.
You should be seeing the red and green LEDs toggling back and forth. It's OK to move onto the next step when you're ready
Still not working?
Try proceeding to the next steps to get other example applications running on your board. If you still have problems, try contacting us through the NXP Community.
Training
To learn what to do next, find your issue below. If you still need help, contact NXP Support.
| Training | Description |
|---|---|
| AN12770 i.MX 8X C0 Migration Guide Migrating from i.MX 8X B0 to i.MX 8X C0 s | This application note introduces the major considerations required to migrate from i.MX 8X B0 to i.MX 8X C0, including i.MX 8QuadXPlus, i.MX 8DualXPlus, and i.MX 8DualX. |
| AN13273 i.MX 8QuadXPlus/8DualXPlus/DualX Product Lifetime Usage | Describes the estimated product lifetimes for the i.MX 8QuadXPlus/8DualXPlus/8DualX application processors based on the criteria used in the qualification process. |
| I.MX 8X Training | Full list of on-demand training, how-to videos and webinars from NXP about this product. |
Communities
Connect with other engineers and get expert advice on designing with the i.MX8X on one of our community sites.
- i.MX Forums
- Useful Documents and Threads of i.MX Processors
- i.MX Graphics
- i.MX Solutions
- Power Management
- Wireless Connectivity
Software Forums
